US English (US)
FR French
DE German
ES Spanish
IT Italian
NL Dutch
menu

Contact Us

No results found. Still need help? Contact us

  • Scheduled Assistance
  • Contact Us
English (US)
US English (US)
FR French
DE German
ES Spanish
IT Italian
NL Dutch
arrow_back
  • Getting Started
  • Devices
  • App
  • Portal
  • Admin Settings
  • Accessories
  • Labels
  • Repairs
  • APIs
  • Task Manager
  • Scheduled Assistance
  • Contact Us

Printer Calibration (X Series)

Contact Us

If you still have questions or prefer to get help directly from an agent, please submit a request.
We’ll get back to you as soon as possible.

  • Getting Started
    Getting Started Guides Set Up Training
  • Devices
    Troubleshooting Device Overview 2.0 Model X Series Model Fit Model Lite Model mC-Label3 Printer Device Tablet Internet Connection Warranty & Support
  • App
    Error Codes Troubleshooting App Overview Mobile App Subscription Prep Lists Product Control Rosters Scale Temperature Probe Print History Settings Language Location Overrides
  • Portal
    Portal Overview Locations Categories Menu Items Printer Profiles Users Settings Quick Labels Prep List Print History Mass Import and Export Media Library Location Overrides Product Control Rosters Scale Temperature Probe Groups
  • Admin Settings
    Start with Admin Settings Admin Settings Overview Locations Devices and Licenses
  • Accessories
    Bluetooth Scanner USB Scanner Temperature Probe Scale Label Rewinder Fit Printer Shelf Warranty
  • Labels
    Overview Troubleshooting
  • Repairs
    2.0 Model X Series Model Lite Model DateCodeGenie® Tablet
  • APIs
    Inbound APIs Outbound APIs
  • Task Manager
    Task Manager Overview Venues Forms Users Resources Task Manager App
+ More
  • Home
  • Devices
  • X Series Model

Calibrating the DateCodeGenie® printer may help if the printer is not cutting or advancing labels correctly. This article goes over calibrating the X Series (X2, X22, X23) printer.

Steps:

1. Check that label roll is loaded with the labels facing upward and with the black line facing down. For more information on label loading, see Load Labels in the X Model Device.

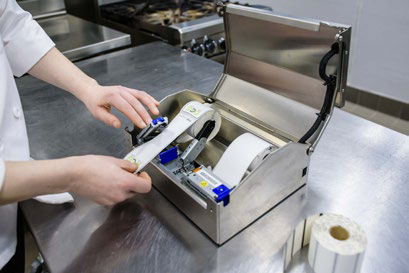
2. Locate the 2 red or black buttons on the right side of each printer near the bottom housing.

NOTE

A pencil can be used to gently press the buttons on the right sided printer if you cannot reach.


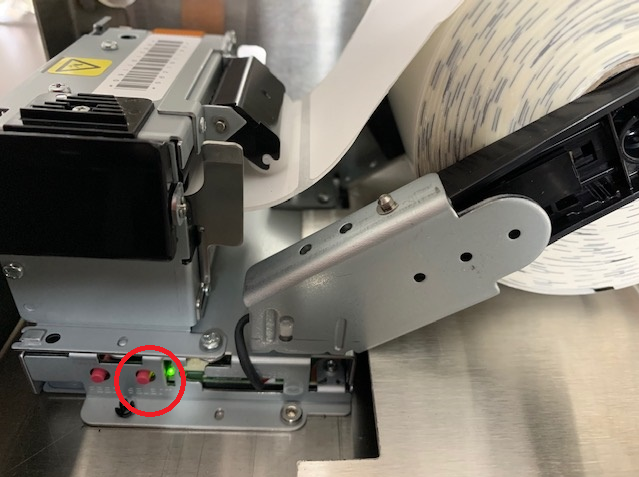
3. Press and hold the SELECT button, the BACK button, until the labels advance, then release.

NOTE

If labels continually feed and do not stop, replace with a new roll with a solid black line on the back. For more information on correct and incorrect labels, see DateCodeGenie® Labels.


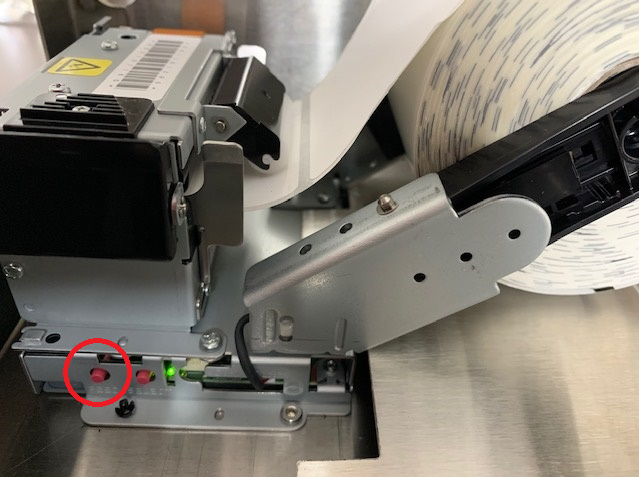
4. Press the FEED button, the FRONT button. Labels will advance to the black line and cut.

NOTE

If the printer doesn't cut on a black line, repeat this step.


5. Repeat these steps for each printer.


Failed Sensitivity Errors: Failed sensitivity errors that occur during printer calibration can be caused by three things: 

1. Missing or faded lines on the label

Check that there is a solid black line on the back of the label. To see incorrect labels, see the chart in DateCodeGenie® Labels.


2. Debris blocking the black line sensor

Clean the printer black line sensor and thermal head. See Device Placement, Maintenance and Cleaning.


3. Liquid Damage

Check for liquid damage. See Where Are Liquid Detection Labels Located.  


Related Articles

  • Clear Buffer for DCG X Series
  • Printer Advancing Multiple Labels

Was this article helpful?

Yes
No
Give feedback about this article

Related Articles

  • Clear Buffer for DCG X Series
  • Printer Advancing Multiple Labels
© 2025 DateCodeGenie

899 Montreal Circle, St. Paul, MN 55102

Privacy Policy

contact us
About NCCO

Knowledge Base Software powered by Helpjuice

Expand