
Etiketten zijn niet correct afgedrukt
Table of Contents
Labels waarvan een correct voorbeeld in de app wordt weergegeven, maar niet correct worden afgedrukt, kunnen worden veroorzaakt door een probleem dat verband houdt met de app, het printerprofiel, de printer of labels.
Onjuist afdrukken kan het volgende omvatten:
- Afdrukken buiten het midden
- Afdruk vervaagd
- Etiketten overslaan
- Afdrukken over meerdere labels
- Etiket op verkeerde plaats afgesneden, zie Printerkalibratie (X-serie) of Printerkalibratie (Lite)
Stappen:
1. Download updates op de app van het apparaat en druk vervolgens de labels opnieuw af.
Download updates via de app
Door updates te downloaden, beschikt de app over de meest nauwkeurige gegevens voor het afdrukken. Bovendien ontvangt u een melding wanneer er een nieuwe versie beschikbaar is om te downloaden.
WAARSCHUWING
Internetverbinding vereist, zie Apparaat verbinden met wifi of Apparaat verbinden met Ethernet .
OPMERKINGEN
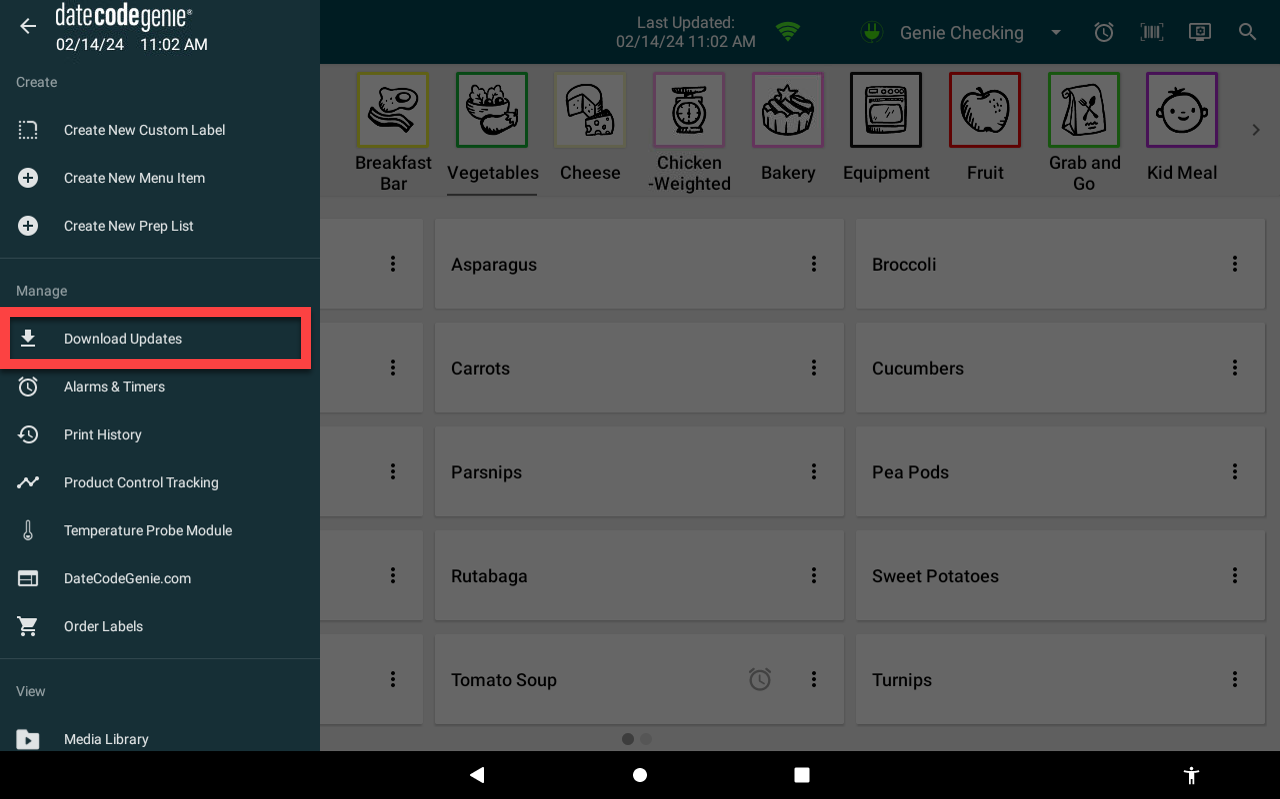
- Portaalbeheerders en managers kunnen medewerkers toestemming geven om updates te downloaden via de app. Zie Toestemming om updates te downloaden.
- De tijd voor het downloaden van updates varieert afhankelijk van de internetsnelheid, de hoeveelheid data die moet worden bijgewerkt en de tijdsduur sinds de laatste download.
De laatst bijgewerkte tijd wordt weergegeven op de notificatiebalk van de app.
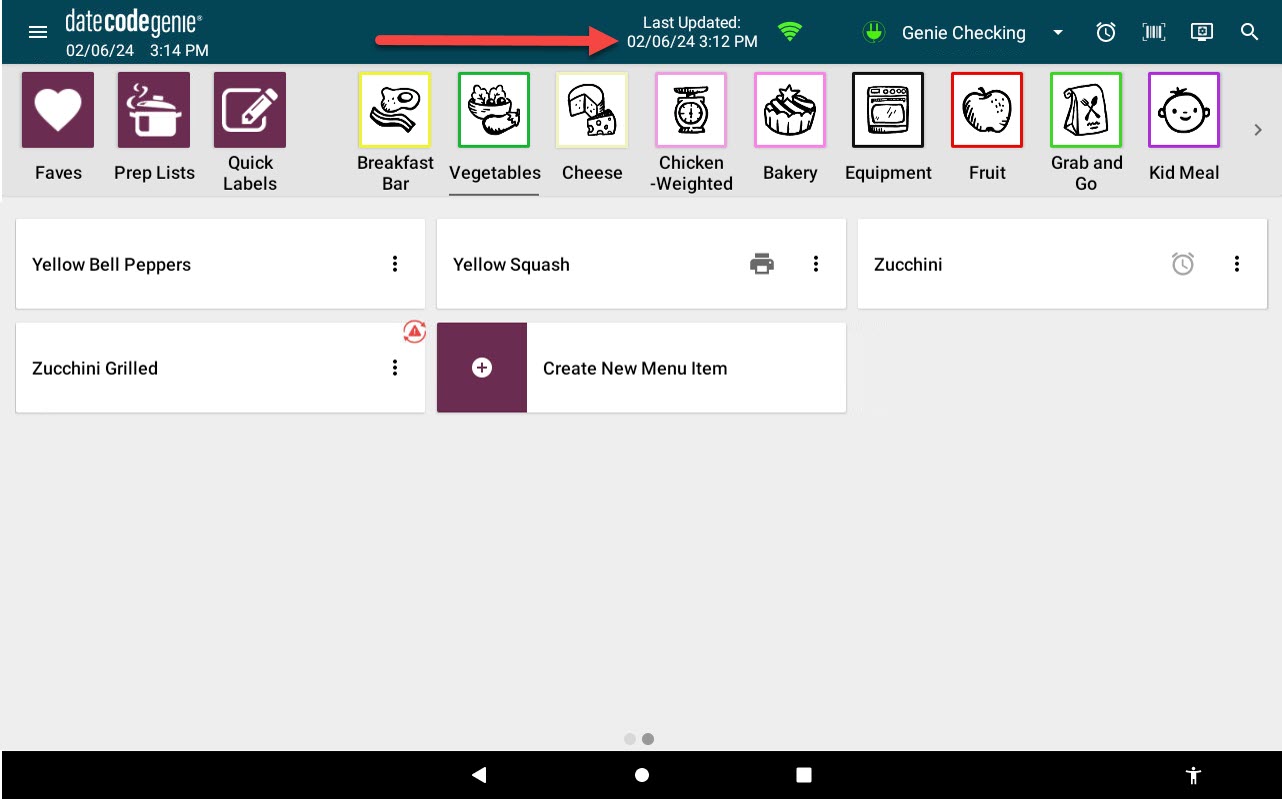
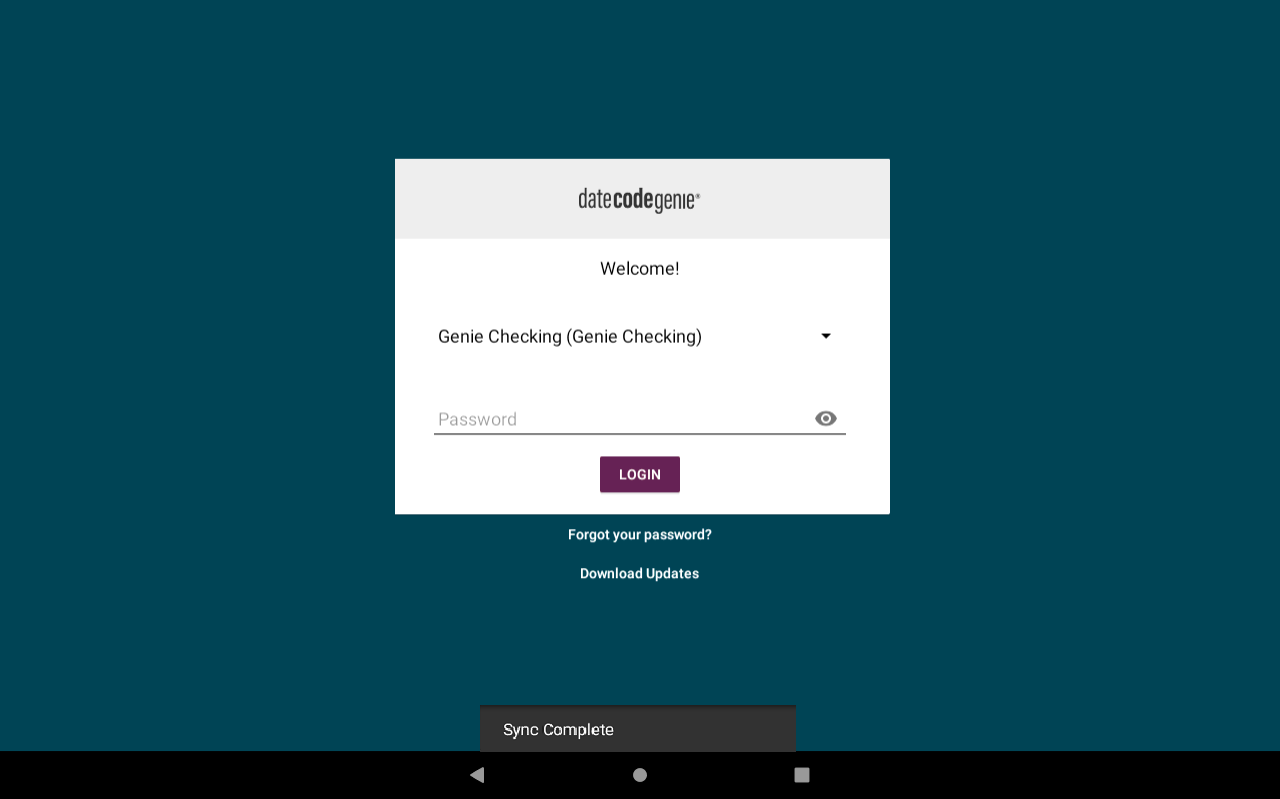
Er zijn vier manieren om updates te downloaden:
1. App-inlogscherm
1. Tik op Updates downloaden op het inlogscherm van de app.
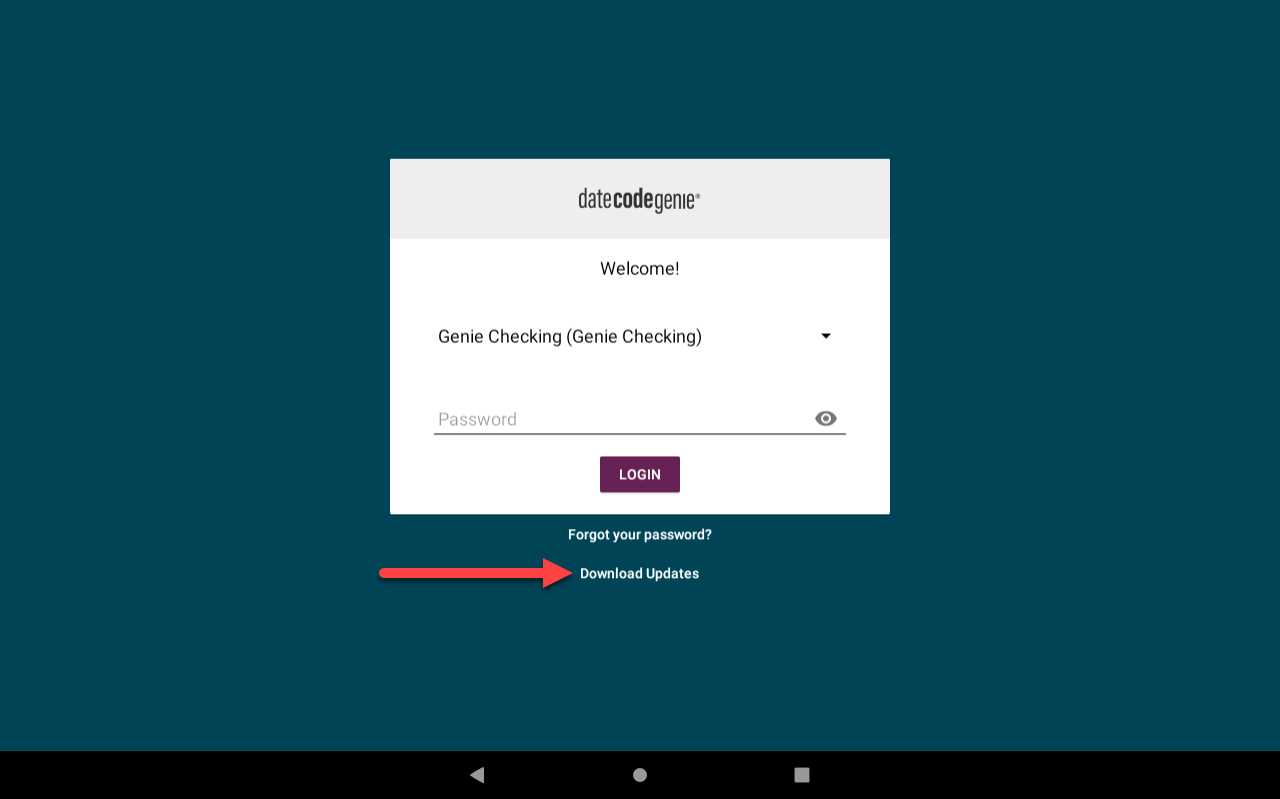
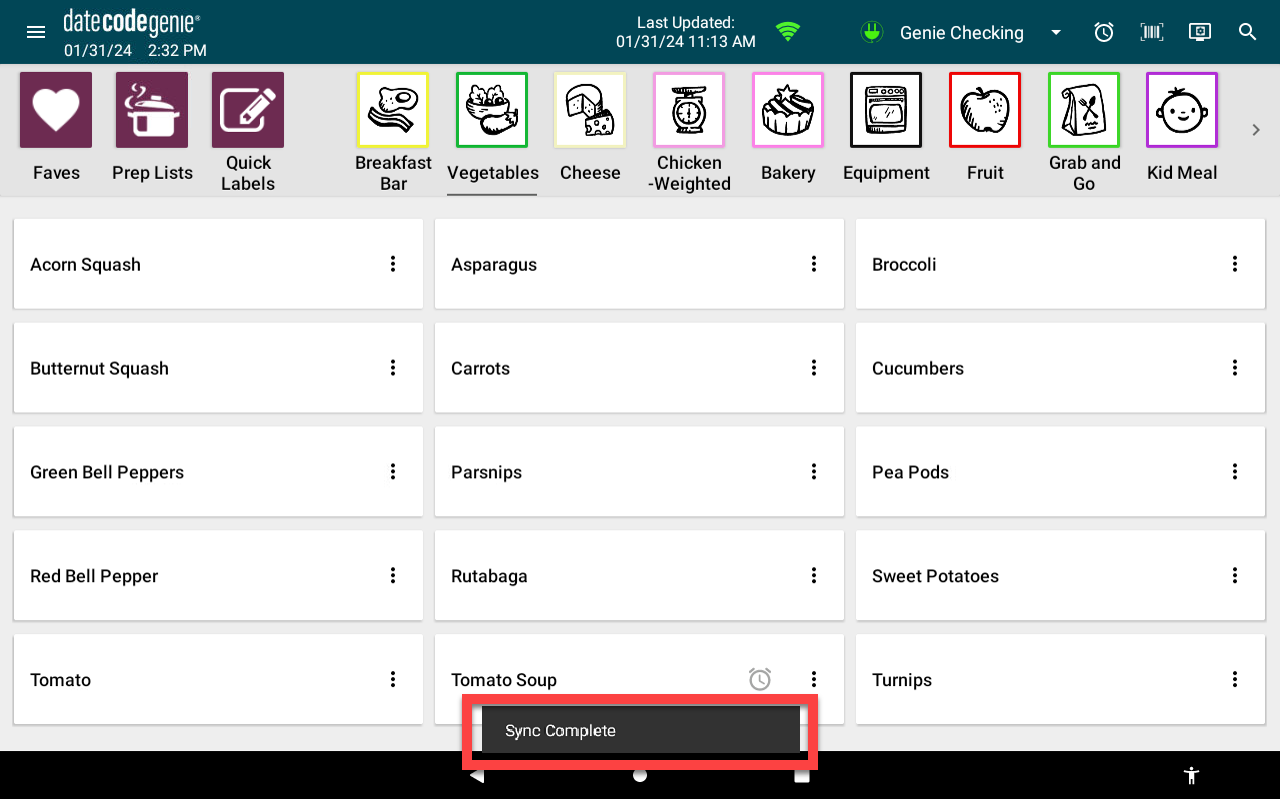
2. Een groen ronddraaiend cirkelpictogram wordt weergegeven en blijft draaien tijdens het downloaden. Het scherm wordt donker en is inactief.
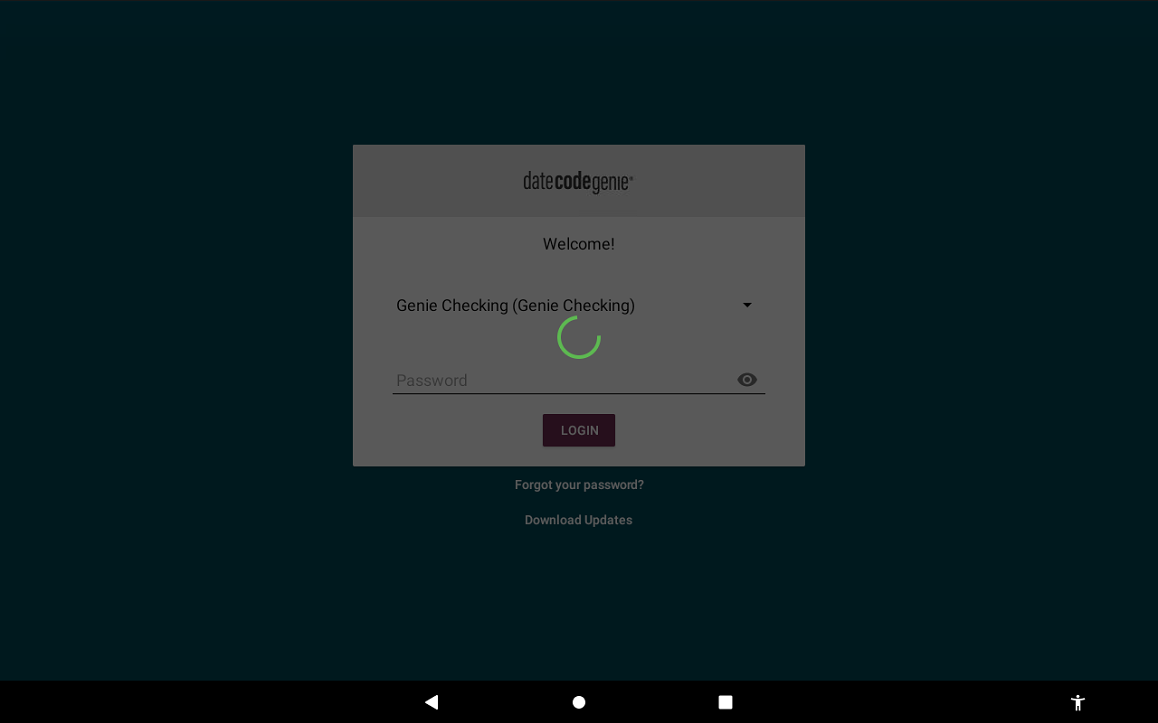
3. Onderaan het inlogscherm van de app wordt kort het bericht 'Synchronisatie voltooid' weergegeven om aan te geven dat de download is voltooid en actief is.
2. Navigatieopties
1. Tik op de navigatieknop (pictogram met drie lijntjes).
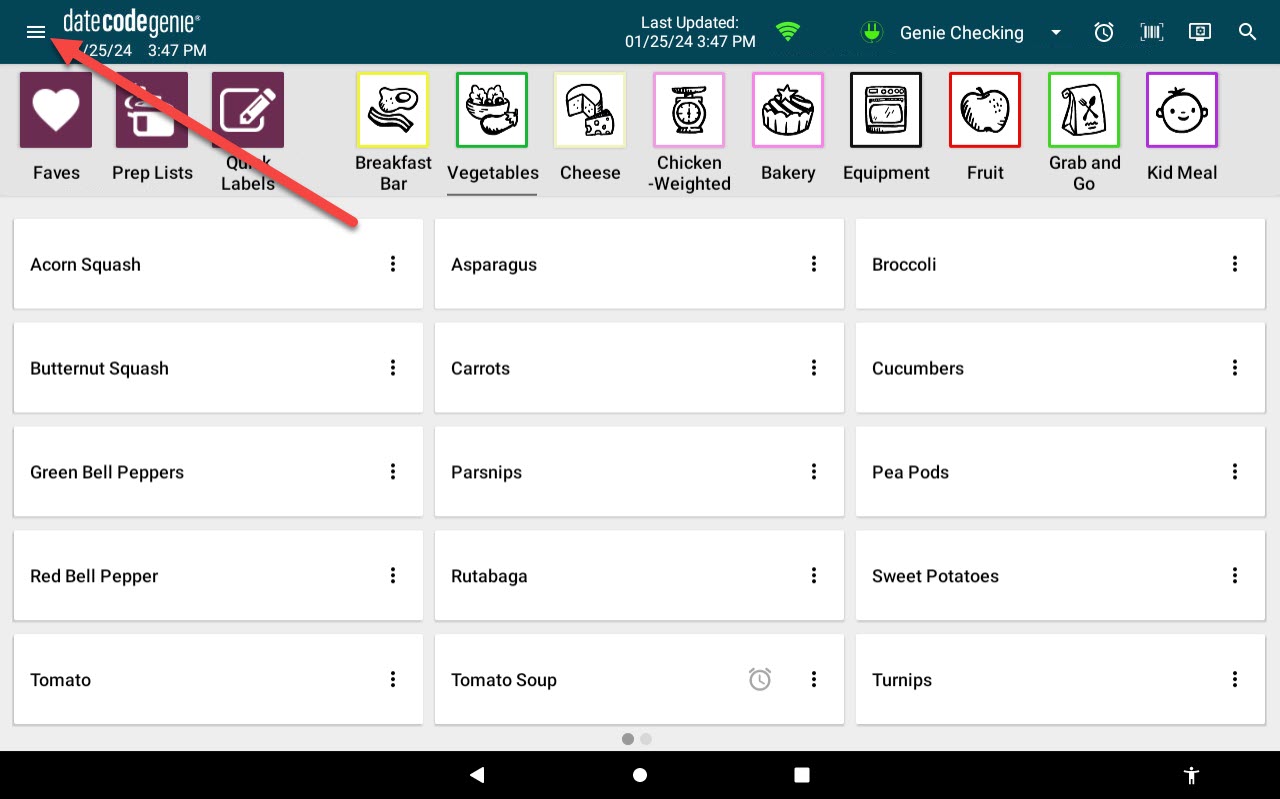
2. Tik op Updates downloaden.
3. Een groen ronddraaiend cirkelpictogram wordt weergegeven en blijft draaien tijdens het downloaden. Het scherm wordt donker en is inactief.

4. Onderaan het app-dashboard wordt kort het bericht Synchronisatie voltooid weergegeven om aan te geven dat de download is voltooid en actief is.
3. Downloadknop
1. Tik op de downloadknop (rood cirkelvormig pijlpictogram met de klok mee), indien weergegeven.
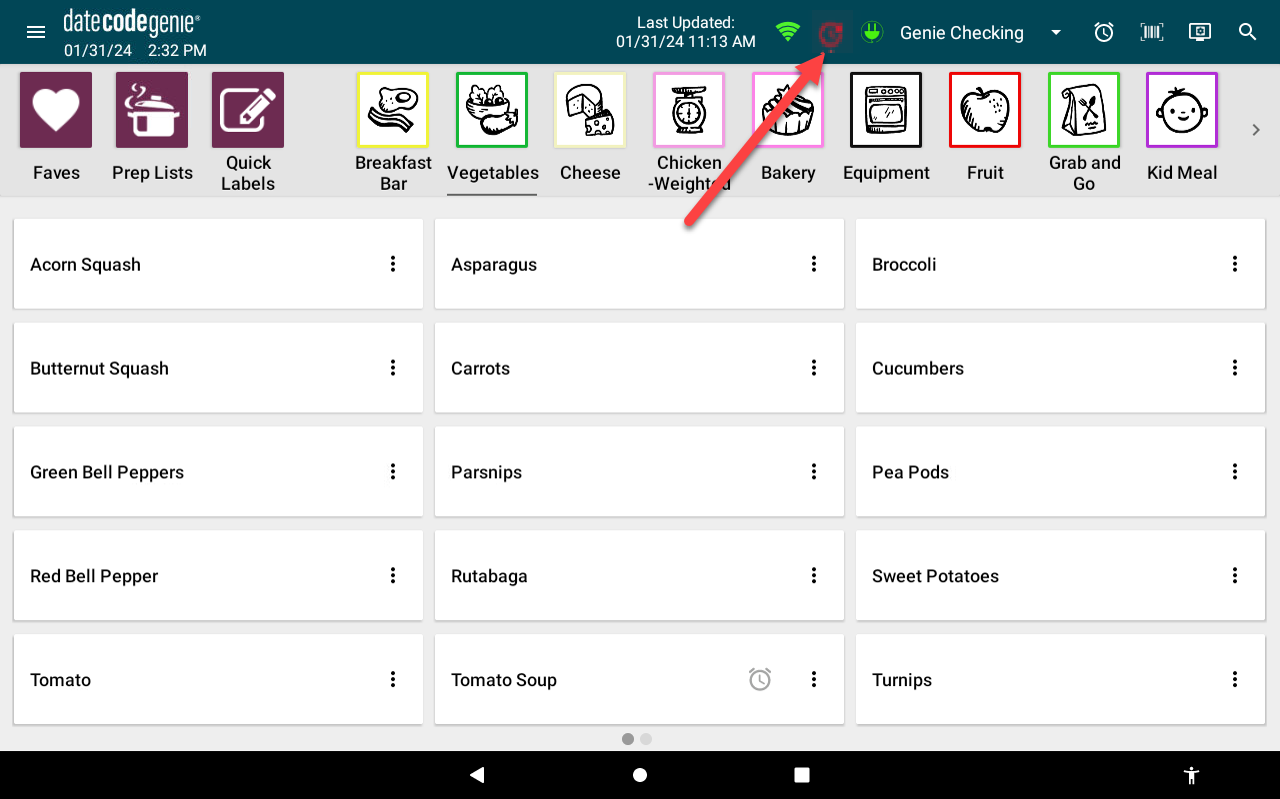
2. Een groen ronddraaiend cirkelpictogram wordt weergegeven en blijft draaien tijdens het downloaden. Het scherm wordt donker en is inactief.
3. Onderaan het app-dashboard wordt kort aangegeven dat de synchronisatie is voltooid en dat de download is geactiveerd.
4. Updates automatisch downloaden
Vereist dat medewerkers handmatig updates downloaden voordat ze inloggen op de app na een bepaalde periode van inactiviteit. Automatische app-downloads zijn niet beschikbaar.
Zie Automatisch updates downloaden op de app
2. Controleer of het juiste labelformaat in de printer is geladen en dat overeenkomt met het printerprofiel dat probeert af te drukken. Herdruk.
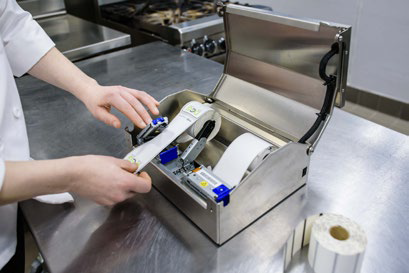
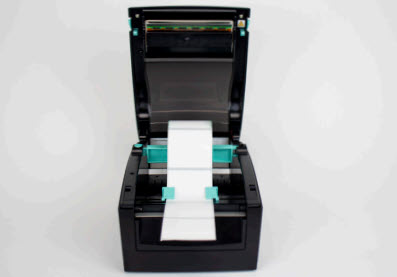
Etiketten laden in het X-modelapparaat
Labels laden in een X-modelapparaat is eenvoudig. Volg de onderstaande stappen of bekijk de video voor hulp.
Stappen:
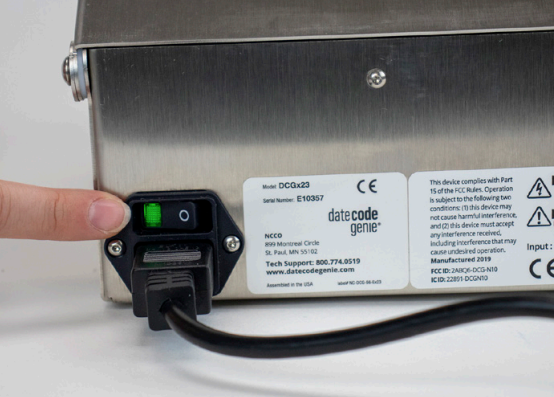
1. Controleer of het netsnoer is aangesloten op een werkend stopcontact en of de hoofdschakelaar aan de achterkant van het apparaat groen brandt.
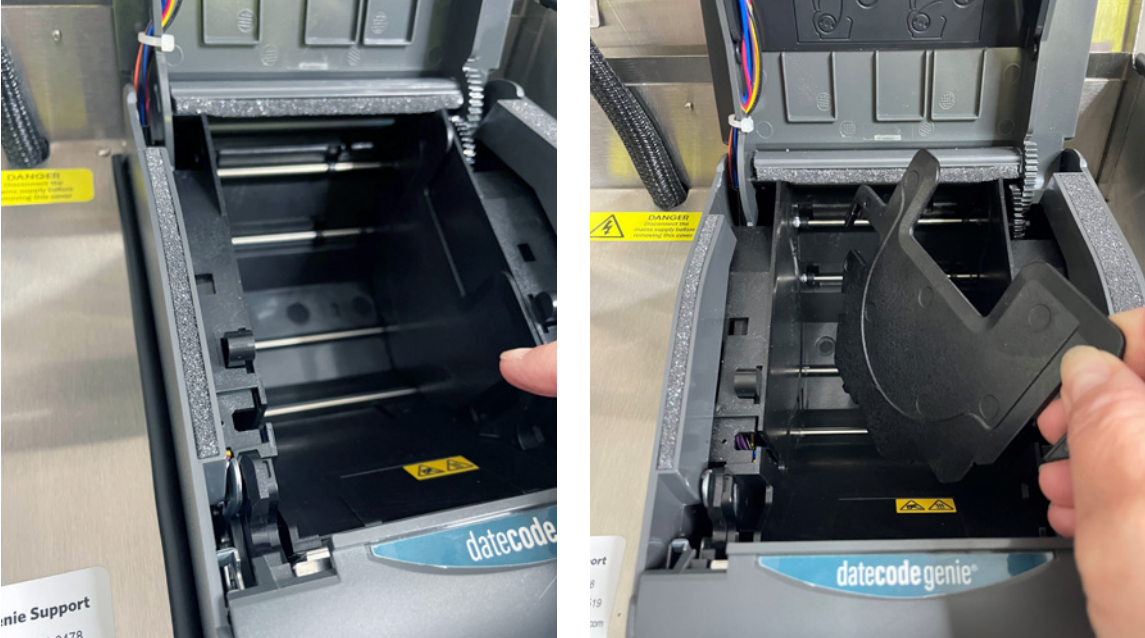
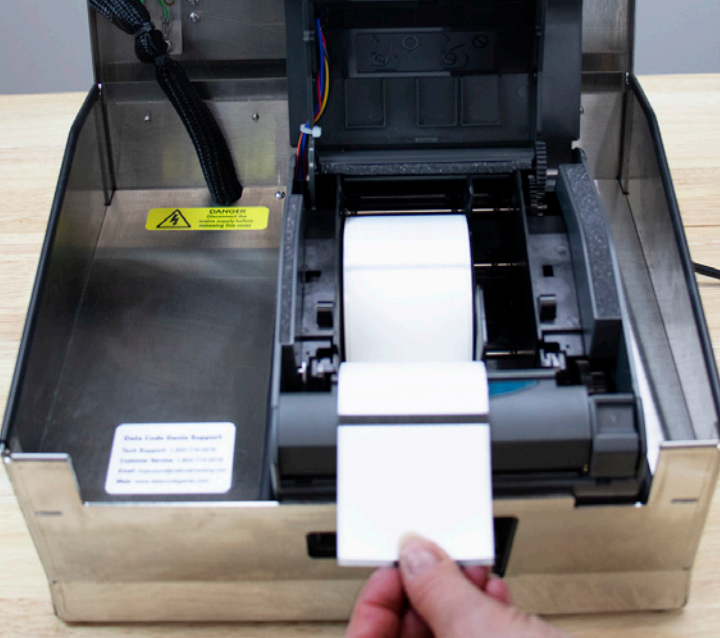
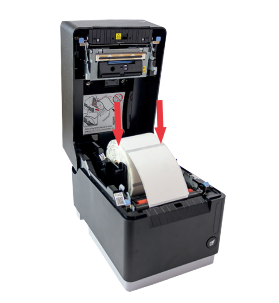
2. Open het deksel van de behuizing, scheid de twee zwarte armen en plaats de etikettenrol in de printer. Rol de etikettenrol van bovenaf af, met de zwarte lijnen naar beneden. 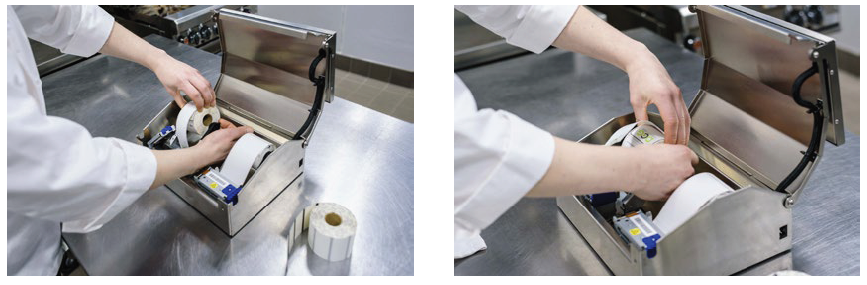
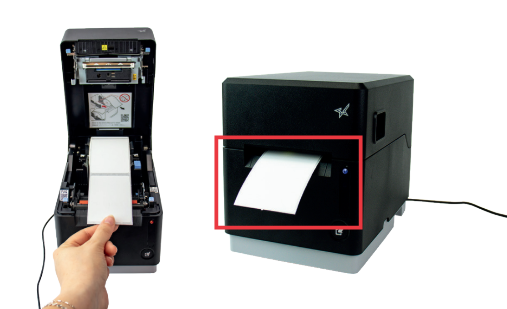
3. Druk op het blauw/zwarte lipje om de hendel los te maken, trek de etiketten over de rand van de opening en sluit de hendel totdat deze vastklikt.
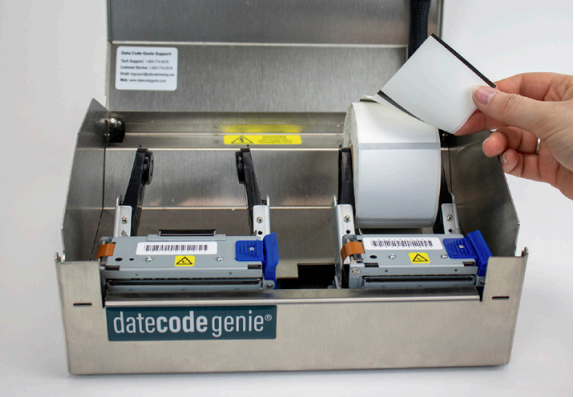 |
 |
4. Labels worden automatisch doorgevoerd en gesneden om de printer te kalibreren. Herhaal dit voor de tweede printer (indien van toepassing).
5. Sluit de behuizing en begin met printen.
2. Controleer of het juiste labelformaat in de printer is geladen en dat overeenkomt met het printerprofiel dat probeert af te drukken. Herdruk.
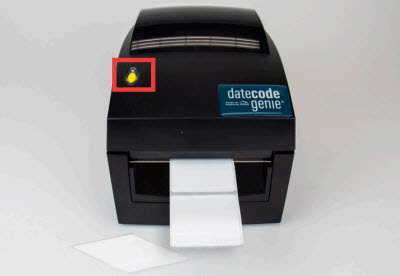
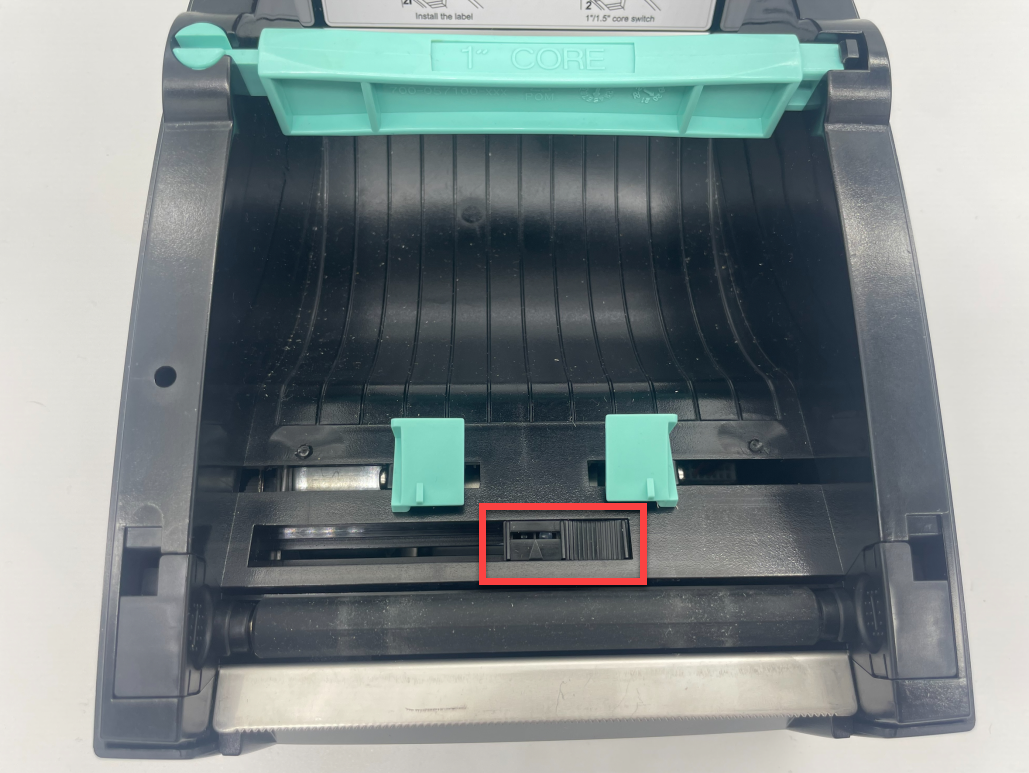
Etiketten laden in het Lite-modelapparaat
Labels laden in een Lite-modelapparaat is eenvoudig. Volg de onderstaande stappen of bekijk de video voor hulp.
Stappen:
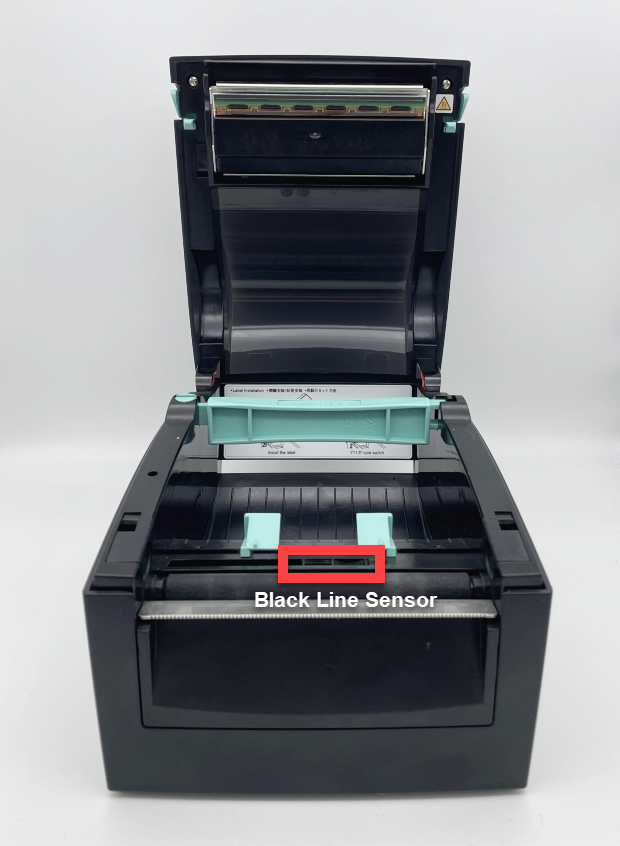
1. Trek voorzichtig aan de blauw/groene kernbalk vanaf de rechterkant en trek deze recht omhoog. Schuif de zwarte lijnsensor helemaal naar rechts van de opening
2. Schuif de labelrol op de kernbalk met de labels naar voren gericht en afrollend van links. Klik de kernbalk dicht.
3. Voer labels door de blauwe/groene geleiders en trek ze over de rand van de printer. Pas de geleiders aan de breedte van het label aan en klik het deksel van de printer dicht.
4. Druk op de gele feed-knop, indien nodig, om uit te lijnen op de zwarte lijn. Trek omlaag om het label te scheuren.
2. Controleer of het juiste labelformaat in de printer is geladen en dat overeenkomt met het printerprofiel dat probeert af te drukken. Herdruk.
Labels laden in apparaten van het 2.0- en Fit-model
Model 2.0 is niet meer leverbaar.
Labels laden in de 2.0- en Fit-modelapparaten.
Stappen:
1. Open het deksel als u een 2.0-apparaat gebruikt.
2. Druk op de ontgrendelingsknop van de printer om deze te openen.
3. Zoek de rolgeleider aan de rechterkant van de opening en til deze op om deze te verwijderen.
4. Neem de labelrol, rol deze af van onderen met de zwarte lijnen naar boven en plaats deze aan de linkerkant van de opening. Trek de labels over de rand van de printer.
5. Plaats de rolgeleider aan de rechterkant van de etikettenrol om deze op zijn plaats te houden.

6. Sluit het deksel van de printer. De etiketten worden automatisch doorgevoerd en afgesneden om te kalibreren.
7. Sluit het deksel. De printer is klaar om te printen.
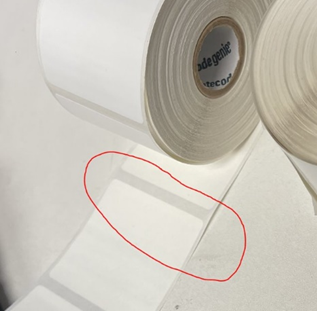
3. Controleer of de labels DateCodeGenie®-labels zijn en voldoen aan de labelvereisten.
DateCodeGenie®-labels
DateCodeGenie-labels worden speciaal voor DateCodeGenie-apparaten geproduceerd. Labels zijn verkrijgbaar in verschillende vormen, maten en kleefstoffen met behulp van black line-technologie om te printen en te snijden.
Thermisch printen
DateCodeGenie printers gebruiken thermisch printen om tekst en afbeeldingen in zwart over te brengen op labels in plaats van inkt. Er is geen inkt of inktpatronen nodig voor DateCodeGenie apparaten.
Black Line-technologie
DateCodeGenie-labels gebruiken zwarte lijnen op de achterkant van de rol om correct te printen. Labels met onjuiste zwarte lijnen worden onjuist geprint. Zie voor referentie Black Line Issues on Labels .
Linerless-etiketten
DateCodeGenie linerless labels worden alleen gebruikt met de mC-Label3 printer. Ze elimineren het loslaten van de liner en verminderen afval door meer labels per rol te leveren, wat leidt tot minder rolwisselingen en minder noodzaak om verschillende labelformaten aan te schaffen of te wisselen.
Aankopen
Etiketten kunt u kopen op de website van de NCCO-winkel: https://store.ncco.com of via uw distributeur.
3. Controleer of de labels DateCodeGenie®-labels zijn en voldoen aan de labelvereisten.
Problemen met de afdrukkwaliteit van DateCodeGenie®-labels
Alle printers die in DateCodeGenie worden gebruikt, maken gebruik van direct-thermische technologie. Als de kwaliteit van een afgedrukt label onvoldoende of niet helder is, kan de kwaliteit van het label onjuist zijn.
- De kwaliteit van het afgedrukte etiket is onvoldoende
- Afgedrukte etiketten worden niet duidelijk afgedrukt
- Etiketten kunnen hun kleefkracht verliezen wanneer ze op een object worden geplaatst
- Het bedrukte etiket kan gedeeltelijk leeg zijn
Vervaagde etiketten
Als u oplosbare etiketten gebruikt, controleer dan of de houdbaarheidsdatum niet is verstreken.
Stappen:
1. Gebruik een nieuwe etikettenrol.
OPMERKING
Durapeel-, permanente en verwijderbare etiketten hebben een houdbaarheid van één jaar (1 jaar). Oplosbare etiketten hebben een houdbaarheid van zes maanden (6 maanden). Probeer indien mogelijk een niet-oplosbaar etiket.
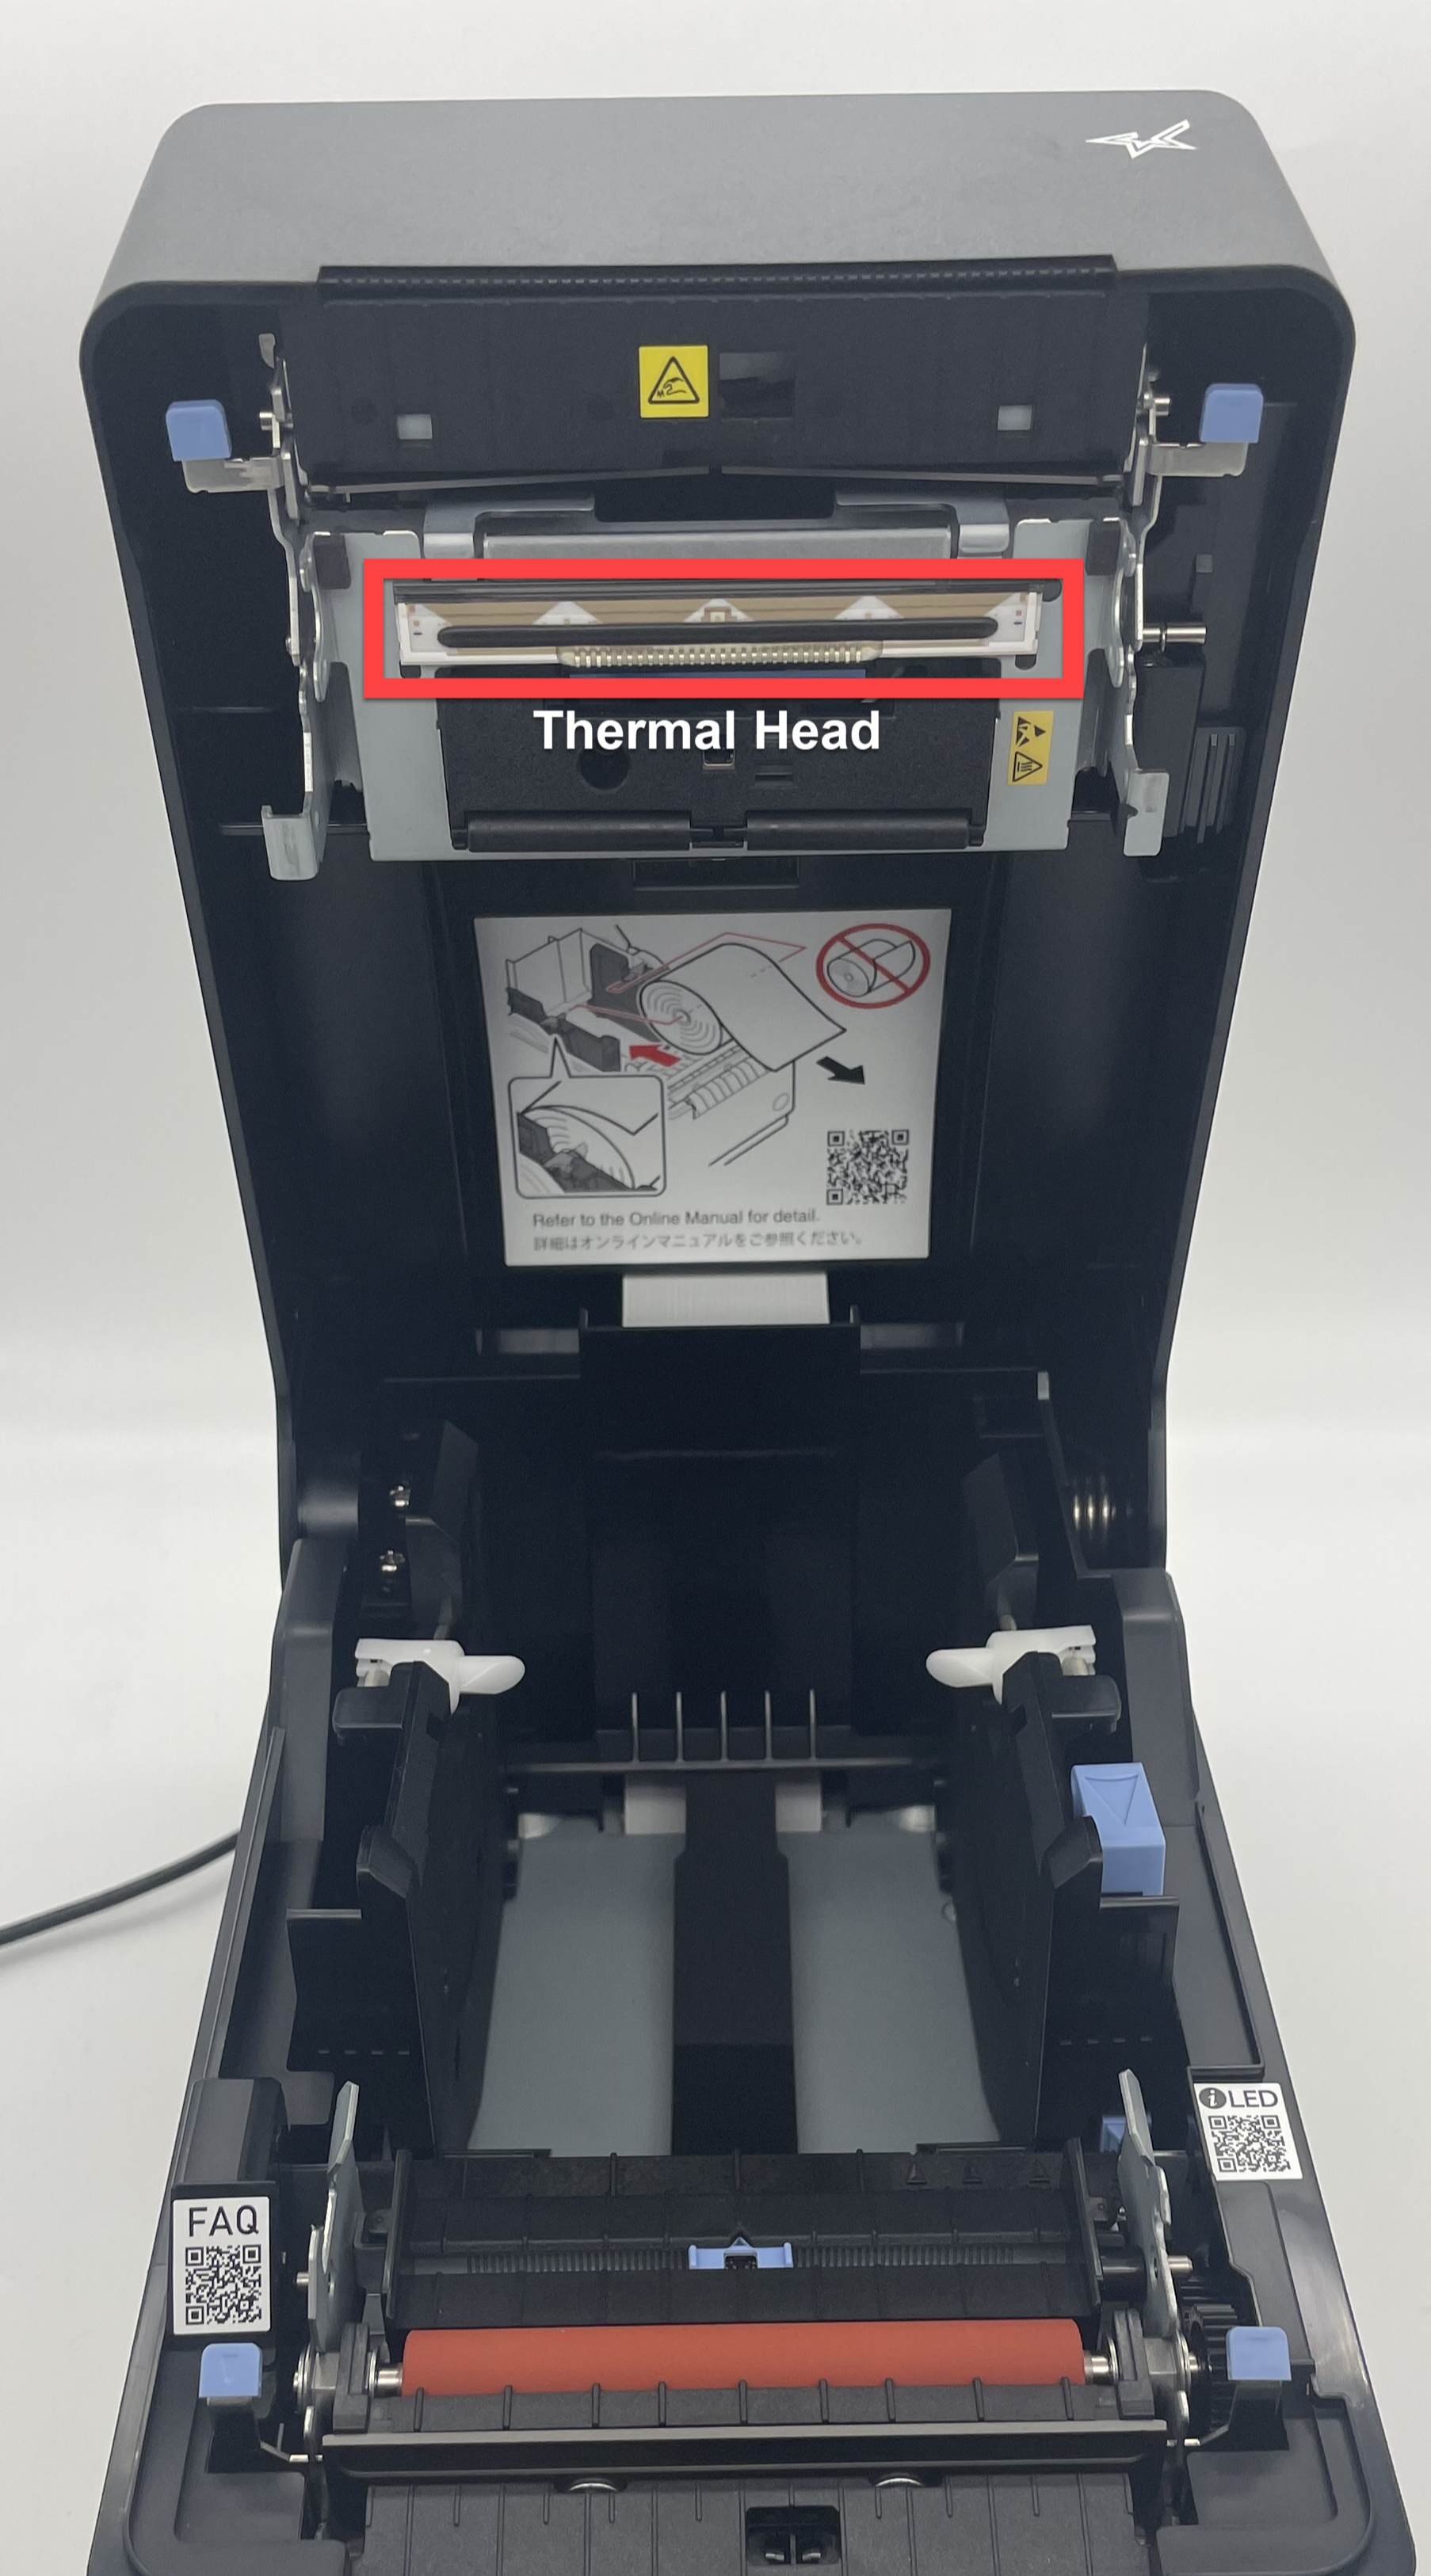
2. Reinig de thermische kop van de DateCodeGenie-printer en verwijder alle vuil en resten. Zie Plaatsing en onderhoud van het apparaat .
De helft van het label is vervaagd of leeg
De afdruk op slechts de helft van een etiket is lichter, of slechts de helft van het etiket is bedrukt.
Als u een Lite model gebruikt, is een van de clips kapot. Het apparaat moet gerepareerd worden. Zie Contact & Support .


Verkeerd uitgelijnd afdrukken
Afdrukfouten veroorzaakt door een printerstoring. Etiketten kunnen echter ook een fout veroorzaken.
Stappen:
1. Probeer een nieuwe etikettenrol die van links naar rechts een volledig zwarte lijn heeft.
2. Maak een foto van de voor- en achterkant van de onjuiste labels en geef de onderstaande informatie door aan de technische ondersteuning:
- Jouw naam
- Serienummer van het apparaat
- Labelvoorraadcode, indien bekend
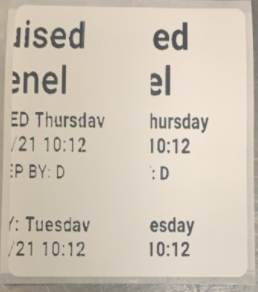
Niet uitgelijnde kleurcode
De zwarte balk bedekt de dagbalken niet volledig.
Stappen:
1. Controleer al uw etikettenrollen om na te gaan hoeveel rollen het betreft.
2. Kies een rol met volledig zwarte lijnen, niet vervaagd of te dun.
3. Plaats de kaart in uw printer en druk opnieuw af.
4. Maak een foto van de voor- en achterkant van de onjuiste labels en geef de onderstaande informatie door aan de technische ondersteuning:
- Jouw naam
- Serienummer van het apparaat
- Bestelde productcode van het etiket
- Datum en bestelnummer voor etiketten
Ontbrekende afdruk
Drukfouten veroorzaakt door enkele fouten.
Stappen:
1. Controleer of de thermische kop van de printer niet bedekt is:
- Zo ja, lees dan dit artikel over het reinigen van de thermische kop van uw printer. Zie Plaatsing en onderhoud van het apparaat .
- Als dat niet het geval is, probeer dan een nieuwe etikettenrol om te controleren of de etiketten niet defect zijn.
2. Voor etiketten waarop geen etiket is afgedrukt:
- Controleer of de etiketten correct in de printer zijn geplaatst
- Controleer of er geen vuil op de thermische kop van de printer zit
- Probeer een nieuwe etikettenrol om te controleren of de etiketten niet onjuist zijn
3. Controleer of de printer niet beschadigd is geraakt door de vloeistof.
OPMERKING
Controleer indien van toepassing de vloeistofdetectie-indicatoren (LDI) voor het specifieke apparaat dat wordt gebruikt. Zie Waar bevinden zich vloeistofdetectielabels?
4. Maak een foto van de voor- en achterkant van de onjuiste labels en geef de onderstaande informatie door aan de technische ondersteuning:
- Jouw naam
- Serienummer van het apparaat
- Labelvoorraadcode, indien bekend
Lijnen door label
Er lopen lege lijnen door het etiket.
|
Lege verticale lijnen over het hele label duiden op een defect aan de printkop. De printer moet worden vervangen. Neem contact op met het reparatiecentrum (zie Contact & Support) om de volgende stappen te bespreken.
|
Al uw afdrukken zijn zichtbaar maar vervaagd. Het reinigen van de thermische kop kan het probleem mogelijk verhelpen. De plaatsing van de thermische kop verschilt per apparaatmodel. Zie Plaatsing en onderhoud van het apparaat of printer. Zie Plaatsing en onderhoud van de printer.
|


3. Controleer of de labels DateCodeGenie®-labels zijn en voldoen aan de labelvereisten.
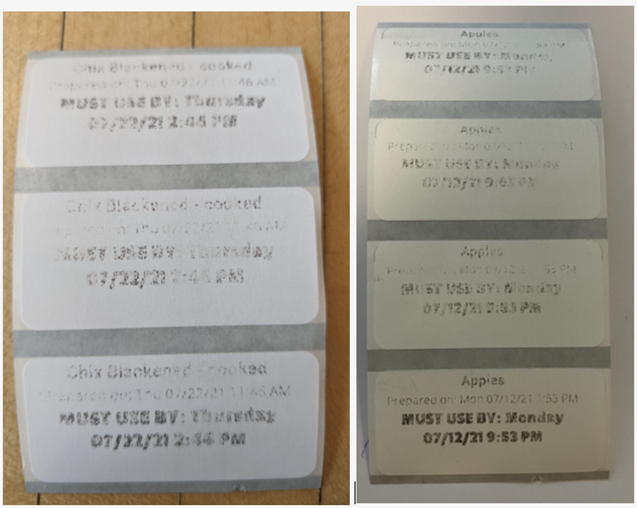
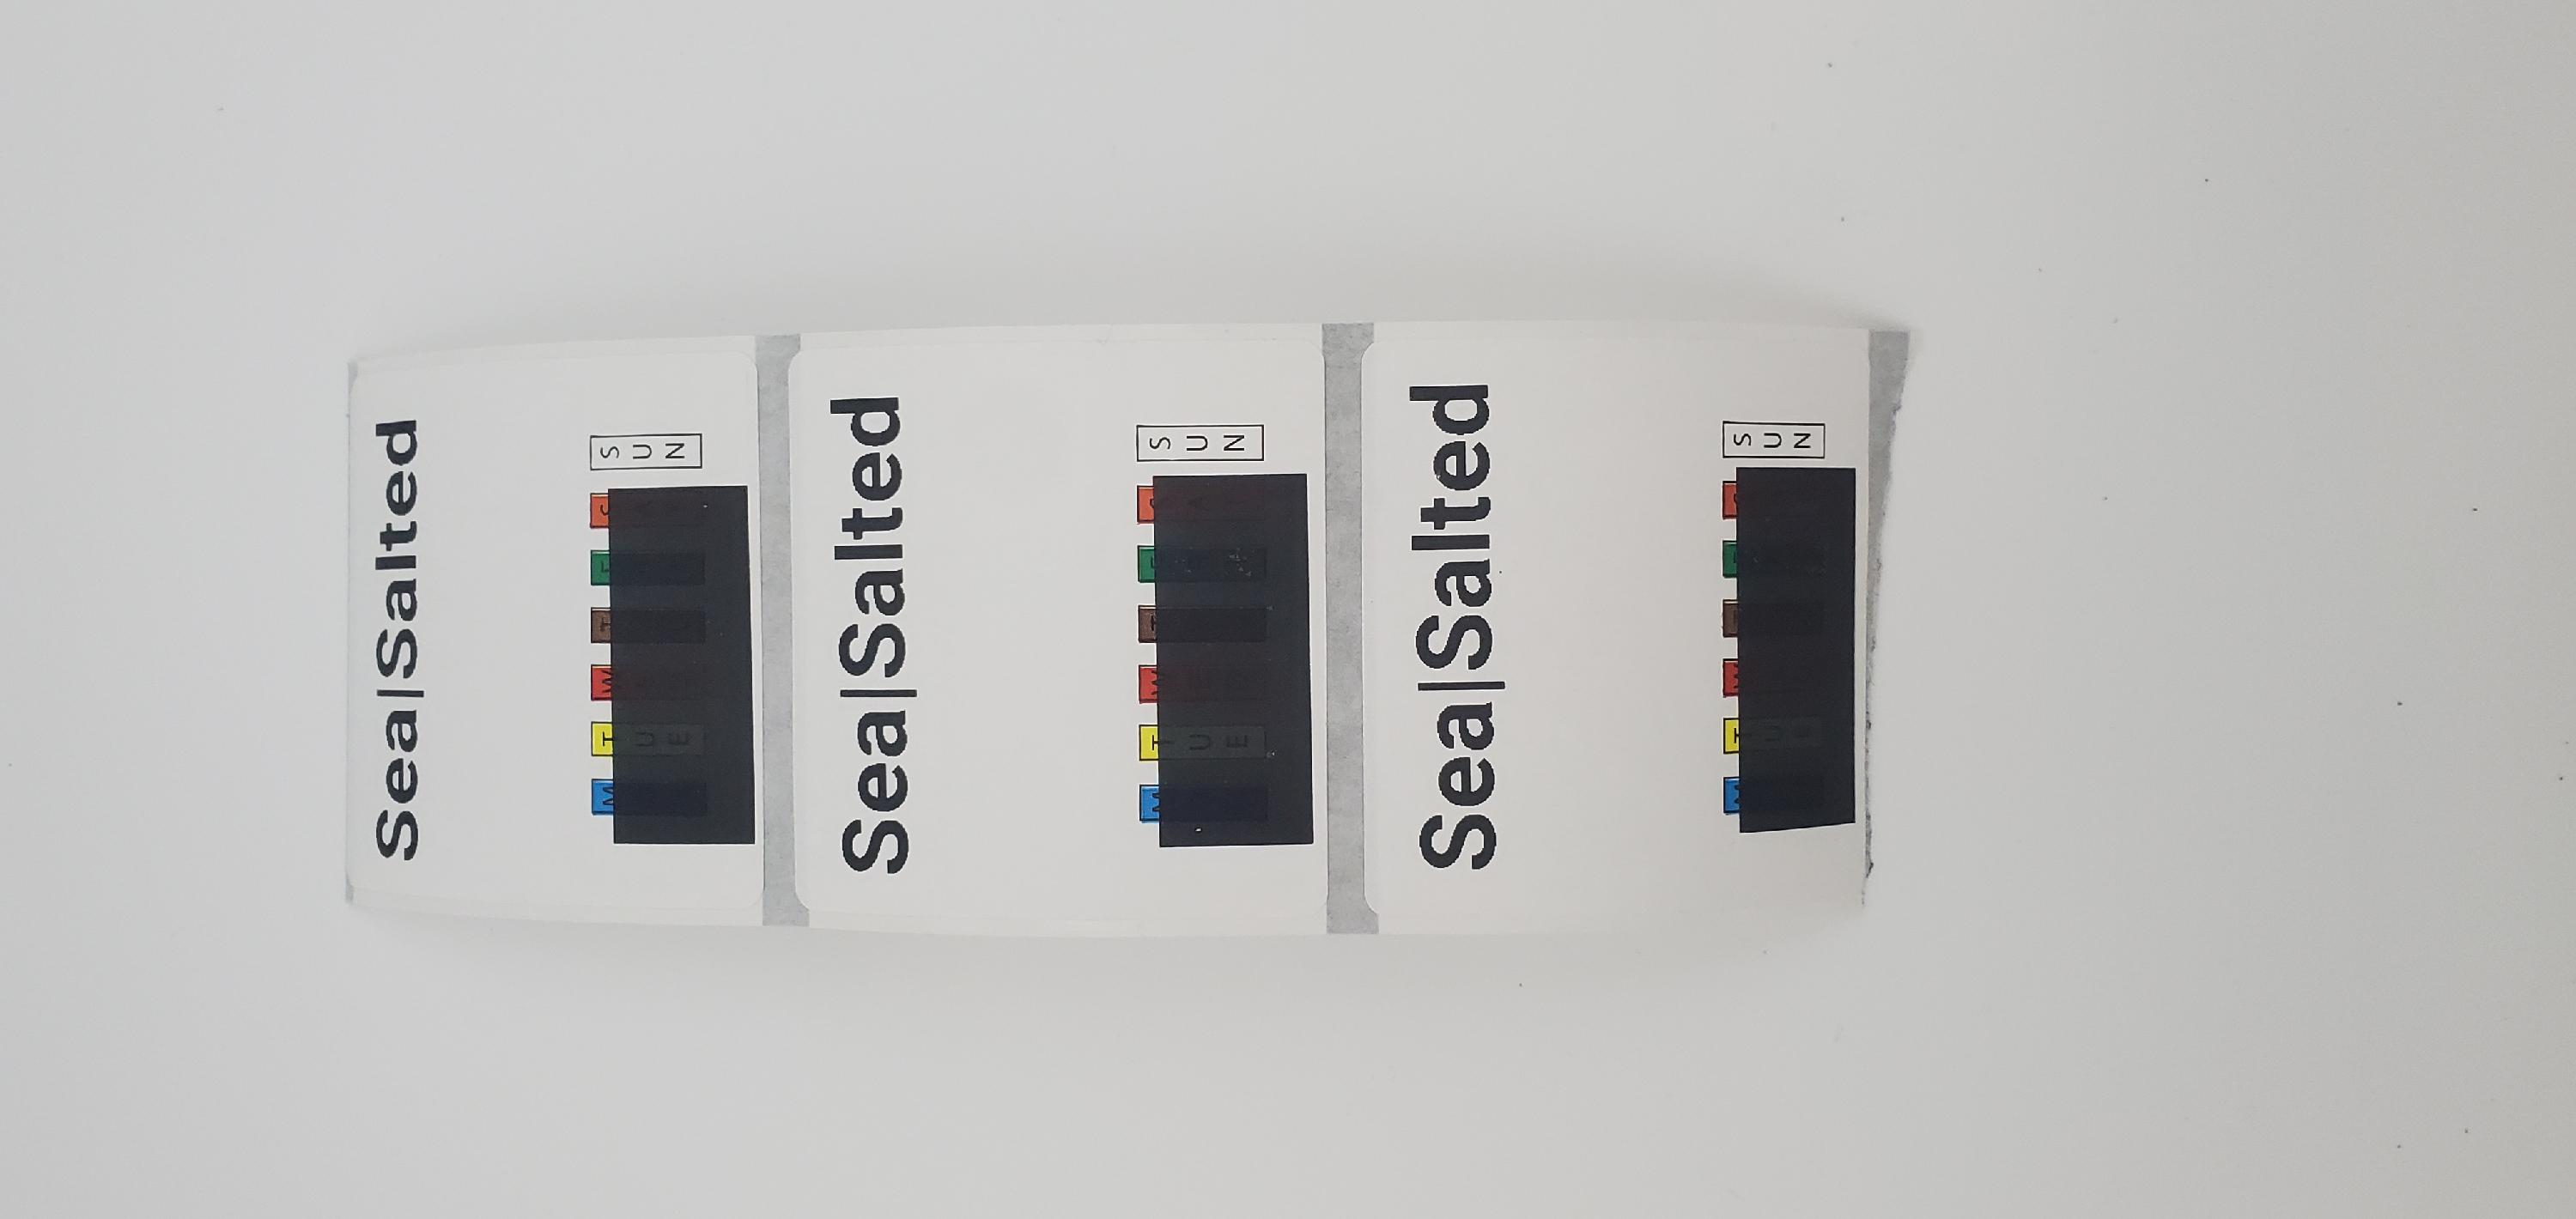
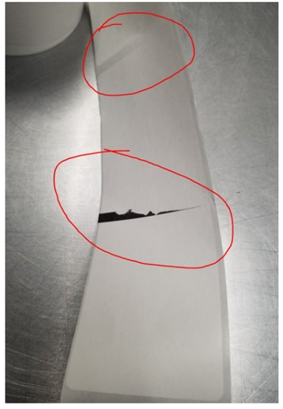
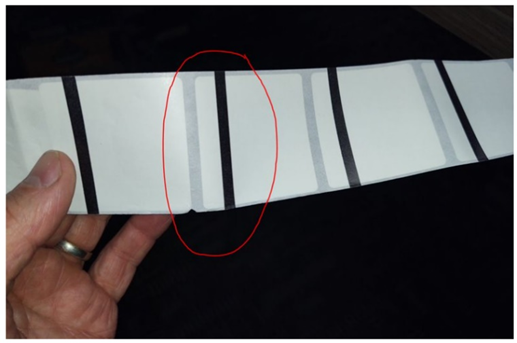
Vage lijn op de voorkant van het label
Bij bepaalde label-SKU's kan er een vage lijn op de voorkant van het label staan, zoals hieronder weergegeven.
![]()
Behandel de oproep volgens de SKU zoals hieronder vermeld:
2x3 permanente labels (DCG-P23-4B)
SKU DCG-P23-4B wordt met een korting verkocht aan klanten die bij aankoop op de hoogte waren gesteld van het vervaagde lijndefect.
DCG-P23-4B wordt aangegeven door een zwarte scherpe lijn op de zijkant van de labelrol.
We zullen deze SKU niet terugbetalen, omdat deze als defect wordt verkocht.

2x2 oplosbare etiketten (DCG-D22)
Geef klanten een nieuwe rol als hun 2x2 oplosbare labels (SKU DCG-D22) een vage lijn op de voorkant hebben.
Zie Contact en ondersteuning voor aanvullende hulp
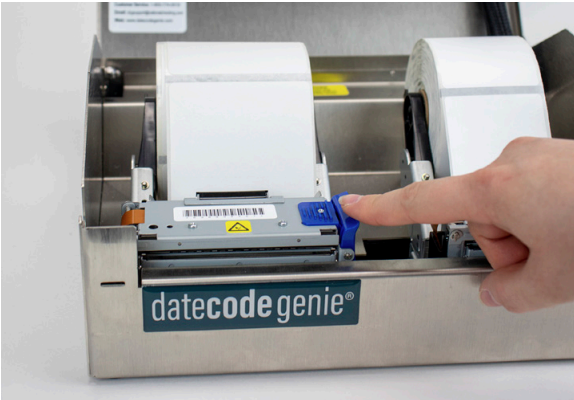
4. Kalibreer de printer voor een apparaat van het DateCodeGenie® X-model en druk de labels opnieuw af.
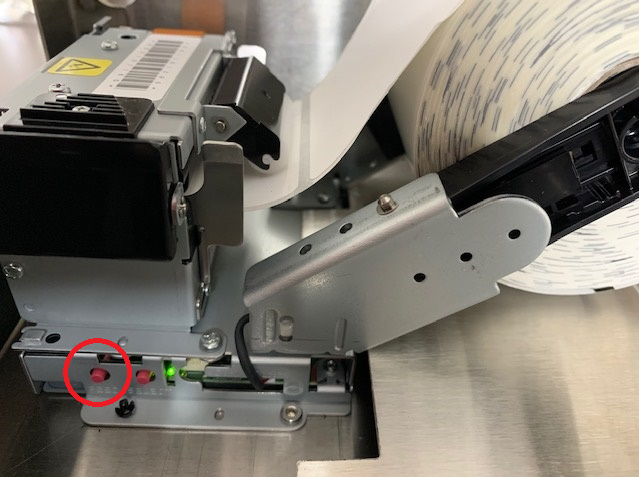
Printerkalibratie (X-serie)
Kalibreren van de DateCodeGenie® printer kan helpen als de printer labels niet correct snijdt of doorvoert. Dit artikel gaat over het kalibreren van de X Series (X2, X22, X23) printer.
Stappen:
1. Controleer of de labelrol is geladen met de labels naar boven en met de zwarte lijn naar beneden. Zie Labels laden in het X-modelapparaat voor meer informatie over het laden van labels.

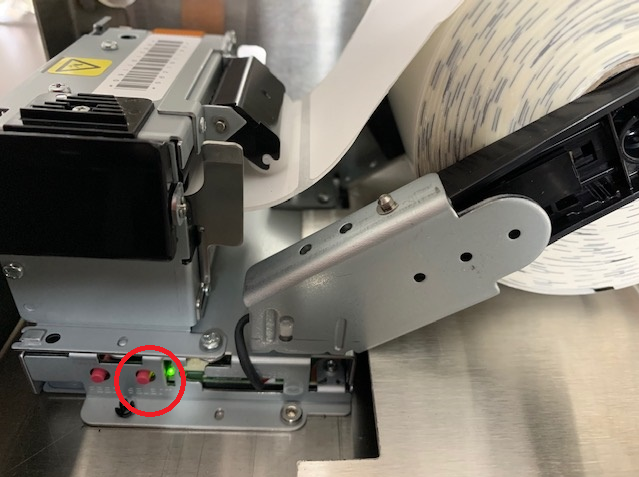
2. Zoek de 2 rode of zwarte knoppen aan de rechterkant van elke printer, vlak bij de onderkant van de behuizing.
OPMERKING
Als u er zelf niet bij kunt, kunt u met een potlood voorzichtig op de knoppen op de printer aan de rechterkant drukken.

3. Houd de SELECT-knop en de BACK-knop ingedrukt totdat de labels verschijnen en laat de knop vervolgens los.
OPMERKING
Als labels continu worden doorgevoerd en niet stoppen, vervangt u deze door een nieuwe rol met een effen zwarte lijn op de achterkant. Voor meer informatie over correcte en incorrecte labels, zie DateCodeGenie® Labels .
4. Druk op de FEED-knop, de FRONT-knop. Labels gaan naar de zwarte lijn en worden gesneden.
OPMERKING
Herhaal deze stap als de printer niet op een zwarte lijn afdrukt.
5. Herhaal deze stappen voor elke printer.
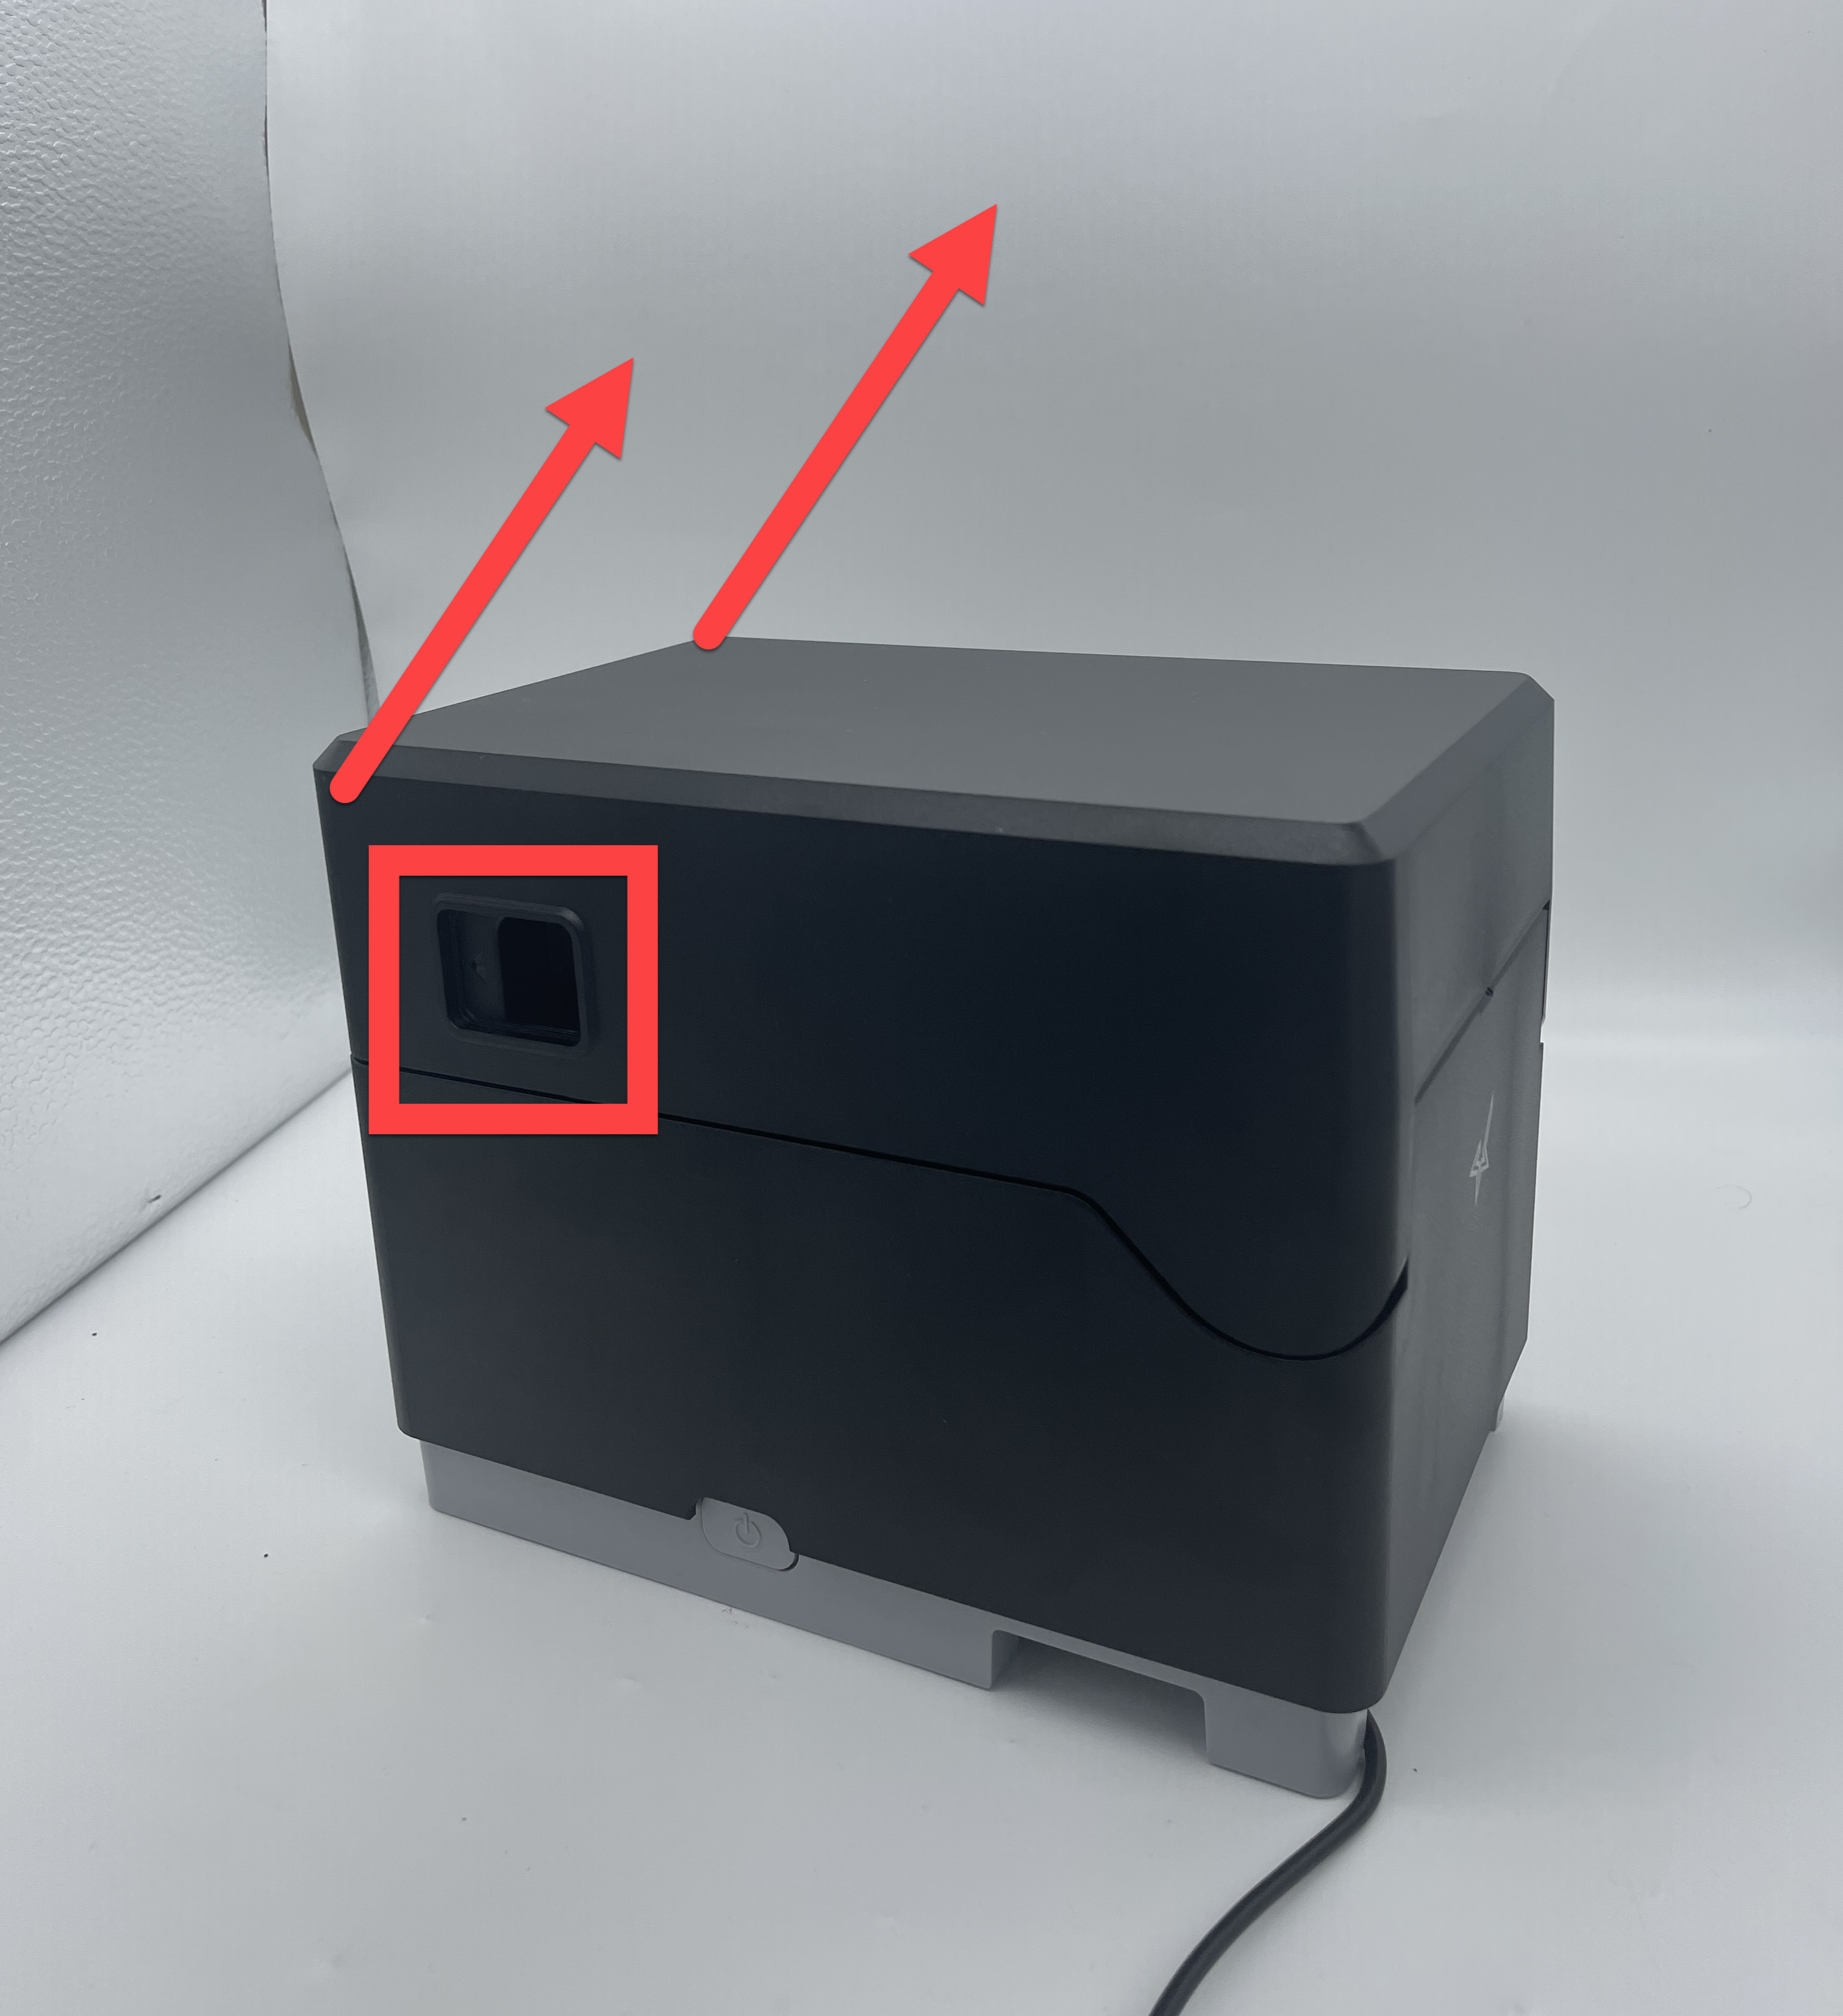
Mislukte gevoeligheidsfouten: Mislukte gevoeligheidsfouten die optreden tijdens de printerkalibratie kunnen drie oorzaken hebben:
1. Ontbrekende of vervaagde lijnen op het etiket
Controleer of er een effen zwarte lijn op de achterkant van het label staat. Om onjuiste labels te zien, zie de grafiek in DateCodeGenie® Labels .
2. Vuil blokkeert de zwarte lijnsensor
Reinig de zwarte lijnsensor en thermische kop van de printer. Zie Plaatsing, onderhoud en reiniging van het apparaat .
4. Kalibreer de printer voor een apparaat van het DateCodeGenie® Lite-model en druk de labels opnieuw af.
Printerkalibratie (Lite)
Als labels niet correct worden afgedrukt, doorgevoerd of gesneden, zal het kalibreren van de printer de zwarte lijn en scheur resetten voor correct afdrukken.
Er zijn opties om de printer te kalibreren:
Handmatige printerkalibratie
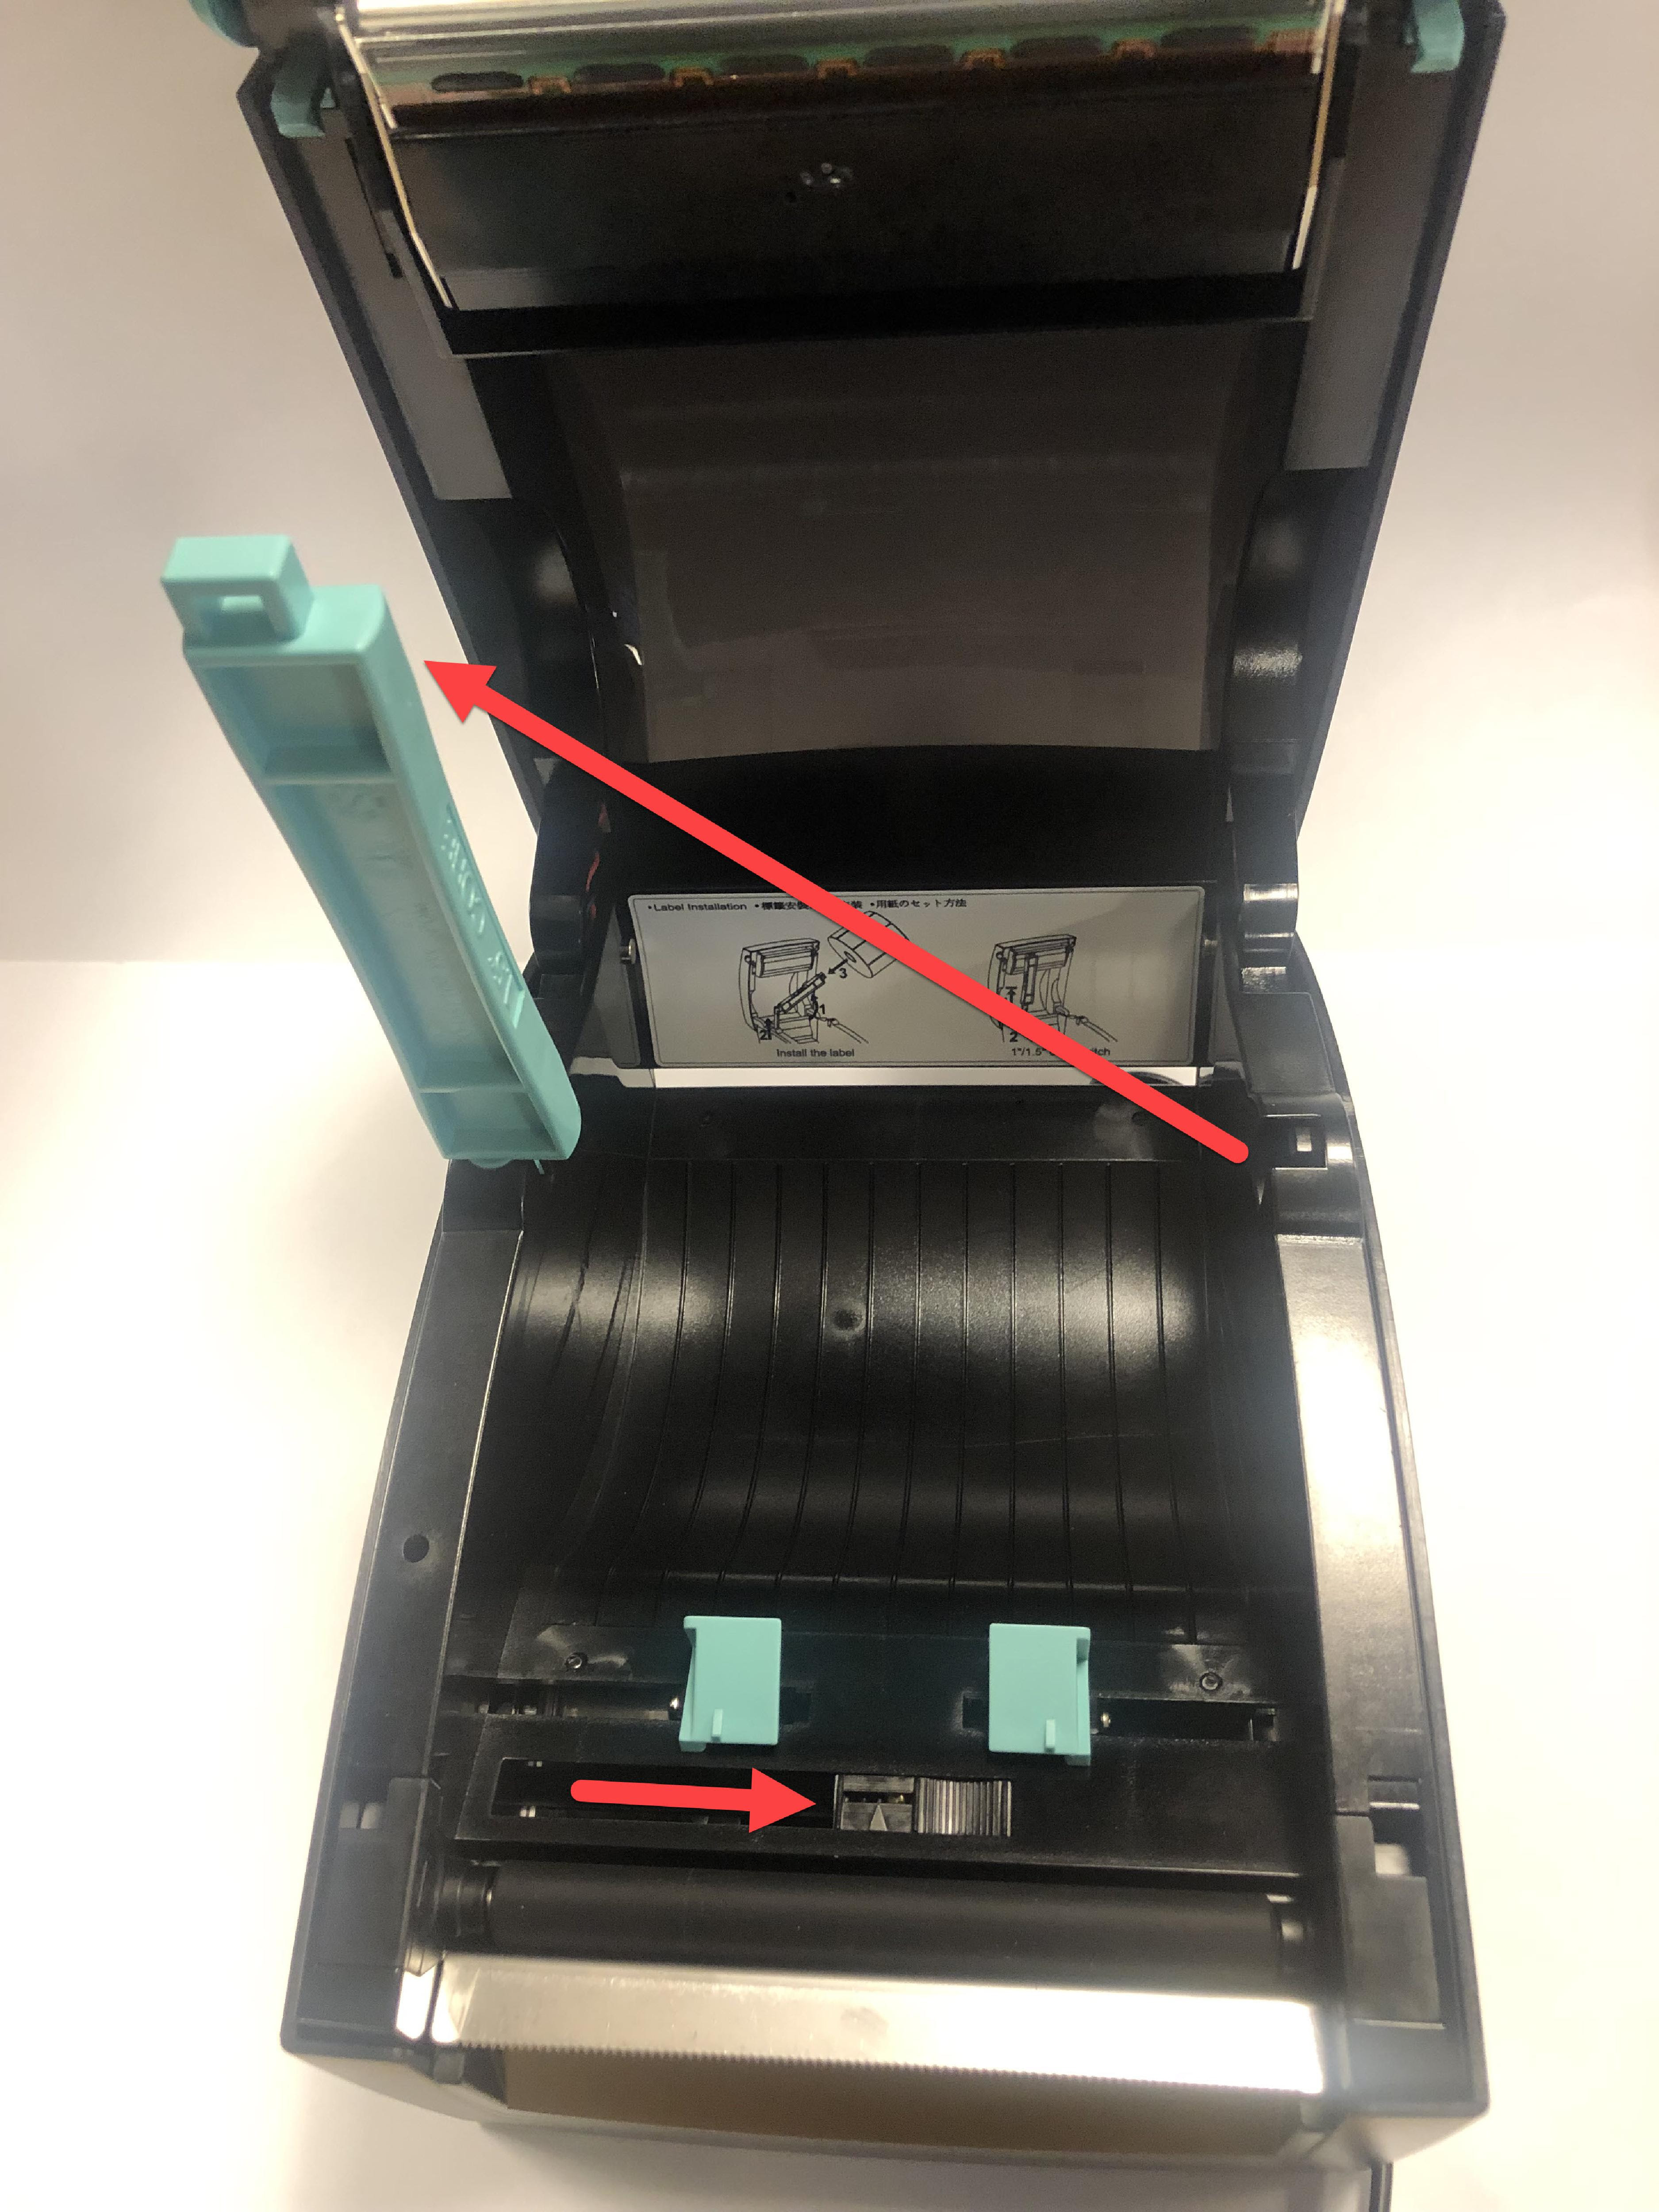
1. Open de printer door tegelijkertijd de twee blauw/groene ontgrendelingsknoppen van de printer in te drukken en deze omhoog te tillen.

2. Schuif de zwarte lijnsensor helemaal rechts van de opening.
3. Voer de labels door de blauw/groene geleiders en steken over de rand van de printer uit. Pas de geleiders aan de breedte van het etiket aan en klik het printerdeksel dicht.
OPMERKING
Etiketten laden? Zie Labels laden in het Lite-modelapparaat .
4. Zet de aan/uit-schakelaar in de O-stand om de printer uit te zetten.

5. Houd de gele voedingsknop met één hand ingedrukt terwijl u met de andere hand de stroom weer inschakelt. Laat de voedingsknop los wanneer u de pieptonen hoort en het rode lampje knippert. Er worden zelftestlabels afgedrukt.

6. Druk nogmaals op de doorvoerknop om de labels door te voeren naar de zwarte lijn en trek ze naar beneden om ze te scheuren.

App-printerkalibratie
1. Log indien nodig in op de app met uw gebruikersnaam en wachtwoord.
2. Tik op de navigatieknop (pictogram met drie lijnen) in de linkerbovenhoek.
3. Tik op Instellingen in het menu.
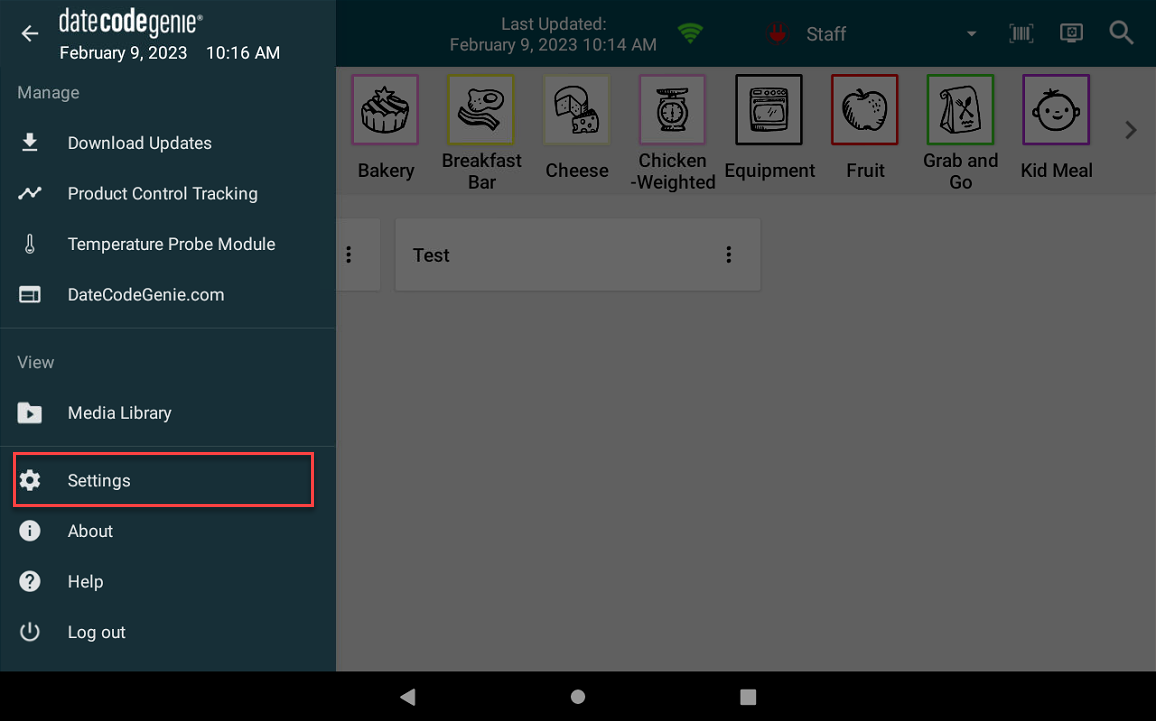
4. Tik op Printerinstellingen.

5. Voeg labeltype toe als er geen wordt vermeld.
OPMERKING
Een onjuist labeltype zal ertoe leiden dat de printer niet correct kalibreert.
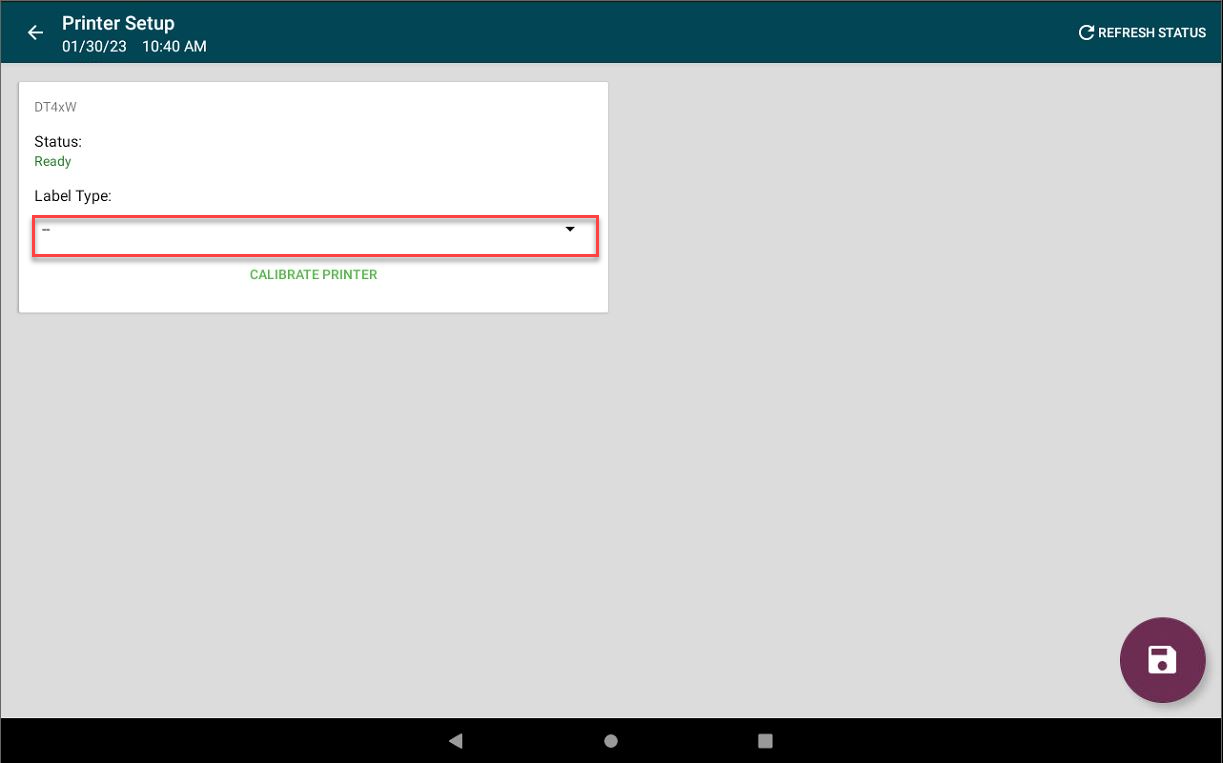
6. Tik op Printer kalibreren.
OPMERKING
De status moet "Gereed" zijn om labels af te drukken. Als u problemen ondervindt met de printerverbinding, raadpleegt u Probleem met printerverbinding (fout 300x1) voor Lite-apparaat .
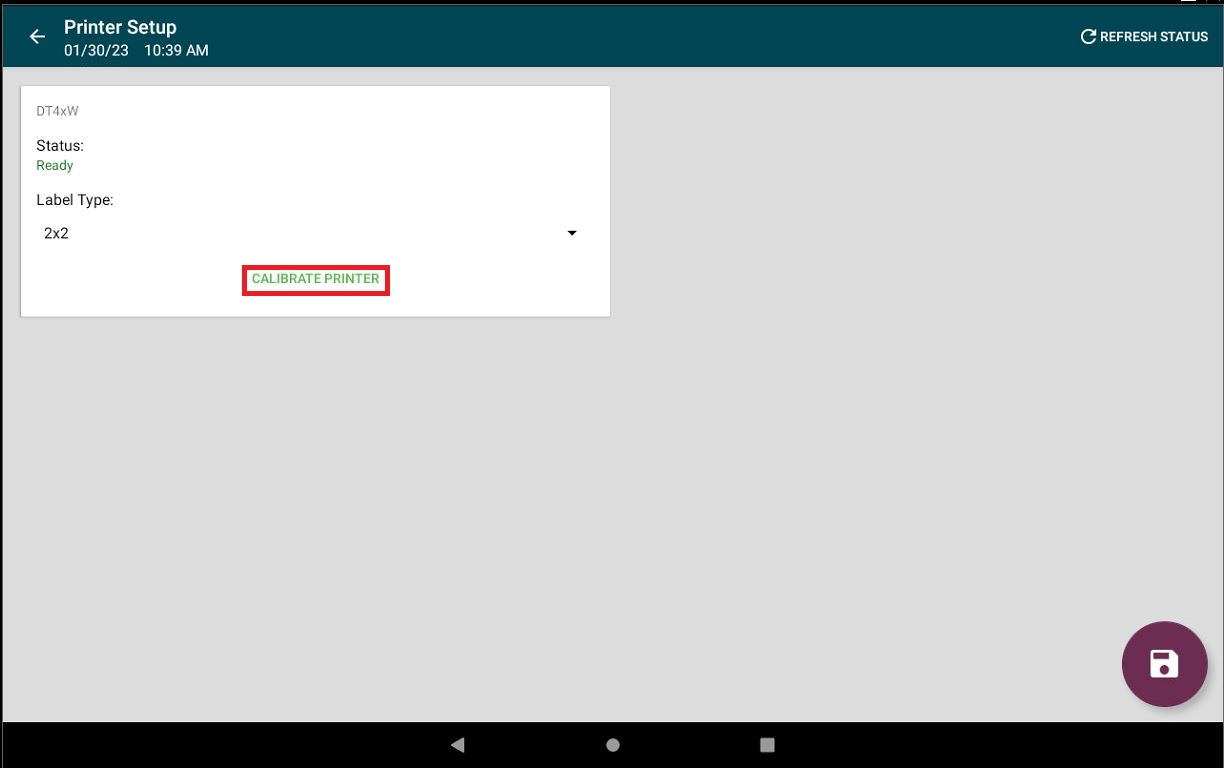
7. Er wordt een zelftestlabel afgedrukt.
5. Reinig de zwarte lijnsensor en de thermische kop van de printer en druk de labels opnieuw af.
Plaatsing en onderhoud van het apparaat
Een juiste plaatsing, onderhoud en routinematige reiniging van uw DateCodeGenie®-apparaat is een eenvoudige en effectieve manier om uw apparaat te onderhouden.
Apparaatonderhoud
Plaatsing
- Alleen omgeving op kamertemperatuur
- Plaats het op een vlakke, stabiele ondergrond of bevestig het aan een veilige muur of plank, uit de buurt van trillingen, vocht en vloeistoffen van welke aard dan ook
Onderhoud
Alle modellen
- Het apparaat kan aangesloten blijven op de voeding terwijl de tablet is ingeschakeld om de batterijlading te behouden
- Zorg ervoor dat op bepaalde modellen rubberen voetjes zijn bevestigd om het apparaat op zijn plaats te houden
2.0-model
- Zorg ervoor dat de vloeistofbeschermingsafdichting (zwarte rubberen flap) op zijn plaats zit op het 2.0-modelapparaat om te beschermen tegen vocht en vloeistof
Passend model
- Zorg ervoor dat de spatafdekking op zijn plaats zit op het Fit-modelapparaat om te beschermen tegen vocht en vloeistof
Lite-model
- Zorg ervoor dat de siliconen hoes van de tablet op zijn plaats zit op de Lite-tablet om te beschermen tegen onbedoelde schade
Schoonmaak
Roestvrij stalen behuizing
Schoonmaakbenodigdheden nodig
- Pluisvrije doek of microvezeldoek
- Schuimende ontvetter
- Veeg het roestvrij staal af met een pluisvrije doek of microvezeldoek.
WAARSCHUWING
- Gebruik nooit schuursponsjes, dit veroorzaakt krassen en verkleuringen.
- Zorg ervoor dat de tablet is uitgeschakeld en dat de stekker van het apparaat is losgekoppeld
het stopcontact voordat u met schoonmaken begint.
- Voor een diepere reiniging brengt u een kleine hoeveelheid schuimende ontvetter rechtstreeks op het roestvrij staal aan en veegt u het onmiddellijk af.
OPMERKING
Veeg overtollige spray onmiddellijk van de tablet.
Tablet
Schoonmaakbenodigdheden nodig
- Pluisvrije doek of microvezeldoek
- Glasreiniger op alcoholbasis
- Spuit een zachte, pluisvrije doek in met een glasreiniger op alcoholbasis en veeg het touchscreen voorzichtig schoon.
WAARSCHUWING
Gebruik nooit een schuursponsje of spuit nooit rechtstreeks op het touchscreen, omdat dit het scherm kan beschadigen.
- Herhaal indien nodig.
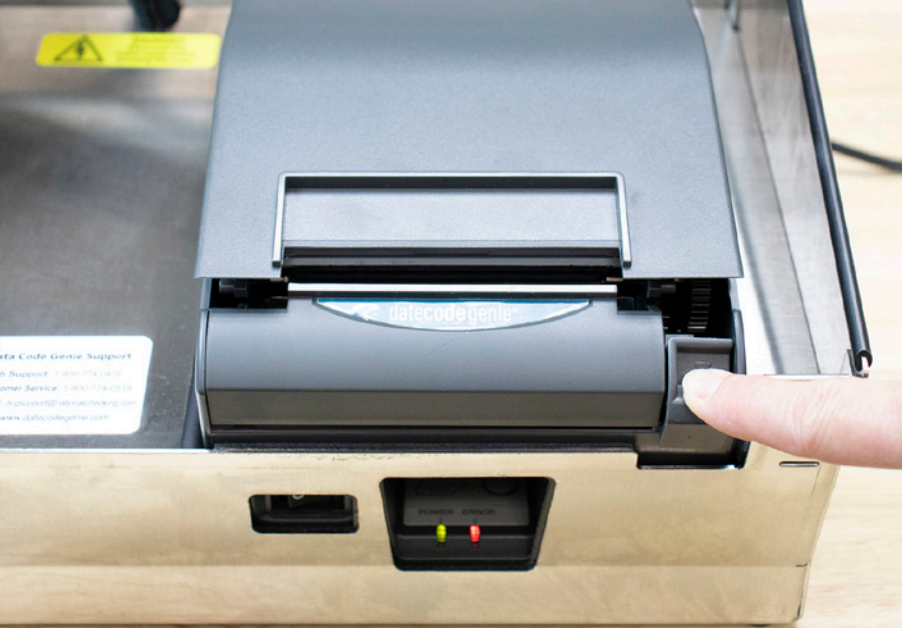
Printer
Schoonmaakbenodigdheden nodig
- Isopropylalcohol
- Wattenstaafjes, zachte kleding of plakband
- Ingeblikte lucht
WAARSCHUWINGEN
- Maak de printer nooit onmiddellijk na het afdrukken schoon. Wacht tot de printer is afgekoeld om schade aan de thermische kop te voorkomen.
- Voorkom krassen en stel de thermische kop niet bloot aan statische elektriciteit.
- Verwijder de labelrol en eventueel vastzittende labels uit de printer.
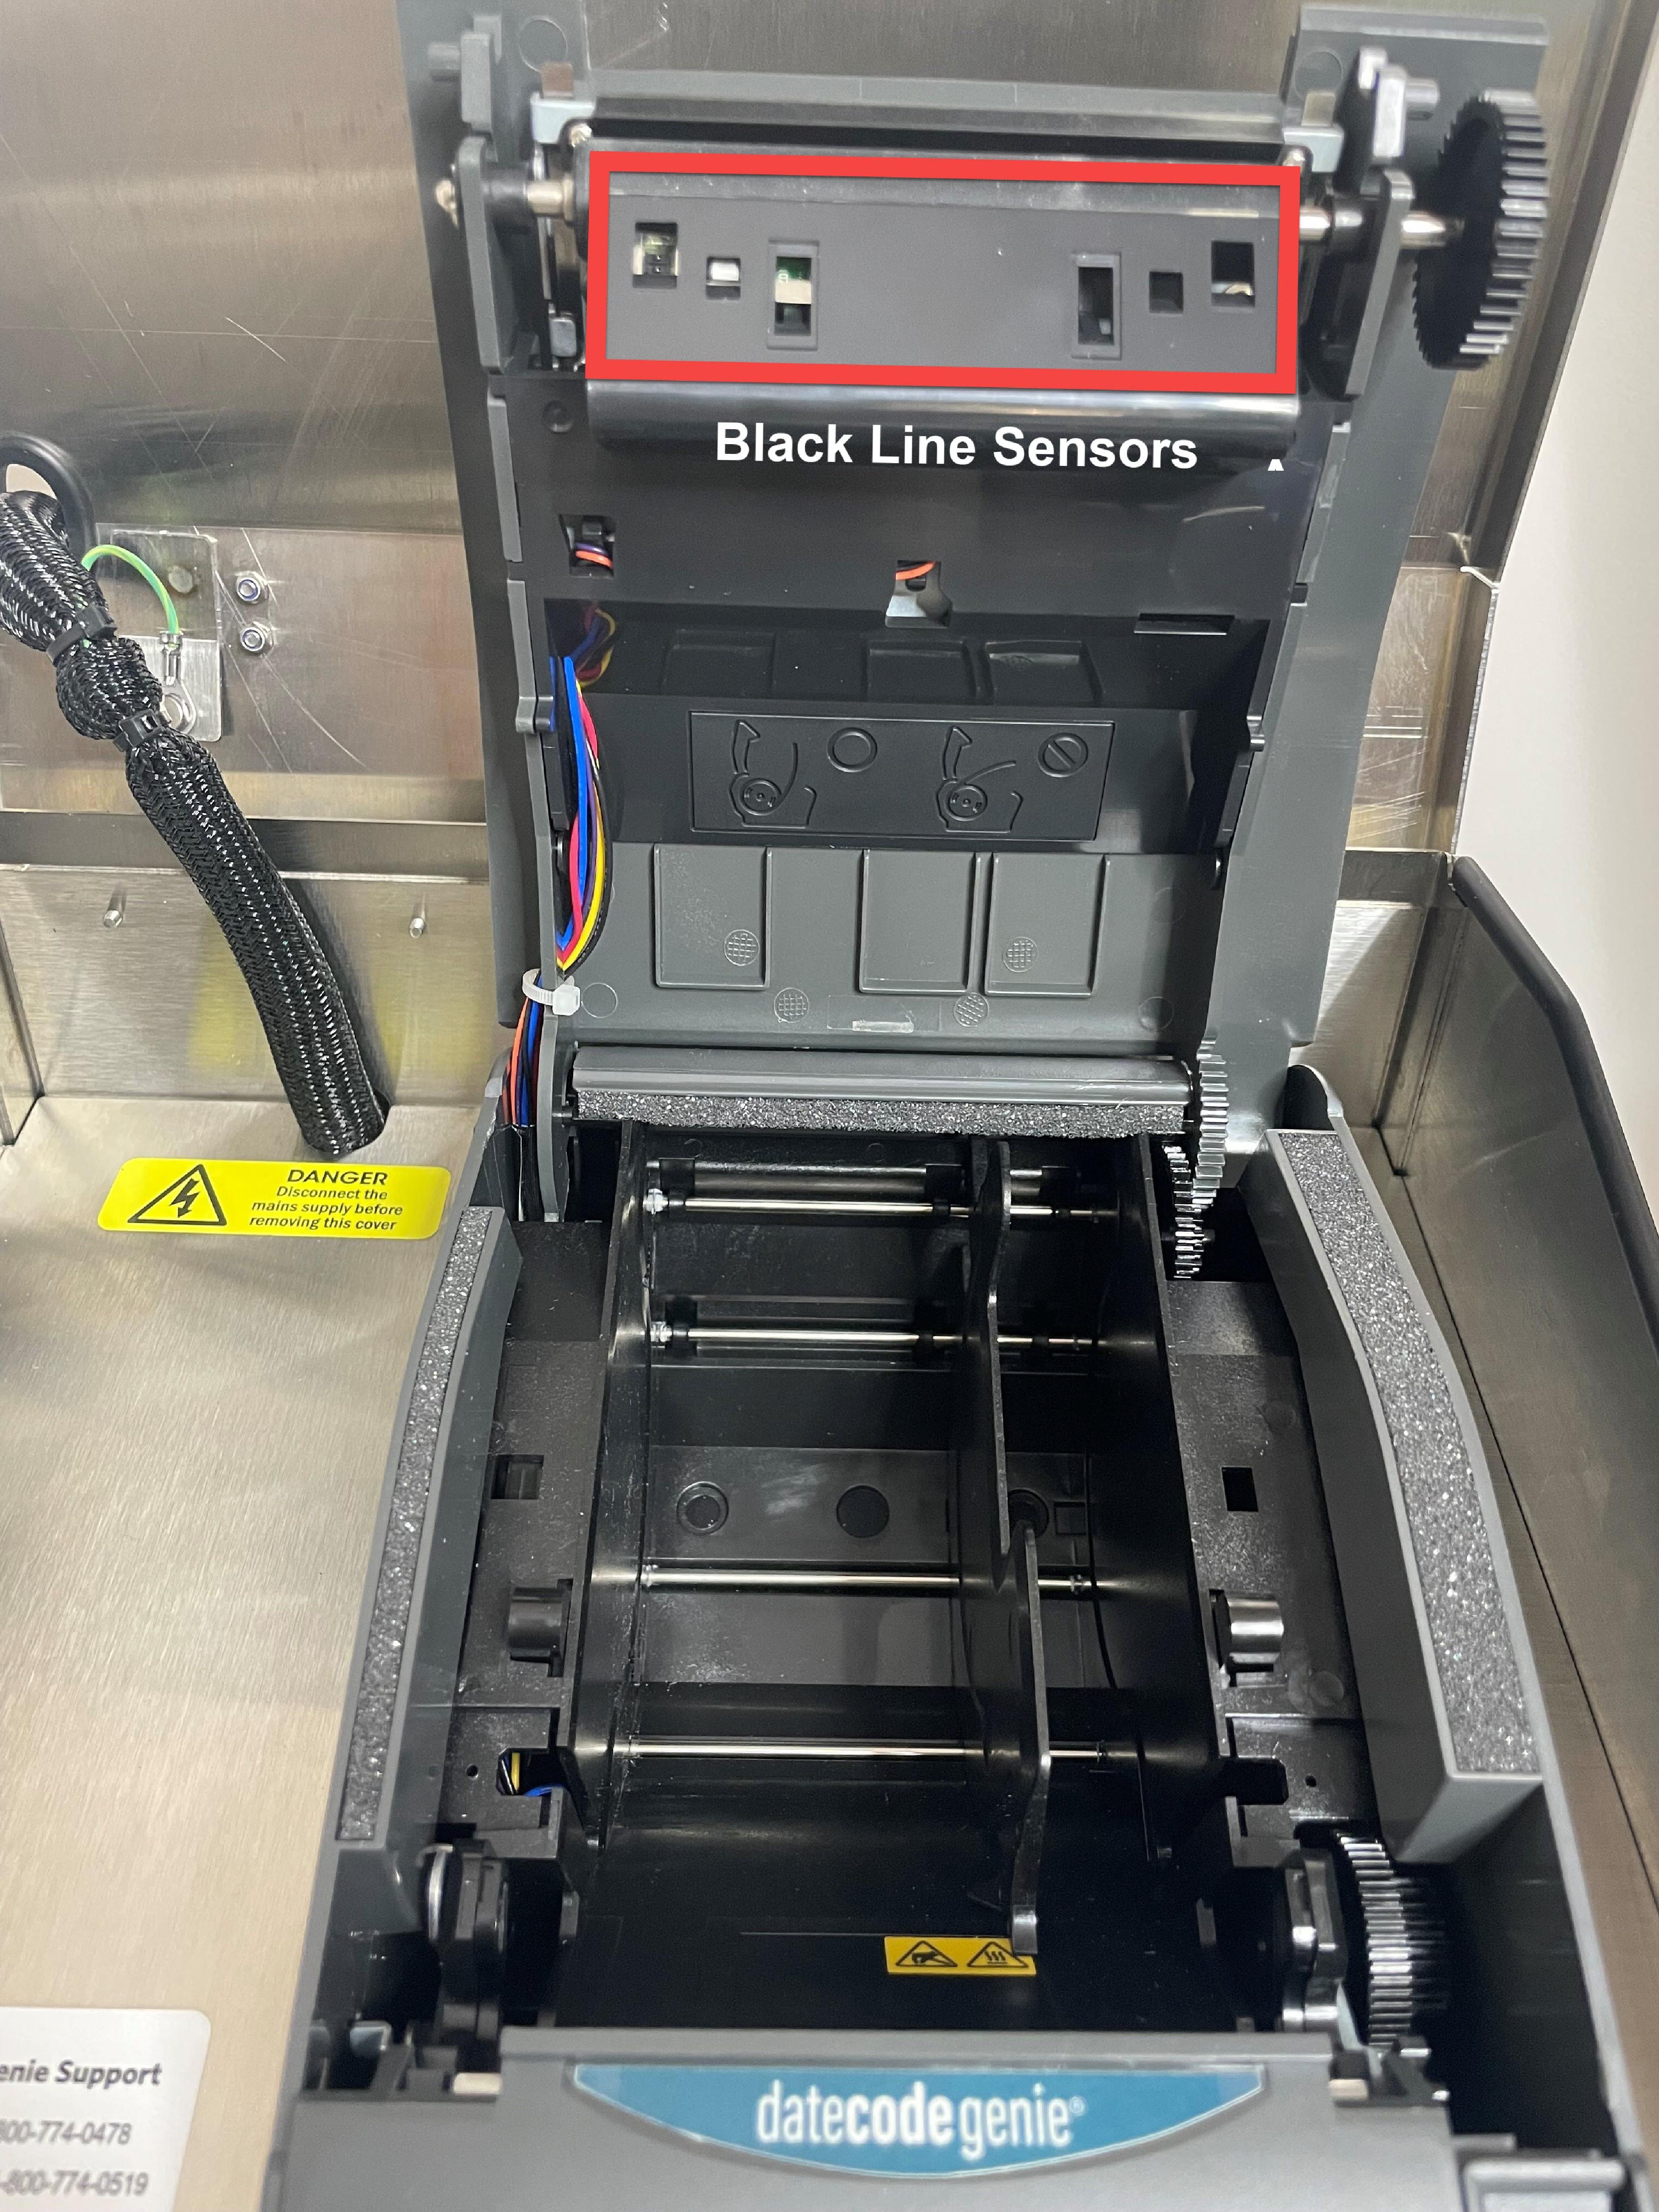
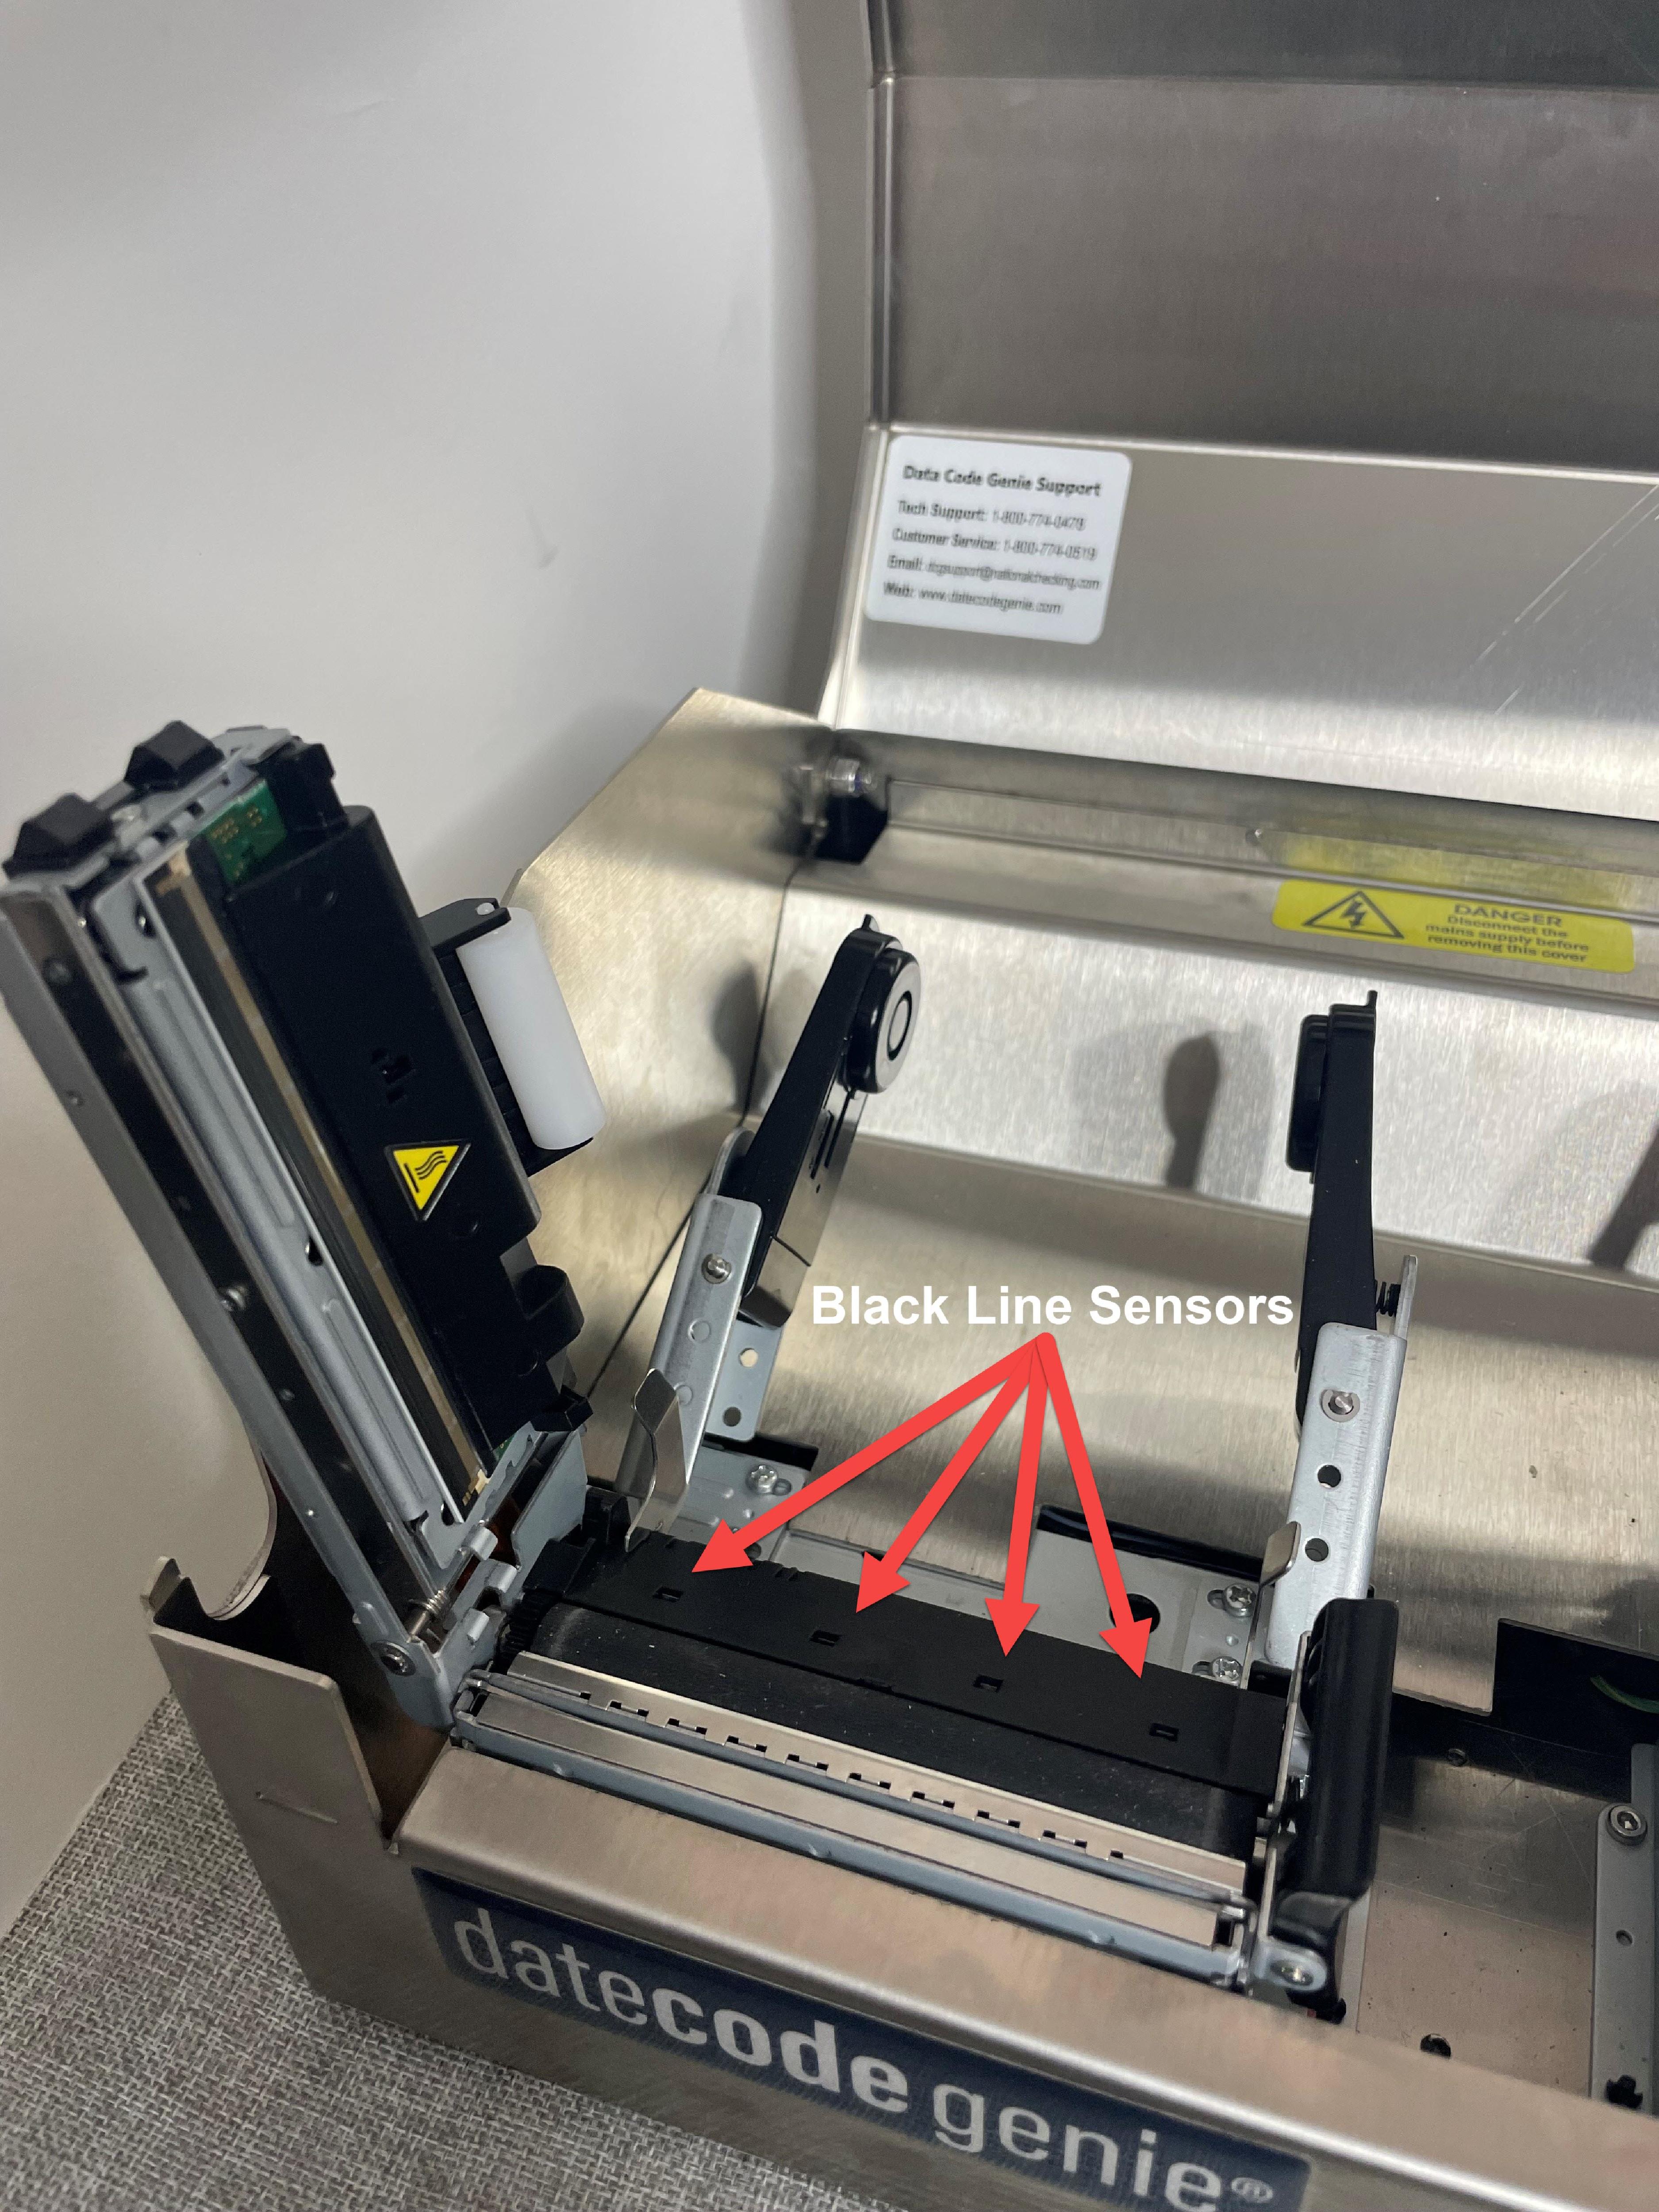
- Spuit ingeblikte lucht om eventueel vuil uit de printeropening, inclusief de zwarte lijnsensoren , te verwijderen.
OPMERKING
Houd de ingeblikte lucht niet schuin om te voorkomen dat er vloeistof in de printer wordt geblazen.
| 2.0 en Fit-model | X-model | Lite-model |
|---|---|---|
 |
 |
 |
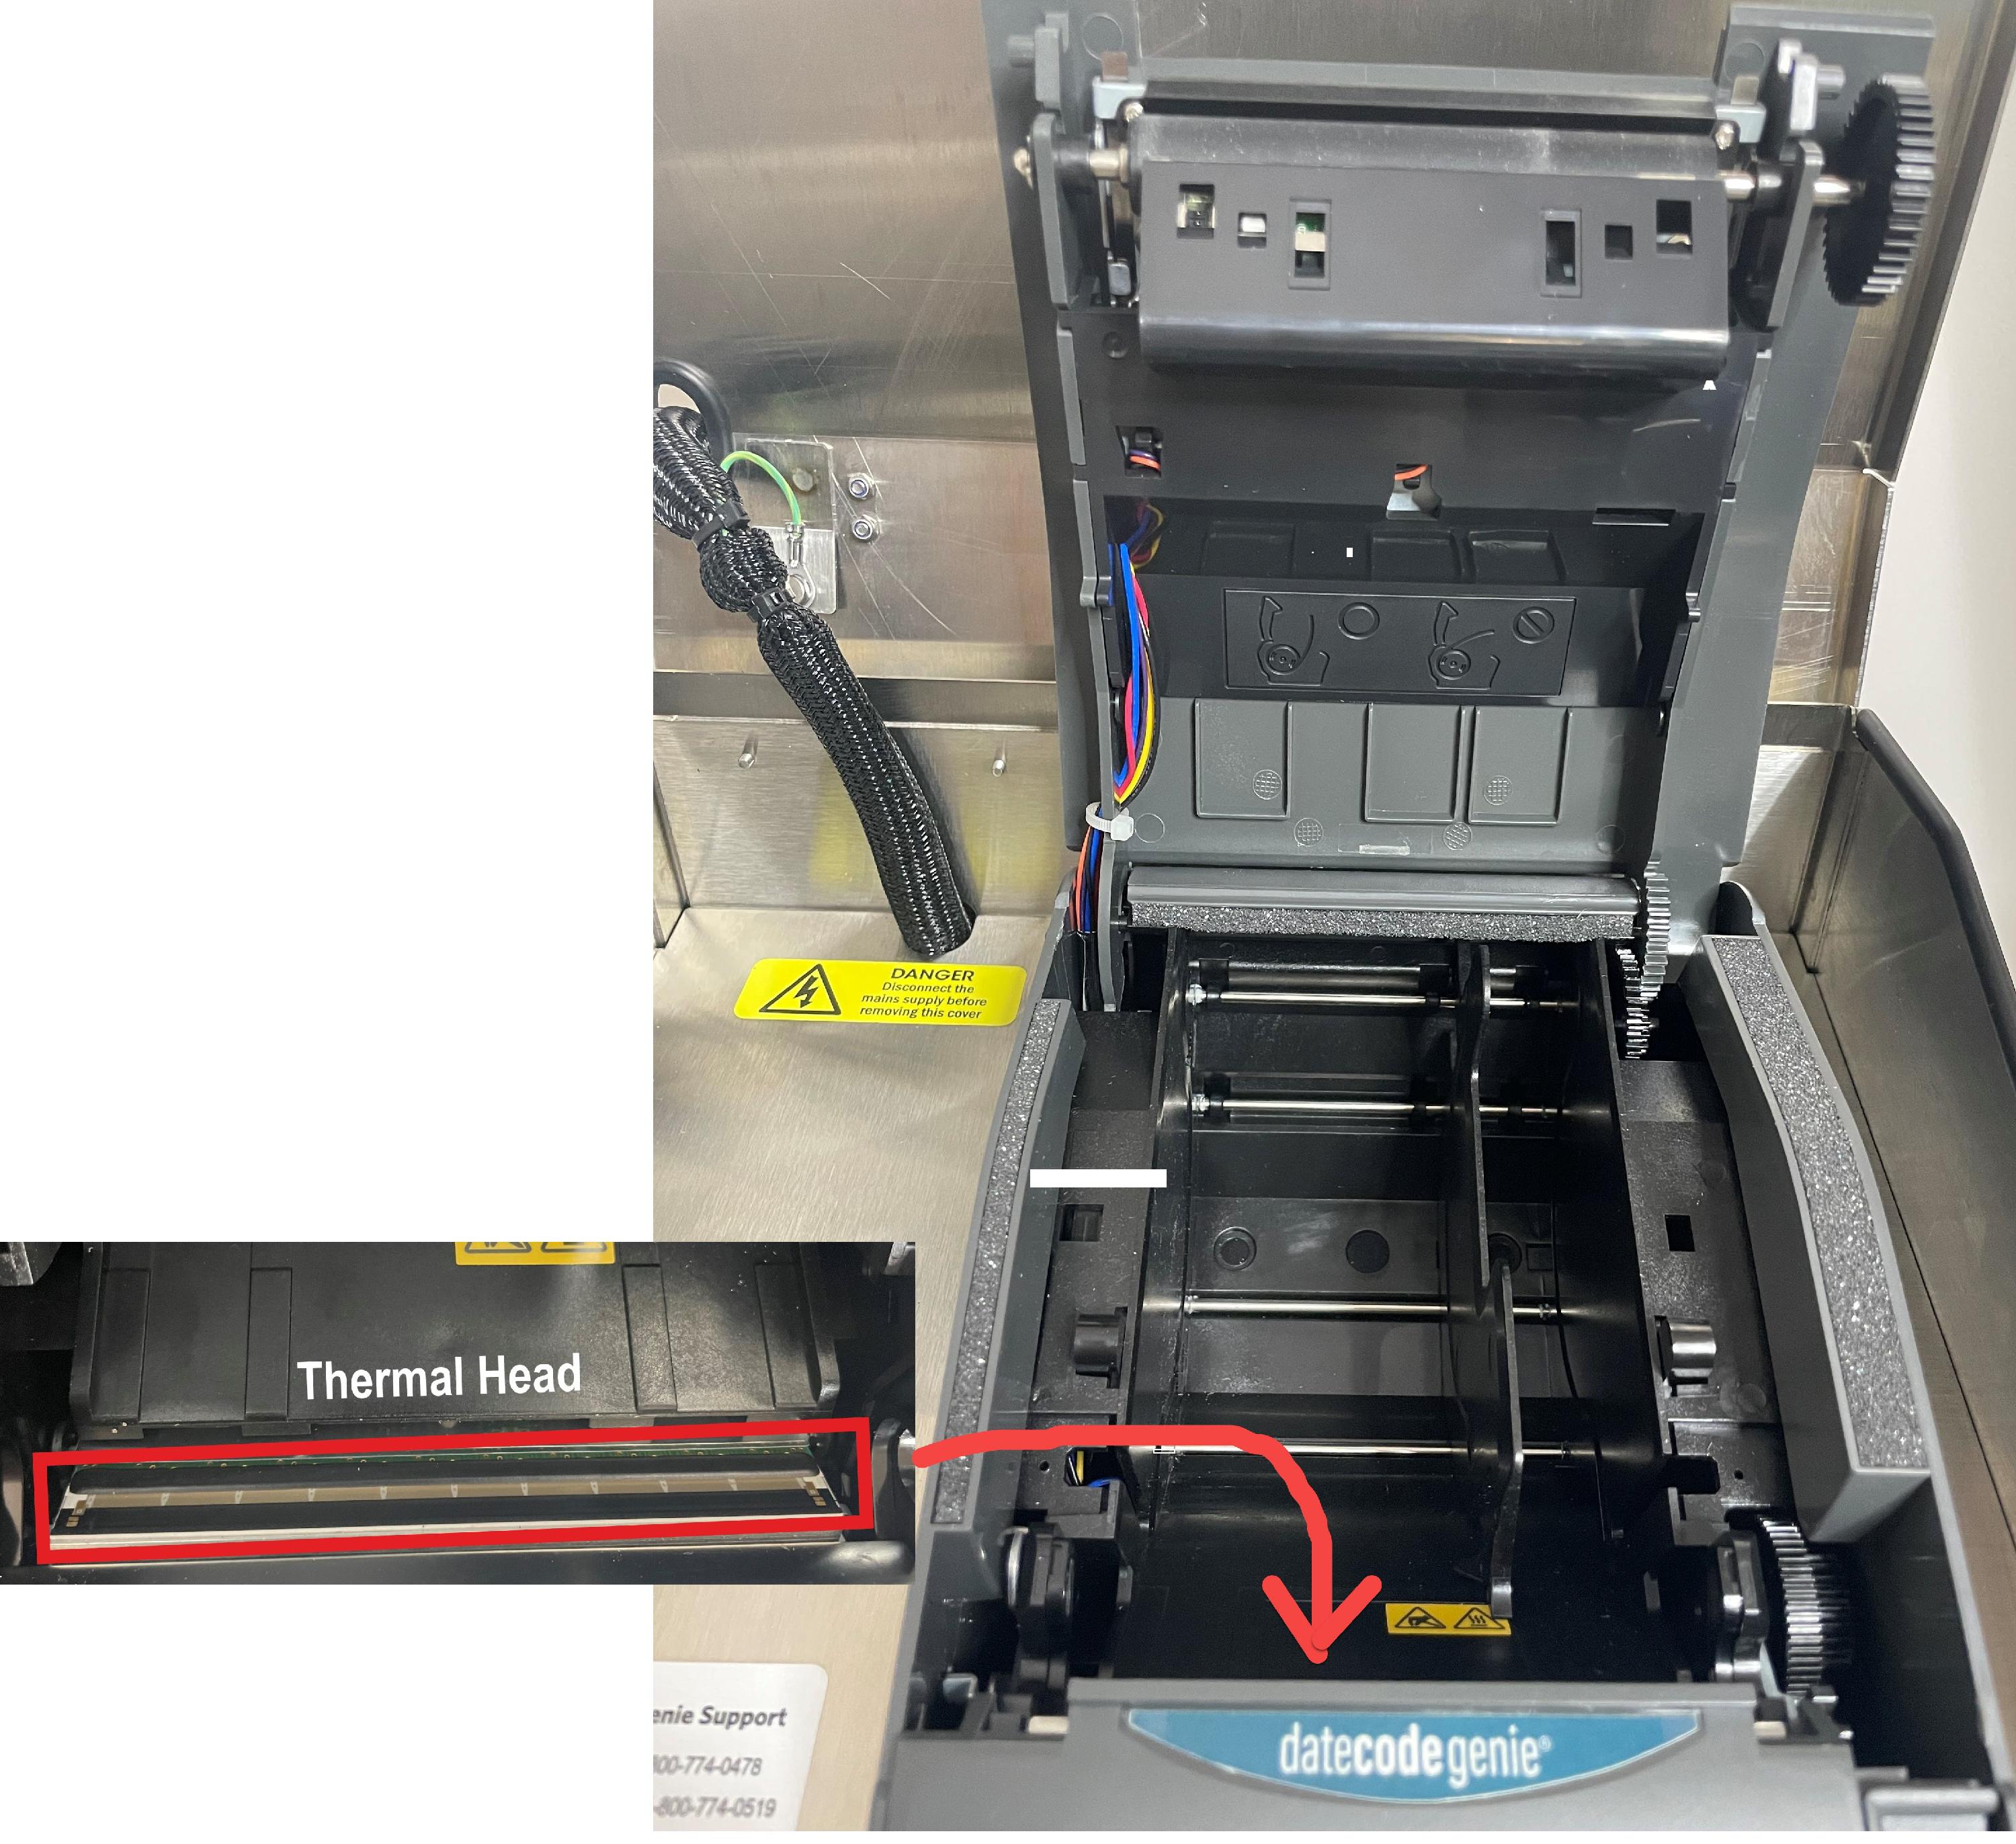
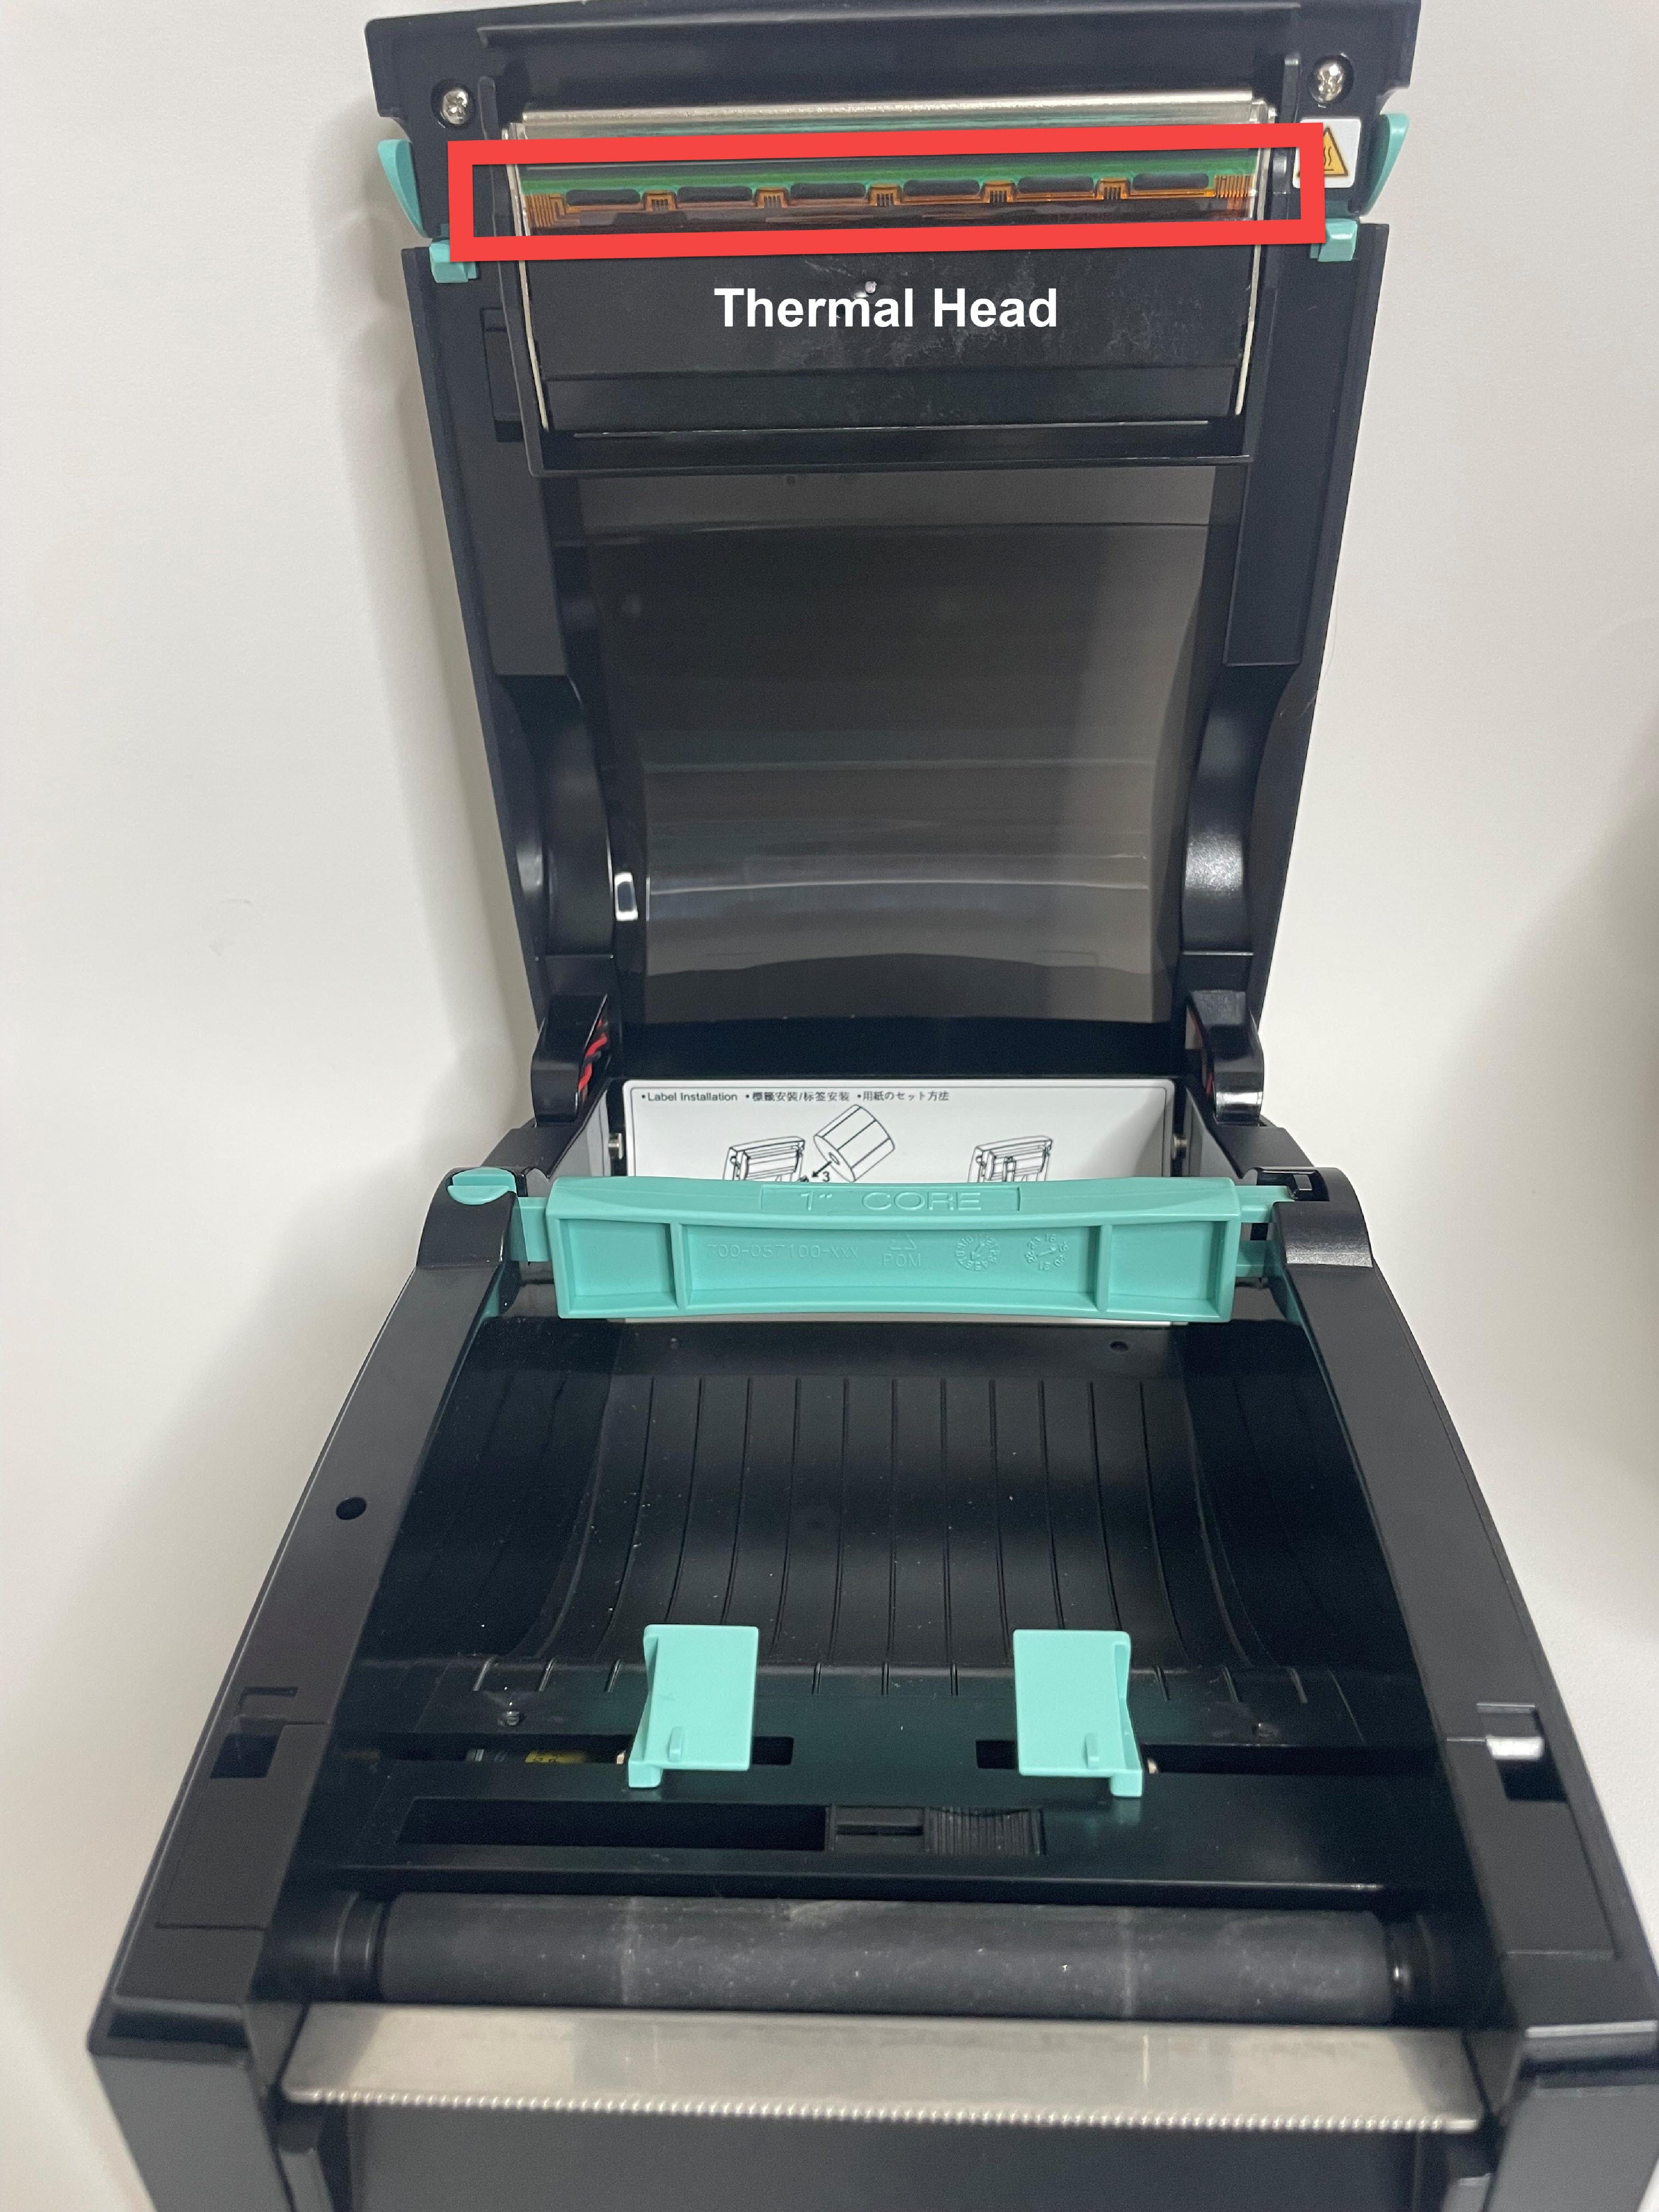
- Gebruik een wattenstaafje en een zachte doek, licht bevochtigd met isopropylalcohol, en veeg af of gebruik plakband om lichtjes op de roller en de thermische kop te drukken om eventuele resten te verwijderen.
| 2.0 en Fit-model | X-model | Lite-model |
|---|---|---|
 |
 |
 |
- Herhaal dit totdat het wattenstaafje en de zachte doek wit blijven of het plakband alle resten heeft verwijderd.
- Laad de labelrol nadat de thermische kop volledig droog is en vrij van resten.
WAARSCHUWING
Het afdrukken van etiketten met een vochtige thermische kop zal de printer beschadigen.
5. Reinig de zwarte lijnsensor en de thermische kop van de printer en druk de labels opnieuw af.
Printerplaatsing en -onderhoud
Een juiste plaatsing, onderhoud en routinematige reiniging van uw DateCodeGenie®-printer is een eenvoudige en effectieve manier om uw printer te onderhouden.
Printeronderhoud
Plaatsing
- Alleen omgeving op kamertemperatuur
- Plaats het op een vlak, stabiel oppervlak of monteer het aan een veilige muur of plank, uit de buurt van trillingen, vocht en vloeistoffen van welke aard dan ook
Schoonmaak
Printer
Zorg voor een routinematige printerreiniging om papierstoringen, problemen met de afdrukkwaliteit en het verkeerd afsnijden van labels te voorkomen.
Schoonmaakbenodigdheden nodig
- Isopropylalcohol
- Wattenstaafjes, zachte kleding of plakband
- Ingeblikte lucht
WAARSCHUWINGEN
- Maak de printer nooit onmiddellijk na het afdrukken schoon. Wacht tot de printer is afgekoeld om schade aan de thermische kop te voorkomen.
- Voorkom krassen en stel de thermische kop niet bloot aan statische elektriciteit.
- Gebruik geen isopropylalcohol om het snijmes, het stationaire mes en de etiketrol schoon te maken, aangezien hierdoor de niet-klevende coating kan worden verwijderd. Gebruik plakband om deze onderdelen in de printer lichtjes aan te drukken.
- Verwijder de labelrol en eventueel vastzittende labels uit de printer.
- Spuit ingeblikte lucht om eventueel vuil uit de printeropening, inclusief de zwarte lijnsensor , te verwijderen.
OPMERKING
Houd de ingeblikte lucht niet schuin om te voorkomen dat er vloeistof in de printer wordt geblazen.
| mC-Label3 |
|---|
 |
3. Gebruik een wattenstaafje en een zachte doek, licht bevochtigd met isopropylalcohol, en veeg lichtjes over de roller en de thermische kop om eventuele resten te verwijderen.
4. Een ander reinigingsmiddel dat u kunt gebruiken is plakband, waarmee u lichtjes op de rol en de thermische kop drukt om eventuele resten te verwijderen.
| mC-Label3 |
|---|
 |
5. Herhaal dit totdat het wattenstaafje en de zachte doek wit blijven of de plakband alle resten heeft verwijderd.
6. Laad de labelrol nadat de thermische kop volledig droog is en vrij van resten.
WAARSCHUWING
Het afdrukken van etiketten met een vochtige thermische kop zal de printer beschadigen.
3. Controleer of de labels DateCodeGenie®-labels zijn en voldoen aan de labelvereisten.
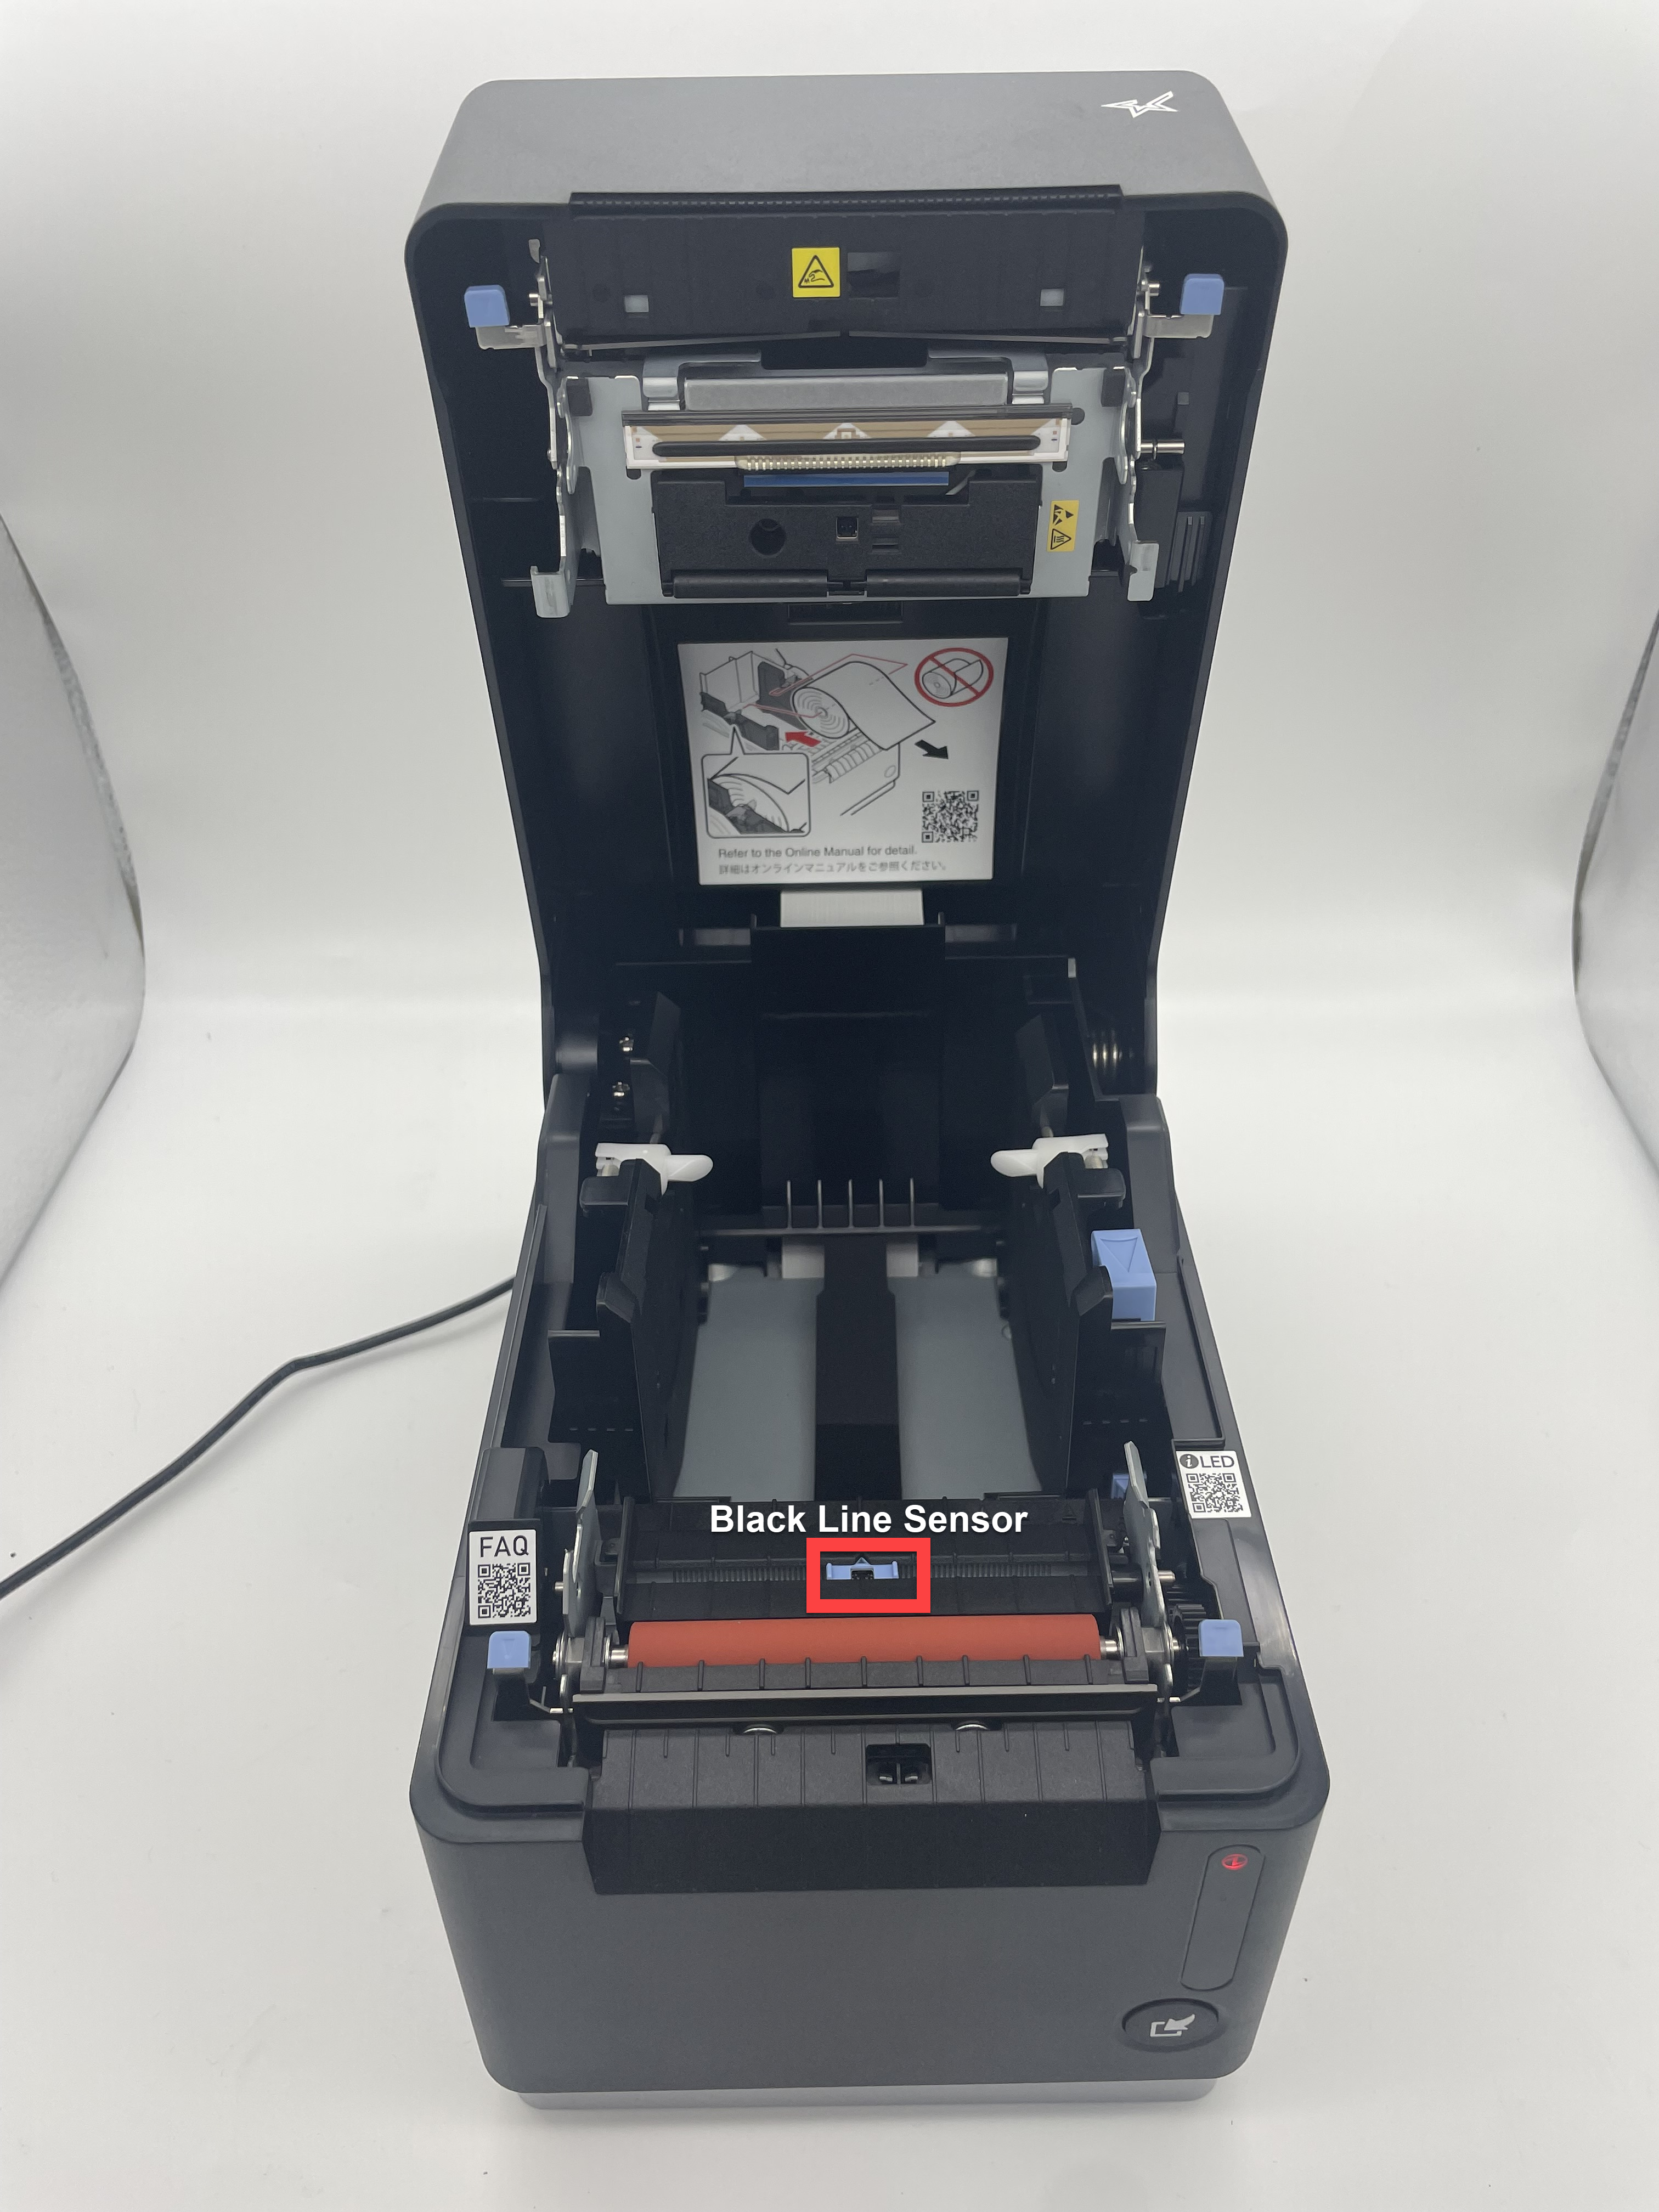
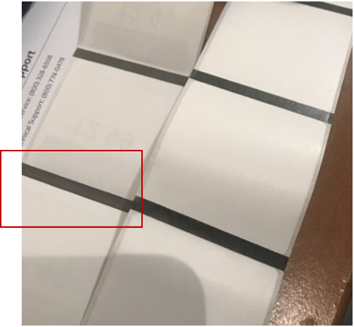
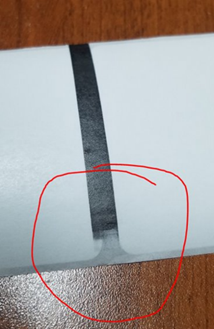
Zwarte lijnen op DateCodeGenie®-labels
DateCodeGenie®-labels maken gebruik van zwarte lijntechnologie om aan te geven waar een label moet worden afgedrukt en gesneden.
De zwarte lijnen moeten de juiste kleurdichtheid, lijndikte, lijnvoltooiing en tussenruimte hebben om correct te kunnen worden afgedrukt, zoals weergegeven.
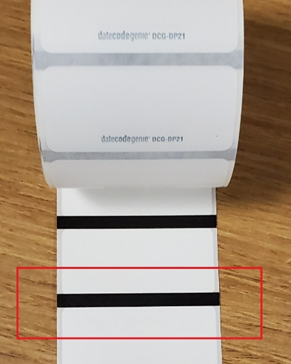
Onjuiste zwarte lijnen zijn onder andere:
Kleurdichtheid
Zwarte lijnen lijken vaag of grijs van kleur en hebben niet de juiste kleurdichtheid die de printer nodig heeft om correct te printen en te snijden.
Lijndikte
De zwarte lijn is te dun en voldoet niet aan de juiste lijndikte, zodat de printer correct kan printen en snijden.
Volledige lijn
De onvolledige zwarte lijn, bijvoorbeeld dat de lijn niet van rand tot rand loopt of ontbreekt op de achterkant van het etiket, is nodig om de printer correct te laten printen en snijden.
Onvolledig
Gedeeltelijke lijn
Vermist
Plaatsing van de opening
Er worden zwarte lijnen op de achterkant van de etiketten afgedrukt en deze voldoen aan de specificaties voor dichtheid, dikte en volledige lijn. Er wordt echter geen zwarte lijn afgedrukt tussen de tussenruimtes van de etiketten die de printer nodig heeft om correct te kunnen afdrukken en snijden.
Bevestig dat uw labelrol een onjuiste zwarte lijn heeft en stuur vervolgens een e-mail naar reparaties, zie Contact & Support . Vermeld de volgende informatie:
- Totaal aantal beïnvloede etikettenrollen
- Afbeelding van de voor- en achterkant van de etiketten
- Bestelnummer, besteldatum en productcode voor onjuiste etikettenrollen
- Lotcode van het etiket, te vinden op de hoofdverpakking
- Uw naam en telefoonnummer
- Serienummer van het apparaat
Wij bevestigen of de zwarte lijnen onjuist zijn. Vervolgens kunnen we vervangende labels bestellen en binnen 1-5 werkdagen via de grond verzenden.
Indien gewenst kunnen vervangende labels met een 2nd Day Air-service worden verzonden binnen 1-2 werkdagen.
OPMERKINGEN
- Als etiketten voldoen aan de vereisten voor zwarte lijnen en niet correct worden afgedrukt, kunt u de printer kalibreren. Raadpleeg vervolgens Problemen met het apparaat oplossen voor meer oplossingen.
- Als er een zichtbare streep aan de linkerkant van een doorzichtig etiket zit, is dit noodzakelijk, zie Streep op doorzichtige etiketten
2. Controleer of het juiste labelformaat in de printer is geladen en dat overeenkomt met het printerprofiel dat probeert af te drukken. Herdruk.
Laad etiketten in de mC-Label3-printer
Laad labels in een mC-Label3-printer.
Stappen:
1. Druk op de hendel aan de rechterkant van de printer om het deksel te openen.
2. Druk op de blauwe hendel en plaats de labelrol met de voorkant naar boven tussen de geleiders om de breedte van de labelrol aan te passen.

3. Duw de labelrol voorzichtig in de geleiders, zodat de assen aan elke kant van de labelrol op hun plaats klikken.
4. Trek de labels over de rand van de printer en sluit het printerdeksel. Etiketten worden automatisch doorgevoerd en afgesneden om te kalibreren, zodat ze klaar zijn om af te drukken.
2. Controleer of het juiste labelformaat in de printer is geladen en dat overeenkomt met het printerprofiel dat probeert af te drukken. Herdruk.
How to Load Labels in the X Model Device
Labels laden in een X-modelapparaat is eenvoudig. Volg de onderstaande stappen of bekijk de video voor hulp.
Stappen:
1. Controleer of het netsnoer is aangesloten op een werkend stopcontact en of de hoofdschakelaar aan de achterkant van het apparaat groen brandt.
2. Open het deksel van de behuizing, scheid de twee zwarte armen en plaats de etikettenrol in de printer. Rol de etikettenrol van bovenaf af, met de zwarte lijnen naar beneden.
3. Druk op het blauw/zwarte lipje om de hendel los te maken, trek de etiketten over de rand van de opening en sluit de hendel totdat deze vastklikt.
|
|
4. Labels worden automatisch doorgevoerd en gesneden om de printer te kalibreren. Herhaal dit voor de tweede printer (indien van toepassing).
5. Sluit de behuizing en begin met printen.
2. Controleer of het juiste labelformaat in de printer is geladen en dat overeenkomt met het printerprofiel dat probeert af te drukken. Herdruk.
How to Load Labels in the Lite Model Device
Labels laden in een Lite-modelapparaat is eenvoudig. Volg de onderstaande stappen of bekijk de video voor hulp.
Stappen:
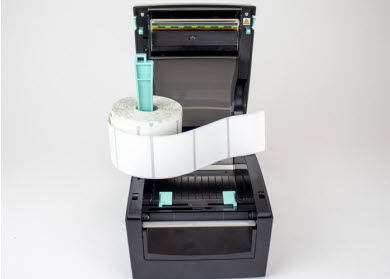
1. Trek voorzichtig aan de blauw/groene kernbalk vanaf de rechterkant en trek deze recht omhoog. Schuif de zwarte lijnsensor helemaal naar rechts van de opening
2. Schuif de labelrol op de kernbalk met de labels naar voren gericht en afrollend van links. Klik de kernbalk dicht.
3. Voer labels door de blauwe/groene geleiders en trek ze over de rand van de printer. Pas de geleiders aan de breedte van het label aan en klik het deksel van de printer dicht.
4. Druk op de gele feed-knop, indien nodig, om uit te lijnen op de zwarte lijn. Trek omlaag om het label te scheuren.
2. Controleer of het juiste labelformaat in de printer is geladen en dat overeenkomt met het printerprofiel dat probeert af te drukken. Herdruk.
How to Load Labels in the 2.0 and Fit Model Devices
Model 2.0 is niet meer leverbaar.
Labels laden in de 2.0- en Fit-modelapparaten.
Stappen:
1. Open het deksel als u een 2.0-apparaat gebruikt.
2. Druk op de ontgrendelingsknop van de printer om deze te openen.
3. Zoek de rolgeleider aan de rechterkant van de opening en til deze op om deze te verwijderen.
4. Neem de labelrol, rol deze af van onderen met de zwarte lijnen naar boven en plaats deze aan de linkerkant van de opening. Trek de labels over de rand van de printer.
5. Plaats de rolgeleider aan de rechterkant van de etikettenrol om deze op zijn plaats te houden.
6. Sluit het deksel van de printer. De etiketten worden automatisch doorgevoerd en afgesneden om te kalibreren.
7. Sluit het deksel. De printer is klaar om te printen.
2. Controleer of het juiste labelformaat in de printer is geladen en dat overeenkomt met het printerprofiel dat probeert af te drukken. Herdruk.
Load Labels in the mC-Label3 Printer
Laad labels in een mC-Label3-printer.
Stappen:
1. Druk op de hendel aan de rechterkant van de printer om het deksel te openen.
2. Druk op de blauwe hendel en plaats de labelrol met de voorkant naar boven tussen de geleiders om de breedte van de labelrol aan te passen.
3. Duw de labelrol voorzichtig in de geleiders, zodat de assen aan elke kant van de labelrol op hun plaats klikken.
4. Trek de labels over de rand van de printer en sluit het printerdeksel. Etiketten worden automatisch doorgevoerd en afgesneden om te kalibreren, zodat ze klaar zijn om af te drukken.
3. Controleer of de labels DateCodeGenie®-labels zijn en voldoen aan de labelvereisten.
DateCodeGenie® Labels
DateCodeGenie-labels worden speciaal voor DateCodeGenie-apparaten geproduceerd. Labels zijn verkrijgbaar in verschillende vormen, maten en kleefstoffen met behulp van black line-technologie om te printen en te snijden.
Thermisch printen
DateCodeGenie printers gebruiken thermisch printen om tekst en afbeeldingen in zwart over te brengen op labels in plaats van inkt. Er is geen inkt of inktpatronen nodig voor DateCodeGenie apparaten.
Black Line-technologie
DateCodeGenie-labels gebruiken zwarte lijnen op de achterkant van de rol om correct te printen. Labels met onjuiste zwarte lijnen worden onjuist geprint. Zie voor referentie Black Line Issues on Labels .
Linerless-etiketten
DateCodeGenie linerless labels worden alleen gebruikt met de mC-Label3 printer. Ze elimineren het loslaten van de liner en verminderen afval door meer labels per rol te leveren, wat leidt tot minder rolwisselingen en minder noodzaak om verschillende labelformaten aan te schaffen of te wisselen.
Aankopen
Etiketten kunt u kopen op de website van de NCCO-winkel: https://store.ncco.com of via uw distributeur.
3. Controleer of de labels DateCodeGenie®-labels zijn en voldoen aan de labelvereisten.
DateCodeGenie® Label Print Quality Issues
Alle printers die in DateCodeGenie worden gebruikt, maken gebruik van direct-thermische technologie. Als de kwaliteit van een afgedrukt label onvoldoende of niet helder is, kan de kwaliteit van het label onjuist zijn.
- De kwaliteit van het afgedrukte etiket is onvoldoende
- Afgedrukte etiketten worden niet duidelijk afgedrukt
- Etiketten kunnen hun kleefkracht verliezen wanneer ze op een object worden geplaatst
- Het bedrukte etiket kan gedeeltelijk leeg zijn
Vervaagde etiketten
Als u oplosbare etiketten gebruikt, controleer dan of de houdbaarheidsdatum niet is verstreken.
Stappen:
1. Gebruik een nieuwe etikettenrol.
OPMERKING
Durapeel-, permanente en verwijderbare etiketten hebben een houdbaarheid van één jaar (1 jaar). Oplosbare etiketten hebben een houdbaarheid van zes maanden (6 maanden). Probeer indien mogelijk een niet-oplosbaar etiket.
2. Reinig de thermische kop van de DateCodeGenie-printer en verwijder alle vuil en resten. Zie Plaatsing en onderhoud van het apparaat .
De helft van het label is vervaagd of leeg
De afdruk op slechts de helft van een etiket is lichter, of slechts de helft van het etiket is bedrukt.
Als u een Lite model gebruikt, is een van de clips kapot. Het apparaat moet gerepareerd worden. Zie Contact & Support .
Verkeerd uitgelijnd afdrukken
Afdrukfouten veroorzaakt door een printerstoring. Etiketten kunnen echter ook een fout veroorzaken.
Stappen:
1. Probeer een nieuwe etikettenrol die van links naar rechts een volledig zwarte lijn heeft.
2. Maak een foto van de voor- en achterkant van de onjuiste labels en geef de onderstaande informatie door aan de technische ondersteuning:
- Jouw naam
- Serienummer van het apparaat
- Labelvoorraadcode, indien bekend
Niet uitgelijnde kleurcode
De zwarte balk bedekt de dagbalken niet volledig.
Stappen:
1. Controleer al uw etikettenrollen om na te gaan hoeveel rollen het betreft.
2. Kies een rol met volledig zwarte lijnen, niet vervaagd of te dun.
3. Plaats de kaart in uw printer en druk opnieuw af.
4. Maak een foto van de voor- en achterkant van de onjuiste labels en geef de onderstaande informatie door aan de technische ondersteuning:
- Jouw naam
- Serienummer van het apparaat
- Bestelde productcode van het etiket
- Datum en bestelnummer voor etiketten
Ontbrekende afdruk
Drukfouten veroorzaakt door enkele fouten.
Stappen:
1. Controleer of de thermische kop van de printer niet bedekt is:
- Zo ja, lees dan dit artikel over het reinigen van de thermische kop van uw printer. Zie Plaatsing en onderhoud van het apparaat .
- Als dat niet het geval is, probeer dan een nieuwe etikettenrol om te controleren of de etiketten niet defect zijn.
2. Voor etiketten waarop geen etiket is afgedrukt:
- Controleer of de etiketten correct in de printer zijn geplaatst
- Controleer of er geen vuil op de thermische kop van de printer zit
- Probeer een nieuwe etikettenrol om te controleren of de etiketten niet onjuist zijn
3. Controleer of de printer niet beschadigd is geraakt door de vloeistof.
OPMERKING
Controleer indien van toepassing de vloeistofdetectie-indicatoren (LDI) voor het specifieke apparaat dat wordt gebruikt. Zie Waar bevinden zich vloeistofdetectielabels?
4. Maak een foto van de voor- en achterkant van de onjuiste labels en geef de onderstaande informatie door aan de technische ondersteuning:
- Jouw naam
- Serienummer van het apparaat
- Labelvoorraadcode, indien bekend
Lijnen door label
Er lopen lege lijnen door het etiket.
|
Lege verticale lijnen over het hele label duiden op een defect aan de printkop. De printer moet worden vervangen. Neem contact op met het reparatiecentrum (zie Contact & Support) om de volgende stappen te bespreken.
|
Al uw afdrukken zijn zichtbaar maar vervaagd. Het reinigen van de thermische kop kan het probleem mogelijk verhelpen. De plaatsing van de thermische kop verschilt per apparaatmodel. Zie Plaatsing en onderhoud van het apparaat of printer. Zie Plaatsing en onderhoud van de printer.
|
3. Controleer of de labels DateCodeGenie®-labels zijn en voldoen aan de labelvereisten.
Faint Line on Label Front
Bij bepaalde label-SKU's kan er een vage lijn op de voorkant van het label staan, zoals hieronder weergegeven.
![]()
Behandel de oproep volgens de SKU zoals hieronder vermeld:
2x3 permanente labels (DCG-P23-4B)
SKU DCG-P23-4B wordt met een korting verkocht aan klanten die bij aankoop op de hoogte waren gesteld van het vervaagde lijndefect.
DCG-P23-4B wordt aangegeven door een zwarte scherpe lijn op de zijkant van de labelrol.
We zullen deze SKU niet terugbetalen, omdat deze als defect wordt verkocht.
2x2 oplosbare etiketten (DCG-D22)
Geef klanten een nieuwe rol als hun 2x2 oplosbare labels (SKU DCG-D22) een vage lijn op de voorkant hebben.
Zie Contact en ondersteuning voor aanvullende hulp
3. Controleer of de labels DateCodeGenie®-labels zijn en voldoen aan de labelvereisten.
Black Lines on DateCodeGenie® Labels
DateCodeGenie®-labels maken gebruik van zwarte lijntechnologie om aan te geven waar een label moet worden afgedrukt en gesneden.
De zwarte lijnen moeten de juiste kleurdichtheid, lijndikte, lijnvoltooiing en tussenruimte hebben om correct te kunnen worden afgedrukt, zoals weergegeven.
Onjuiste zwarte lijnen zijn onder andere:
Kleurdichtheid
Zwarte lijnen lijken vaag of grijs van kleur en hebben niet de juiste kleurdichtheid die de printer nodig heeft om correct te printen en te snijden.
Lijndikte
De zwarte lijn is te dun en voldoet niet aan de juiste lijndikte, zodat de printer correct kan printen en snijden.
Volledige lijn
De onvolledige zwarte lijn, bijvoorbeeld dat de lijn niet van rand tot rand loopt of ontbreekt op de achterkant van het etiket, is nodig om de printer correct te laten printen en snijden.
Onvolledig
Gedeeltelijke lijn
Vermist
Plaatsing van de opening
Er worden zwarte lijnen op de achterkant van de etiketten afgedrukt en deze voldoen aan de specificaties voor dichtheid, dikte en volledige lijn. Er wordt echter geen zwarte lijn afgedrukt tussen de tussenruimtes van de etiketten die de printer nodig heeft om correct te kunnen afdrukken en snijden.
Bevestig dat uw labelrol een onjuiste zwarte lijn heeft en stuur vervolgens een e-mail naar reparaties, zie Contact & Support . Vermeld de volgende informatie:
- Totaal aantal beïnvloede etikettenrollen
- Afbeelding van de voor- en achterkant van de etiketten
- Bestelnummer, besteldatum en productcode voor onjuiste etikettenrollen
- Lotcode van het etiket, te vinden op de hoofdverpakking
- Uw naam en telefoonnummer
- Serienummer van het apparaat
Wij bevestigen of de zwarte lijnen onjuist zijn. Vervolgens kunnen we vervangende labels bestellen en binnen 1-5 werkdagen via de grond verzenden.
Indien gewenst kunnen vervangende labels met een 2nd Day Air-service worden verzonden binnen 1-2 werkdagen.
OPMERKINGEN
- Als etiketten voldoen aan de vereisten voor zwarte lijnen en niet correct worden afgedrukt, kunt u de printer kalibreren. Raadpleeg vervolgens Problemen met het apparaat oplossen voor meer oplossingen.
- Als er een zichtbare streep aan de linkerkant van een doorzichtig etiket zit, is dit noodzakelijk, zie Streep op doorzichtige etiketten
4. Kalibreer de printer voor een DateCodeGenie® X- of Lite-model en druk de labels opnieuw af.
Printer Calibration (X Series)
Kalibreren van de DateCodeGenie® printer kan helpen als de printer labels niet correct snijdt of doorvoert. Dit artikel gaat over het kalibreren van de X Series (X2, X22, X23) printer.
Stappen:
1. Controleer of de labelrol is geladen met de labels naar boven en met de zwarte lijn naar beneden. Zie Labels laden in het X-modelapparaat voor meer informatie over het laden van labels.
2. Zoek de 2 rode of zwarte knoppen aan de rechterkant van elke printer, vlak bij de onderkant van de behuizing.
OPMERKING
Als u er zelf niet bij kunt, kunt u met een potlood voorzichtig op de knoppen op de printer aan de rechterkant drukken.
3. Houd de SELECT-knop en de BACK-knop ingedrukt totdat de labels verschijnen en laat de knop vervolgens los.
OPMERKING
Als labels continu worden doorgevoerd en niet stoppen, vervangt u deze door een nieuwe rol met een effen zwarte lijn op de achterkant. Voor meer informatie over correcte en incorrecte labels, zie DateCodeGenie® Labels .
4. Druk op de FEED-knop, de FRONT-knop. Labels gaan naar de zwarte lijn en worden gesneden.
OPMERKING
Herhaal deze stap als de printer niet op een zwarte lijn afdrukt.
5. Herhaal deze stappen voor elke printer.
Mislukte gevoeligheidsfouten: Mislukte gevoeligheidsfouten die optreden tijdens de printerkalibratie kunnen drie oorzaken hebben:
1. Ontbrekende of vervaagde lijnen op het etiket
Controleer of er een effen zwarte lijn op de achterkant van het label staat. Om onjuiste labels te zien, zie de grafiek in DateCodeGenie® Labels .
2. Vuil blokkeert de zwarte lijnsensor
Reinig de zwarte lijnsensor en thermische kop van de printer. Zie Plaatsing, onderhoud en reiniging van het apparaat .
4. Kalibreer de printer voor een DateCodeGenie® X- of Lite-model en druk de labels opnieuw af.
Printer Calibration (Lite)
Als labels niet correct worden afgedrukt, doorgevoerd of gesneden, zal het kalibreren van de printer de zwarte lijn en scheur resetten voor correct afdrukken.
Er zijn opties om de printer te kalibreren:
Handmatige printerkalibratie
1. Open de printer door tegelijkertijd de twee blauw/groene ontgrendelingsknoppen van de printer in te drukken en deze omhoog te tillen.
2. Schuif de zwarte lijnsensor helemaal rechts van de opening.
3. Voer de labels door de blauw/groene geleiders en steken over de rand van de printer uit. Pas de geleiders aan de breedte van het etiket aan en klik het printerdeksel dicht.
OPMERKING
Etiketten laden? Zie Labels laden in het Lite-modelapparaat .
4. Zet de aan/uit-schakelaar in de O-stand om de printer uit te zetten.
5. Houd de gele voedingsknop met één hand ingedrukt terwijl u met de andere hand de stroom weer inschakelt. Laat de voedingsknop los wanneer u de pieptonen hoort en het rode lampje knippert. Er worden zelftestlabels afgedrukt.
6. Druk nogmaals op de doorvoerknop om de labels door te voeren naar de zwarte lijn en trek ze naar beneden om ze te scheuren.
App-printerkalibratie
1. Log indien nodig in op de app met uw gebruikersnaam en wachtwoord.
2. Tik op de navigatieknop (pictogram met drie lijnen) in de linkerbovenhoek.
3. Tik op Instellingen in het menu.
4. Tik op Printerinstellingen.
5. Voeg labeltype toe als er geen wordt vermeld.
OPMERKING
Een onjuist labeltype zal ertoe leiden dat de printer niet correct kalibreert.
6. Tik op Printer kalibreren.
OPMERKING
De status moet "Gereed" zijn om labels af te drukken. Als u problemen ondervindt met de printerverbinding, raadpleegt u Probleem met printerverbinding (fout 300x1) voor Lite-apparaat .
7. Er wordt een zelftestlabel afgedrukt.
5. Reinig de zwarte lijnsensor en de thermische kop van de printer en druk de labels opnieuw af.
Device Placement and Care
Een juiste plaatsing, onderhoud en routinematige reiniging van uw DateCodeGenie®-apparaat is een eenvoudige en effectieve manier om uw apparaat te onderhouden.
Apparaatonderhoud
Plaatsing
- Alleen omgeving op kamertemperatuur
- Plaats het op een vlakke, stabiele ondergrond of bevestig het aan een veilige muur of plank, uit de buurt van trillingen, vocht en vloeistoffen van welke aard dan ook
Onderhoud
Alle modellen
- Het apparaat kan aangesloten blijven op de voeding terwijl de tablet is ingeschakeld om de batterijlading te behouden
- Zorg ervoor dat op bepaalde modellen rubberen voetjes zijn bevestigd om het apparaat op zijn plaats te houden
2.0-model
- Zorg ervoor dat de vloeistofbeschermingsafdichting (zwarte rubberen flap) op zijn plaats zit op het 2.0-modelapparaat om te beschermen tegen vocht en vloeistof
Passend model
- Zorg ervoor dat de spatafdekking op zijn plaats zit op het Fit-modelapparaat om te beschermen tegen vocht en vloeistof
Lite-model
- Zorg ervoor dat de siliconen hoes van de tablet op zijn plaats zit op de Lite-tablet om te beschermen tegen onbedoelde schade
Schoonmaak
Roestvrij stalen behuizing
Schoonmaakbenodigdheden nodig
- Pluisvrije doek of microvezeldoek
- Schuimende ontvetter
- Veeg het roestvrij staal af met een pluisvrije doek of microvezeldoek.
WAARSCHUWING
- Gebruik nooit schuursponsjes, dit veroorzaakt krassen en verkleuringen.
- Zorg ervoor dat de tablet is uitgeschakeld en dat de stekker van het apparaat is losgekoppeld
het stopcontact voordat u met schoonmaken begint.
- Voor een diepere reiniging brengt u een kleine hoeveelheid schuimende ontvetter rechtstreeks op het roestvrij staal aan en veegt u het onmiddellijk af.
OPMERKING
Veeg overtollige spray onmiddellijk van de tablet.
Tablet
Schoonmaakbenodigdheden nodig
- Pluisvrije doek of microvezeldoek
- Glasreiniger op alcoholbasis
- Spuit een zachte, pluisvrije doek in met een glasreiniger op alcoholbasis en veeg het touchscreen voorzichtig schoon.
WAARSCHUWING
Gebruik nooit een schuursponsje of spuit nooit rechtstreeks op het touchscreen, omdat dit het scherm kan beschadigen.
- Herhaal indien nodig.
Printer
Schoonmaakbenodigdheden nodig
- Isopropylalcohol
- Wattenstaafjes, zachte kleding of plakband
- Ingeblikte lucht
WAARSCHUWINGEN
- Maak de printer nooit onmiddellijk na het afdrukken schoon. Wacht tot de printer is afgekoeld om schade aan de thermische kop te voorkomen.
- Voorkom krassen en stel de thermische kop niet bloot aan statische elektriciteit.
- Verwijder de labelrol en eventueel vastzittende labels uit de printer.
- Spuit ingeblikte lucht om eventueel vuil uit de printeropening, inclusief de zwarte lijnsensoren , te verwijderen.
OPMERKING
Houd de ingeblikte lucht niet schuin om te voorkomen dat er vloeistof in de printer wordt geblazen.
| 2.0 en Fit-model | X-model | Lite-model |
|---|---|---|
|
|
|
- Gebruik een wattenstaafje en een zachte doek, licht bevochtigd met isopropylalcohol, en veeg af of gebruik plakband om lichtjes op de roller en de thermische kop te drukken om eventuele resten te verwijderen.
| 2.0 en Fit-model | X-model | Lite-model |
|---|---|---|
|
|
|
- Herhaal dit totdat het wattenstaafje en de zachte doek wit blijven of het plakband alle resten heeft verwijderd.
- Laad de labelrol nadat de thermische kop volledig droog is en vrij van resten.
WAARSCHUWING
Het afdrukken van etiketten met een vochtige thermische kop zal de printer beschadigen.
5. Reinig de zwarte lijnsensor en de thermische kop van de printer en druk de labels opnieuw af.
Printer Placement and Care
Een juiste plaatsing, onderhoud en routinematige reiniging van uw DateCodeGenie®-printer is een eenvoudige en effectieve manier om uw printer te onderhouden.
Printeronderhoud
Plaatsing
- Alleen omgeving op kamertemperatuur
- Plaats het op een vlak, stabiel oppervlak of monteer het aan een veilige muur of plank, uit de buurt van trillingen, vocht en vloeistoffen van welke aard dan ook
Schoonmaak
Printer
Zorg voor een routinematige printerreiniging om papierstoringen, problemen met de afdrukkwaliteit en het verkeerd afsnijden van labels te voorkomen.
Schoonmaakbenodigdheden nodig
- Isopropylalcohol
- Wattenstaafjes, zachte kleding of plakband
- Ingeblikte lucht
WAARSCHUWINGEN
- Maak de printer nooit onmiddellijk na het afdrukken schoon. Wacht tot de printer is afgekoeld om schade aan de thermische kop te voorkomen.
- Voorkom krassen en stel de thermische kop niet bloot aan statische elektriciteit.
- Gebruik geen isopropylalcohol om het snijmes, het stationaire mes en de etiketrol schoon te maken, aangezien hierdoor de niet-klevende coating kan worden verwijderd. Gebruik plakband om deze onderdelen in de printer lichtjes aan te drukken.
- Verwijder de labelrol en eventueel vastzittende labels uit de printer.
- Spuit ingeblikte lucht om eventueel vuil uit de printeropening, inclusief de zwarte lijnsensor , te verwijderen.
OPMERKING
Houd de ingeblikte lucht niet schuin om te voorkomen dat er vloeistof in de printer wordt geblazen.
| mC-Label3 |
|---|
|
3. Gebruik een wattenstaafje en een zachte doek, licht bevochtigd met isopropylalcohol, en veeg lichtjes over de roller en de thermische kop om eventuele resten te verwijderen.
4. Een ander reinigingsmiddel dat u kunt gebruiken is plakband, waarmee u lichtjes op de rol en de thermische kop drukt om eventuele resten te verwijderen.
| mC-Label3 |
|---|
|
5. Herhaal dit totdat het wattenstaafje en de zachte doek wit blijven of de plakband alle resten heeft verwijderd.
6. Laad de labelrol nadat de thermische kop volledig droog is en vrij van resten.
WAARSCHUWING
Het afdrukken van etiketten met een vochtige thermische kop zal de printer beschadigen.
3. Controleer of de labels DateCodeGenie®-labels zijn en voldoen aan de labelvereisten.
DateCodeGenie® Labels
DateCodeGenie-labels worden speciaal voor DateCodeGenie-apparaten geproduceerd. Labels zijn verkrijgbaar in verschillende vormen, maten en kleefstoffen met behulp van black line-technologie om te printen en te snijden.
Thermisch printen
DateCodeGenie printers gebruiken thermisch printen om tekst en afbeeldingen in zwart over te brengen op labels in plaats van inkt. Er is geen inkt of inktpatronen nodig voor DateCodeGenie apparaten.
Black Line-technologie
DateCodeGenie-labels gebruiken zwarte lijnen op de achterkant van de rol om correct te printen. Labels met onjuiste zwarte lijnen worden onjuist geprint. Zie voor referentie Black Line Issues on Labels .
Linerless-etiketten
DateCodeGenie linerless labels worden alleen gebruikt met de mC-Label3 printer. Ze elimineren het loslaten van de liner en verminderen afval door meer labels per rol te leveren, wat leidt tot minder rolwisselingen en minder noodzaak om verschillende labelformaten aan te schaffen of te wisselen.
Aankopen
Etiketten kunt u kopen op de website van de NCCO-winkel: https://store.ncco.com of via uw distributeur.
3. Controleer of de labels DateCodeGenie®-labels zijn en voldoen aan de labelvereisten.
DateCodeGenie Label Print Quality Issues
Alle printers die in DateCodeGenie worden gebruikt, maken gebruik van direct-thermische technologie. Als de kwaliteit van een afgedrukt label onvoldoende of niet helder is, kan de kwaliteit van het label onjuist zijn.
- De kwaliteit van het afgedrukte etiket is onvoldoende
- Afgedrukte etiketten worden niet duidelijk afgedrukt
- Etiketten kunnen hun kleefkracht verliezen wanneer ze op een object worden geplaatst
- Het bedrukte etiket kan gedeeltelijk leeg zijn
Vervaagde etiketten
Als u oplosbare etiketten gebruikt, controleer dan of de houdbaarheidsdatum niet is verstreken.
Stappen:
1. Gebruik een nieuwe etikettenrol.
OPMERKING
Durapeel-, permanente en verwijderbare etiketten hebben een houdbaarheid van één jaar (1 jaar). Oplosbare etiketten hebben een houdbaarheid van zes maanden (6 maanden). Probeer indien mogelijk een niet-oplosbaar etiket.
2. Reinig de thermische kop van de DateCodeGenie-printer en verwijder alle vuil en resten. Zie Plaatsing en onderhoud van het apparaat .
De helft van het label is vervaagd of leeg
De afdruk op slechts de helft van een etiket is lichter, of slechts de helft van het etiket is bedrukt.
Als u een Lite model gebruikt, is een van de clips kapot. Het apparaat moet gerepareerd worden. Zie Contact & Support .
Verkeerd uitgelijnd afdrukken
Afdrukfouten veroorzaakt door een printerstoring. Etiketten kunnen echter ook een fout veroorzaken.
Stappen:
1. Probeer een nieuwe etikettenrol die van links naar rechts een volledig zwarte lijn heeft.
2. Maak een foto van de voor- en achterkant van de onjuiste labels en geef de onderstaande informatie door aan de technische ondersteuning:
- Jouw naam
- Serienummer van het apparaat
- Labelvoorraadcode, indien bekend
Niet uitgelijnde kleurcode
De zwarte balk bedekt de dagbalken niet volledig.
Stappen:
1. Controleer al uw etikettenrollen om na te gaan hoeveel rollen het betreft.
2. Kies een rol met volledig zwarte lijnen, niet vervaagd of te dun.
3. Plaats de kaart in uw printer en druk opnieuw af.
4. Maak een foto van de voor- en achterkant van de onjuiste labels en geef de onderstaande informatie door aan de technische ondersteuning:
- Jouw naam
- Serienummer van het apparaat
- Bestelde productcode van het etiket
- Datum en bestelnummer voor etiketten
Ontbrekende afdruk
Drukfouten veroorzaakt door enkele fouten.
Stappen:
1. Controleer of de thermische kop van de printer niet bedekt is:
- Zo ja, lees dan dit artikel over het reinigen van de thermische kop van uw printer. Zie Plaatsing en onderhoud van het apparaat .
- Als dat niet het geval is, probeer dan een nieuwe etikettenrol om te controleren of de etiketten niet defect zijn.
2. Voor etiketten waarop geen etiket is afgedrukt:
- Controleer of de etiketten correct in de printer zijn geplaatst
- Controleer of er geen vuil op de thermische kop van de printer zit
- Probeer een nieuwe etikettenrol om te controleren of de etiketten niet onjuist zijn
3. Controleer of de printer niet beschadigd is geraakt door de vloeistof.
OPMERKING
Controleer indien van toepassing de vloeistofdetectie-indicatoren (LDI) voor het specifieke apparaat dat wordt gebruikt. Zie Waar bevinden zich vloeistofdetectielabels?
4. Maak een foto van de voor- en achterkant van de onjuiste labels en geef de onderstaande informatie door aan de technische ondersteuning:
- Jouw naam
- Serienummer van het apparaat
- Labelvoorraadcode, indien bekend
Lijnen door label
Er lopen lege lijnen door het etiket.
|
Lege verticale lijnen over het hele label duiden op een defect aan de printkop. De printer moet worden vervangen. Neem contact op met het reparatiecentrum (zie Contact & Support) om de volgende stappen te bespreken.
|
Al uw afdrukken zijn zichtbaar maar vervaagd. Het reinigen van de thermische kop kan het probleem mogelijk verhelpen. De plaatsing van de thermische kop verschilt per apparaatmodel. Zie Plaatsing en onderhoud van het apparaat of printer. Zie Plaatsing en onderhoud van de printer.
|
3. Controleer of de labels DateCodeGenie®-labels zijn en voldoen aan de labelvereisten.
Faint Line on Label Front
Bij bepaalde label-SKU's kan er een vage lijn op de voorkant van het label staan, zoals hieronder weergegeven.
![]()
Behandel de oproep volgens de SKU zoals hieronder vermeld:
2x3 permanente labels (DCG-P23-4B)
SKU DCG-P23-4B wordt met een korting verkocht aan klanten die bij aankoop op de hoogte waren gesteld van het vervaagde lijndefect.
DCG-P23-4B wordt aangegeven door een zwarte scherpe lijn op de zijkant van de labelrol.
We zullen deze SKU niet terugbetalen, omdat deze als defect wordt verkocht.
2x2 oplosbare etiketten (DCG-D22)
Geef klanten een nieuwe rol als hun 2x2 oplosbare labels (SKU DCG-D22) een vage lijn op de voorkant hebben.
Zie Contact en ondersteuning voor aanvullende hulp
3. Controleer of de labels DateCodeGenie®-labels zijn en voldoen aan de labelvereisten.
Black Lines on DateCodeGenie® Labels
DateCodeGenie®-labels maken gebruik van zwarte lijntechnologie om aan te geven waar een label moet worden afgedrukt en gesneden.
De zwarte lijnen moeten de juiste kleurdichtheid, lijndikte, lijnvoltooiing en tussenruimte hebben om correct te kunnen worden afgedrukt, zoals weergegeven.
Onjuiste zwarte lijnen zijn onder andere:
Kleurdichtheid
Zwarte lijnen lijken vaag of grijs van kleur en hebben niet de juiste kleurdichtheid die de printer nodig heeft om correct te printen en te snijden.
Lijndikte
De zwarte lijn is te dun en voldoet niet aan de juiste lijndikte, zodat de printer correct kan printen en snijden.
Volledige lijn
De onvolledige zwarte lijn, bijvoorbeeld dat de lijn niet van rand tot rand loopt of ontbreekt op de achterkant van het etiket, is nodig om de printer correct te laten printen en snijden.
Onvolledig
Gedeeltelijke lijn
Vermist
Plaatsing van de opening
Er worden zwarte lijnen op de achterkant van de etiketten afgedrukt en deze voldoen aan de specificaties voor dichtheid, dikte en volledige lijn. Er wordt echter geen zwarte lijn afgedrukt tussen de tussenruimtes van de etiketten die de printer nodig heeft om correct te kunnen afdrukken en snijden.
Bevestig dat uw labelrol een onjuiste zwarte lijn heeft en stuur vervolgens een e-mail naar reparaties, zie Contact & Support . Vermeld de volgende informatie:
- Totaal aantal beïnvloede etikettenrollen
- Afbeelding van de voor- en achterkant van de etiketten
- Bestelnummer, besteldatum en productcode voor onjuiste etikettenrollen
- Lotcode van het etiket, te vinden op de hoofdverpakking
- Uw naam en telefoonnummer
- Serienummer van het apparaat
Wij bevestigen of de zwarte lijnen onjuist zijn. Vervolgens kunnen we vervangende labels bestellen en binnen 1-5 werkdagen via de grond verzenden.
Indien gewenst kunnen vervangende labels met een 2nd Day Air-service worden verzonden binnen 1-2 werkdagen.
OPMERKINGEN
- Als etiketten voldoen aan de vereisten voor zwarte lijnen en niet correct worden afgedrukt, kunt u de printer kalibreren. Raadpleeg vervolgens Problemen met het apparaat oplossen voor meer oplossingen.
- Als er een zichtbare streep aan de linkerkant van een doorzichtig etiket zit, is dit noodzakelijk, zie Streep op doorzichtige etiketten
4. Kalibreer de printer voor een DateCodeGenie® X- of Lite-model en druk de labels opnieuw af.
Printer Calibration (X Series)
Kalibreren van de DateCodeGenie® printer kan helpen als de printer labels niet correct snijdt of doorvoert. Dit artikel gaat over het kalibreren van de X Series (X2, X22, X23) printer.
Stappen:
1. Controleer of de labelrol is geladen met de labels naar boven en met de zwarte lijn naar beneden. Zie Labels laden in het X-modelapparaat voor meer informatie over het laden van labels.
2. Zoek de 2 rode of zwarte knoppen aan de rechterkant van elke printer, vlak bij de onderkant van de behuizing.
OPMERKING
Als u er zelf niet bij kunt, kunt u met een potlood voorzichtig op de knoppen op de printer aan de rechterkant drukken.
3. Houd de SELECT-knop en de BACK-knop ingedrukt totdat de labels verschijnen en laat de knop vervolgens los.
OPMERKING
Als labels continu worden doorgevoerd en niet stoppen, vervangt u deze door een nieuwe rol met een effen zwarte lijn op de achterkant. Voor meer informatie over correcte en incorrecte labels, zie DateCodeGenie® Labels .
4. Druk op de FEED-knop, de FRONT-knop. Labels gaan naar de zwarte lijn en worden gesneden.
OPMERKING
Herhaal deze stap als de printer niet op een zwarte lijn afdrukt.
5. Herhaal deze stappen voor elke printer.
Mislukte gevoeligheidsfouten: Mislukte gevoeligheidsfouten die optreden tijdens de printerkalibratie kunnen drie oorzaken hebben:
1. Ontbrekende of vervaagde lijnen op het etiket
Controleer of er een effen zwarte lijn op de achterkant van het label staat. Om onjuiste labels te zien, zie de grafiek in DateCodeGenie® Labels .
2. Vuil blokkeert de zwarte lijnsensor
Reinig de zwarte lijnsensor en thermische kop van de printer. Zie Plaatsing, onderhoud en reiniging van het apparaat .
4. Kalibreer de printer voor een DateCodeGenie® X- of Lite-model en druk de labels opnieuw af.
Printer Calibration (Lite)
Als labels niet correct worden afgedrukt, doorgevoerd of gesneden, zal het kalibreren van de printer de zwarte lijn en scheur resetten voor correct afdrukken.
Er zijn opties om de printer te kalibreren:
Handmatige printerkalibratie
1. Open de printer door tegelijkertijd de twee blauw/groene ontgrendelingsknoppen van de printer in te drukken en deze omhoog te tillen.
2. Schuif de zwarte lijnsensor helemaal rechts van de opening.
3. Voer de labels door de blauw/groene geleiders en steken over de rand van de printer uit. Pas de geleiders aan de breedte van het etiket aan en klik het printerdeksel dicht.
OPMERKING
Etiketten laden? Zie Labels laden in het Lite-modelapparaat .
4. Zet de aan/uit-schakelaar in de O-stand om de printer uit te zetten.
5. Houd de gele voedingsknop met één hand ingedrukt terwijl u met de andere hand de stroom weer inschakelt. Laat de voedingsknop los wanneer u de pieptonen hoort en het rode lampje knippert. Er worden zelftestlabels afgedrukt.
6. Druk nogmaals op de doorvoerknop om de labels door te voeren naar de zwarte lijn en trek ze naar beneden om ze te scheuren.
App-printerkalibratie
1. Log indien nodig in op de app met uw gebruikersnaam en wachtwoord.
2. Tik op de navigatieknop (pictogram met drie lijnen) in de linkerbovenhoek.
3. Tik op Instellingen in het menu.
4. Tik op Printerinstellingen.
5. Voeg labeltype toe als er geen wordt vermeld.
OPMERKING
Een onjuist labeltype zal ertoe leiden dat de printer niet correct kalibreert.
6. Tik op Printer kalibreren.
OPMERKING
De status moet "Gereed" zijn om labels af te drukken. Als u problemen ondervindt met de printerverbinding, raadpleegt u Probleem met printerverbinding (fout 300x1) voor Lite-apparaat .
7. Er wordt een zelftestlabel afgedrukt.
5. Reinig de zwarte lijnsensor en de thermische kop van de printer en druk de labels opnieuw af.
Device Placement and Care
Een juiste plaatsing, onderhoud en routinematige reiniging van uw DateCodeGenie®-apparaat is een eenvoudige en effectieve manier om uw apparaat te onderhouden.
Apparaatonderhoud
Plaatsing
- Alleen omgeving op kamertemperatuur
- Plaats het op een vlakke, stabiele ondergrond of bevestig het aan een veilige muur of plank, uit de buurt van trillingen, vocht en vloeistoffen van welke aard dan ook
Onderhoud
Alle modellen
- Het apparaat kan aangesloten blijven op de voeding terwijl de tablet is ingeschakeld om de batterijlading te behouden
- Zorg ervoor dat op bepaalde modellen rubberen voetjes zijn bevestigd om het apparaat op zijn plaats te houden
2.0-model
- Zorg ervoor dat de vloeistofbeschermingsafdichting (zwarte rubberen flap) op zijn plaats zit op het 2.0-modelapparaat om te beschermen tegen vocht en vloeistof
Passend model
- Zorg ervoor dat de spatafdekking op zijn plaats zit op het Fit-modelapparaat om te beschermen tegen vocht en vloeistof
Lite-model
- Zorg ervoor dat de siliconen hoes van de tablet op zijn plaats zit op de Lite-tablet om te beschermen tegen onbedoelde schade
Schoonmaak
Roestvrij stalen behuizing
Schoonmaakbenodigdheden nodig
- Pluisvrije doek of microvezeldoek
- Schuimende ontvetter
- Veeg het roestvrij staal af met een pluisvrije doek of microvezeldoek.
WAARSCHUWING
- Gebruik nooit schuursponsjes, dit veroorzaakt krassen en verkleuringen.
- Zorg ervoor dat de tablet is uitgeschakeld en dat de stekker van het apparaat is losgekoppeld
het stopcontact voordat u met schoonmaken begint.
- Voor een diepere reiniging brengt u een kleine hoeveelheid schuimende ontvetter rechtstreeks op het roestvrij staal aan en veegt u het onmiddellijk af.
OPMERKING
Veeg overtollige spray onmiddellijk van de tablet.
Tablet
Schoonmaakbenodigdheden nodig
- Pluisvrije doek of microvezeldoek
- Glasreiniger op alcoholbasis
- Spuit een zachte, pluisvrije doek in met een glasreiniger op alcoholbasis en veeg het touchscreen voorzichtig schoon.
WAARSCHUWING
Gebruik nooit een schuursponsje of spuit nooit rechtstreeks op het touchscreen, omdat dit het scherm kan beschadigen.
- Herhaal indien nodig.
Printer
Schoonmaakbenodigdheden nodig
- Isopropylalcohol
- Wattenstaafjes, zachte kleding of plakband
- Ingeblikte lucht
WAARSCHUWINGEN
- Maak de printer nooit onmiddellijk na het afdrukken schoon. Wacht tot de printer is afgekoeld om schade aan de thermische kop te voorkomen.
- Voorkom krassen en stel de thermische kop niet bloot aan statische elektriciteit.
- Verwijder de labelrol en eventueel vastzittende labels uit de printer.
- Spuit ingeblikte lucht om eventueel vuil uit de printeropening, inclusief de zwarte lijnsensoren , te verwijderen.
OPMERKING
Houd de ingeblikte lucht niet schuin om te voorkomen dat er vloeistof in de printer wordt geblazen.
| 2.0 en Fit-model | X-model | Lite-model |
|---|---|---|
|
|
|
- Gebruik een wattenstaafje en een zachte doek, licht bevochtigd met isopropylalcohol, en veeg af of gebruik plakband om lichtjes op de roller en de thermische kop te drukken om eventuele resten te verwijderen.
| 2.0 en Fit-model | X-model | Lite-model |
|---|---|---|
|
|
|
- Herhaal dit totdat het wattenstaafje en de zachte doek wit blijven of het plakband alle resten heeft verwijderd.
- Laad de labelrol nadat de thermische kop volledig droog is en vrij van resten.
WAARSCHUWING
Het afdrukken van etiketten met een vochtige thermische kop zal de printer beschadigen.
5. Reinig de zwarte lijnsensor en de thermische kop van de printer en druk de labels opnieuw af.
Printer Placement and Care
Een juiste plaatsing, onderhoud en routinematige reiniging van uw DateCodeGenie®-printer is een eenvoudige en effectieve manier om uw printer te onderhouden.
Printeronderhoud
Plaatsing
- Alleen omgeving op kamertemperatuur
- Plaats het op een vlak, stabiel oppervlak of monteer het aan een veilige muur of plank, uit de buurt van trillingen, vocht en vloeistoffen van welke aard dan ook
Schoonmaak
Printer
Zorg voor een routinematige printerreiniging om papierstoringen, problemen met de afdrukkwaliteit en het verkeerd afsnijden van labels te voorkomen.
Schoonmaakbenodigdheden nodig
- Isopropylalcohol
- Wattenstaafjes, zachte kleding of plakband
- Ingeblikte lucht
WAARSCHUWINGEN
- Maak de printer nooit onmiddellijk na het afdrukken schoon. Wacht tot de printer is afgekoeld om schade aan de thermische kop te voorkomen.
- Voorkom krassen en stel de thermische kop niet bloot aan statische elektriciteit.
- Gebruik geen isopropylalcohol om het snijmes, het stationaire mes en de etiketrol schoon te maken, aangezien hierdoor de niet-klevende coating kan worden verwijderd. Gebruik plakband om deze onderdelen in de printer lichtjes aan te drukken.
- Verwijder de labelrol en eventueel vastzittende labels uit de printer.
- Spuit ingeblikte lucht om eventueel vuil uit de printeropening, inclusief de zwarte lijnsensor , te verwijderen.
OPMERKING
Houd de ingeblikte lucht niet schuin om te voorkomen dat er vloeistof in de printer wordt geblazen.
| mC-Label3 |
|---|
|
3. Gebruik een wattenstaafje en een zachte doek, licht bevochtigd met isopropylalcohol, en veeg lichtjes over de roller en de thermische kop om eventuele resten te verwijderen.
4. Een ander reinigingsmiddel dat u kunt gebruiken is plakband, waarmee u lichtjes op de rol en de thermische kop drukt om eventuele resten te verwijderen.
| mC-Label3 |
|---|
|
5. Herhaal dit totdat het wattenstaafje en de zachte doek wit blijven of de plakband alle resten heeft verwijderd.
6. Laad de labelrol nadat de thermische kop volledig droog is en vrij van resten.
WAARSCHUWING
Het afdrukken van etiketten met een vochtige thermische kop zal de printer beschadigen.
4. Kalibreer de printer voor een DateCodeGenie® X- of Lite-model en druk de labels opnieuw af.
Printer Calibration (X Series)
Kalibreren van de DateCodeGenie® printer kan helpen als de printer labels niet correct snijdt of doorvoert. Dit artikel gaat over het kalibreren van de X Series (X2, X22, X23) printer.
Stappen:
1. Controleer of de labelrol is geladen met de labels naar boven en met de zwarte lijn naar beneden. Zie Labels laden in het X-modelapparaat voor meer informatie over het laden van labels.
2. Zoek de 2 rode of zwarte knoppen aan de rechterkant van elke printer, vlak bij de onderkant van de behuizing.
OPMERKING
Als u er zelf niet bij kunt, kunt u met een potlood voorzichtig op de knoppen op de printer aan de rechterkant drukken.
3. Houd de SELECT-knop en de BACK-knop ingedrukt totdat de labels verschijnen en laat de knop vervolgens los.
OPMERKING
Als labels continu worden doorgevoerd en niet stoppen, vervangt u deze door een nieuwe rol met een effen zwarte lijn op de achterkant. Voor meer informatie over correcte en incorrecte labels, zie DateCodeGenie® Labels .
4. Druk op de FEED-knop, de FRONT-knop. Labels gaan naar de zwarte lijn en worden gesneden.
OPMERKING
Herhaal deze stap als de printer niet op een zwarte lijn afdrukt.
5. Herhaal deze stappen voor elke printer.
Mislukte gevoeligheidsfouten: Mislukte gevoeligheidsfouten die optreden tijdens de printerkalibratie kunnen drie oorzaken hebben:
1. Ontbrekende of vervaagde lijnen op het etiket
Controleer of er een effen zwarte lijn op de achterkant van het label staat. Om onjuiste labels te zien, zie de grafiek in DateCodeGenie® Labels .
2. Vuil blokkeert de zwarte lijnsensor
Reinig de zwarte lijnsensor en thermische kop van de printer. Zie Plaatsing, onderhoud en reiniging van het apparaat .
4. Kalibreer de printer voor een DateCodeGenie® X- of Lite-model en druk de labels opnieuw af.
Printer Calibration (Lite)
Als labels niet correct worden afgedrukt, doorgevoerd of gesneden, zal het kalibreren van de printer de zwarte lijn en scheur resetten voor correct afdrukken.
Er zijn opties om de printer te kalibreren:
Handmatige printerkalibratie
1. Open de printer door tegelijkertijd de twee blauw/groene ontgrendelingsknoppen van de printer in te drukken en deze omhoog te tillen.
2. Schuif de zwarte lijnsensor helemaal rechts van de opening.
3. Voer de labels door de blauw/groene geleiders en steken over de rand van de printer uit. Pas de geleiders aan de breedte van het etiket aan en klik het printerdeksel dicht.
OPMERKING
Etiketten laden? Zie Labels laden in het Lite-modelapparaat .
4. Zet de aan/uit-schakelaar in de O-stand om de printer uit te zetten.
5. Houd de gele voedingsknop met één hand ingedrukt terwijl u met de andere hand de stroom weer inschakelt. Laat de voedingsknop los wanneer u de pieptonen hoort en het rode lampje knippert. Er worden zelftestlabels afgedrukt.
6. Druk nogmaals op de doorvoerknop om de labels door te voeren naar de zwarte lijn en trek ze naar beneden om ze te scheuren.
App-printerkalibratie
1. Log indien nodig in op de app met uw gebruikersnaam en wachtwoord.
2. Tik op de navigatieknop (pictogram met drie lijnen) in de linkerbovenhoek.
3. Tik op Instellingen in het menu.
4. Tik op Printerinstellingen.
5. Voeg labeltype toe als er geen wordt vermeld.
OPMERKING
Een onjuist labeltype zal ertoe leiden dat de printer niet correct kalibreert.
6. Tik op Printer kalibreren.
OPMERKING
De status moet "Gereed" zijn om labels af te drukken. Als u problemen ondervindt met de printerverbinding, raadpleegt u Probleem met printerverbinding (fout 300x1) voor Lite-apparaat .
7. Er wordt een zelftestlabel afgedrukt.
5. Reinig de zwarte lijnsensor en de thermische kop van de printer en druk de labels opnieuw af.
Device Placement and Care
Een juiste plaatsing, onderhoud en routinematige reiniging van uw DateCodeGenie®-apparaat is een eenvoudige en effectieve manier om uw apparaat te onderhouden.
Apparaatonderhoud
Plaatsing
- Alleen omgeving op kamertemperatuur
- Plaats het op een vlakke, stabiele ondergrond of bevestig het aan een veilige muur of plank, uit de buurt van trillingen, vocht en vloeistoffen van welke aard dan ook
Onderhoud
Alle modellen
- Het apparaat kan aangesloten blijven op de voeding terwijl de tablet is ingeschakeld om de batterijlading te behouden
- Zorg ervoor dat op bepaalde modellen rubberen voetjes zijn bevestigd om het apparaat op zijn plaats te houden
2.0-model
- Zorg ervoor dat de vloeistofbeschermingsafdichting (zwarte rubberen flap) op zijn plaats zit op het 2.0-modelapparaat om te beschermen tegen vocht en vloeistof
Passend model
- Zorg ervoor dat de spatafdekking op zijn plaats zit op het Fit-modelapparaat om te beschermen tegen vocht en vloeistof
Lite-model
- Zorg ervoor dat de siliconen hoes van de tablet op zijn plaats zit op de Lite-tablet om te beschermen tegen onbedoelde schade
Schoonmaak
Roestvrij stalen behuizing
Schoonmaakbenodigdheden nodig
- Pluisvrije doek of microvezeldoek
- Schuimende ontvetter
- Veeg het roestvrij staal af met een pluisvrije doek of microvezeldoek.
WAARSCHUWING
- Gebruik nooit schuursponsjes, dit veroorzaakt krassen en verkleuringen.
- Zorg ervoor dat de tablet is uitgeschakeld en dat de stekker van het apparaat is losgekoppeld
het stopcontact voordat u met schoonmaken begint.
- Voor een diepere reiniging brengt u een kleine hoeveelheid schuimende ontvetter rechtstreeks op het roestvrij staal aan en veegt u het onmiddellijk af.
OPMERKING
Veeg overtollige spray onmiddellijk van de tablet.
Tablet
Schoonmaakbenodigdheden nodig
- Pluisvrije doek of microvezeldoek
- Glasreiniger op alcoholbasis
- Spuit een zachte, pluisvrije doek in met een glasreiniger op alcoholbasis en veeg het touchscreen voorzichtig schoon.
WAARSCHUWING
Gebruik nooit een schuursponsje of spuit nooit rechtstreeks op het touchscreen, omdat dit het scherm kan beschadigen.
- Herhaal indien nodig.
Printer
Schoonmaakbenodigdheden nodig
- Isopropylalcohol
- Wattenstaafjes, zachte kleding of plakband
- Ingeblikte lucht
WAARSCHUWINGEN
- Maak de printer nooit onmiddellijk na het afdrukken schoon. Wacht tot de printer is afgekoeld om schade aan de thermische kop te voorkomen.
- Voorkom krassen en stel de thermische kop niet bloot aan statische elektriciteit.
- Verwijder de labelrol en eventueel vastzittende labels uit de printer.
- Spuit ingeblikte lucht om eventueel vuil uit de printeropening, inclusief de zwarte lijnsensoren , te verwijderen.
OPMERKING
Houd de ingeblikte lucht niet schuin om te voorkomen dat er vloeistof in de printer wordt geblazen.
| 2.0 en Fit-model | X-model | Lite-model |
|---|---|---|
|
|
|
- Gebruik een wattenstaafje en een zachte doek, licht bevochtigd met isopropylalcohol, en veeg af of gebruik plakband om lichtjes op de roller en de thermische kop te drukken om eventuele resten te verwijderen.
| 2.0 en Fit-model | X-model | Lite-model |
|---|---|---|
|
|
|
- Herhaal dit totdat het wattenstaafje en de zachte doek wit blijven of het plakband alle resten heeft verwijderd.
- Laad de labelrol nadat de thermische kop volledig droog is en vrij van resten.
WAARSCHUWING
Het afdrukken van etiketten met een vochtige thermische kop zal de printer beschadigen.
5. Reinig de zwarte lijnsensor en de thermische kop van de printer en druk de labels opnieuw af.
Printer Placement and Care
Een juiste plaatsing, onderhoud en routinematige reiniging van uw DateCodeGenie®-printer is een eenvoudige en effectieve manier om uw printer te onderhouden.
Printeronderhoud
Plaatsing
- Alleen omgeving op kamertemperatuur
- Plaats het op een vlak, stabiel oppervlak of monteer het aan een veilige muur of plank, uit de buurt van trillingen, vocht en vloeistoffen van welke aard dan ook
Schoonmaak
Printer
Zorg voor een routinematige printerreiniging om papierstoringen, problemen met de afdrukkwaliteit en het verkeerd afsnijden van labels te voorkomen.
Schoonmaakbenodigdheden nodig
- Isopropylalcohol
- Wattenstaafjes, zachte kleding of plakband
- Ingeblikte lucht
WAARSCHUWINGEN
- Maak de printer nooit onmiddellijk na het afdrukken schoon. Wacht tot de printer is afgekoeld om schade aan de thermische kop te voorkomen.
- Voorkom krassen en stel de thermische kop niet bloot aan statische elektriciteit.
- Gebruik geen isopropylalcohol om het snijmes, het stationaire mes en de etiketrol schoon te maken, aangezien hierdoor de niet-klevende coating kan worden verwijderd. Gebruik plakband om deze onderdelen in de printer lichtjes aan te drukken.
- Verwijder de labelrol en eventueel vastzittende labels uit de printer.
- Spuit ingeblikte lucht om eventueel vuil uit de printeropening, inclusief de zwarte lijnsensor , te verwijderen.
OPMERKING
Houd de ingeblikte lucht niet schuin om te voorkomen dat er vloeistof in de printer wordt geblazen.
| mC-Label3 |
|---|
|
3. Gebruik een wattenstaafje en een zachte doek, licht bevochtigd met isopropylalcohol, en veeg lichtjes over de roller en de thermische kop om eventuele resten te verwijderen.
4. Een ander reinigingsmiddel dat u kunt gebruiken is plakband, waarmee u lichtjes op de rol en de thermische kop drukt om eventuele resten te verwijderen.
| mC-Label3 |
|---|
|
5. Herhaal dit totdat het wattenstaafje en de zachte doek wit blijven of de plakband alle resten heeft verwijderd.
6. Laad de labelrol nadat de thermische kop volledig droog is en vrij van resten.
WAARSCHUWING
Het afdrukken van etiketten met een vochtige thermische kop zal de printer beschadigen.
5. Reinig de zwarte lijnsensor en de thermische kop van de printer en druk de labels opnieuw af.
Device Placement and Care
Een juiste plaatsing, onderhoud en routinematige reiniging van uw DateCodeGenie®-apparaat is een eenvoudige en effectieve manier om uw apparaat te onderhouden.
Apparaatonderhoud
Plaatsing
- Alleen omgeving op kamertemperatuur
- Plaats het op een vlakke, stabiele ondergrond of bevestig het aan een veilige muur of plank, uit de buurt van trillingen, vocht en vloeistoffen van welke aard dan ook
Onderhoud
Alle modellen
- Het apparaat kan aangesloten blijven op de voeding terwijl de tablet is ingeschakeld om de batterijlading te behouden
- Zorg ervoor dat op bepaalde modellen rubberen voetjes zijn bevestigd om het apparaat op zijn plaats te houden
2.0-model
- Zorg ervoor dat de vloeistofbeschermingsafdichting (zwarte rubberen flap) op zijn plaats zit op het 2.0-modelapparaat om te beschermen tegen vocht en vloeistof
Passend model
- Zorg ervoor dat de spatafdekking op zijn plaats zit op het Fit-modelapparaat om te beschermen tegen vocht en vloeistof
Lite-model
- Zorg ervoor dat de siliconen hoes van de tablet op zijn plaats zit op de Lite-tablet om te beschermen tegen onbedoelde schade
Schoonmaak
Roestvrij stalen behuizing
Schoonmaakbenodigdheden nodig
- Pluisvrije doek of microvezeldoek
- Schuimende ontvetter
- Veeg het roestvrij staal af met een pluisvrije doek of microvezeldoek.
WAARSCHUWING
- Gebruik nooit schuursponsjes, dit veroorzaakt krassen en verkleuringen.
- Zorg ervoor dat de tablet is uitgeschakeld en dat de stekker van het apparaat is losgekoppeld
het stopcontact voordat u met schoonmaken begint.
- Voor een diepere reiniging brengt u een kleine hoeveelheid schuimende ontvetter rechtstreeks op het roestvrij staal aan en veegt u het onmiddellijk af.
OPMERKING
Veeg overtollige spray onmiddellijk van de tablet.
Tablet
Schoonmaakbenodigdheden nodig
- Pluisvrije doek of microvezeldoek
- Glasreiniger op alcoholbasis
- Spuit een zachte, pluisvrije doek in met een glasreiniger op alcoholbasis en veeg het touchscreen voorzichtig schoon.
WAARSCHUWING
Gebruik nooit een schuursponsje of spuit nooit rechtstreeks op het touchscreen, omdat dit het scherm kan beschadigen.
- Herhaal indien nodig.
Printer
Schoonmaakbenodigdheden nodig
- Isopropylalcohol
- Wattenstaafjes, zachte kleding of plakband
- Ingeblikte lucht
WAARSCHUWINGEN
- Maak de printer nooit onmiddellijk na het afdrukken schoon. Wacht tot de printer is afgekoeld om schade aan de thermische kop te voorkomen.
- Voorkom krassen en stel de thermische kop niet bloot aan statische elektriciteit.
- Verwijder de labelrol en eventueel vastzittende labels uit de printer.
- Spuit ingeblikte lucht om eventueel vuil uit de printeropening, inclusief de zwarte lijnsensoren , te verwijderen.
OPMERKING
Houd de ingeblikte lucht niet schuin om te voorkomen dat er vloeistof in de printer wordt geblazen.
| 2.0 en Fit-model | X-model | Lite-model |
|---|---|---|
|
|
|
- Gebruik een wattenstaafje en een zachte doek, licht bevochtigd met isopropylalcohol, en veeg af of gebruik plakband om lichtjes op de roller en de thermische kop te drukken om eventuele resten te verwijderen.
| 2.0 en Fit-model | X-model | Lite-model |
|---|---|---|
|
|
|
- Herhaal dit totdat het wattenstaafje en de zachte doek wit blijven of het plakband alle resten heeft verwijderd.
- Laad de labelrol nadat de thermische kop volledig droog is en vrij van resten.
WAARSCHUWING
Het afdrukken van etiketten met een vochtige thermische kop zal de printer beschadigen.
5. Reinig de zwarte lijnsensor en de thermische kop van de printer en druk de labels opnieuw af.
Printer Placement and Care
Een juiste plaatsing, onderhoud en routinematige reiniging van uw DateCodeGenie®-printer is een eenvoudige en effectieve manier om uw printer te onderhouden.
Printeronderhoud
Plaatsing
- Alleen omgeving op kamertemperatuur
- Plaats het op een vlak, stabiel oppervlak of monteer het aan een veilige muur of plank, uit de buurt van trillingen, vocht en vloeistoffen van welke aard dan ook
Schoonmaak
Printer
Zorg voor een routinematige printerreiniging om papierstoringen, problemen met de afdrukkwaliteit en het verkeerd afsnijden van labels te voorkomen.
Schoonmaakbenodigdheden nodig
- Isopropylalcohol
- Wattenstaafjes, zachte kleding of plakband
- Ingeblikte lucht
WAARSCHUWINGEN
- Maak de printer nooit onmiddellijk na het afdrukken schoon. Wacht tot de printer is afgekoeld om schade aan de thermische kop te voorkomen.
- Voorkom krassen en stel de thermische kop niet bloot aan statische elektriciteit.
- Gebruik geen isopropylalcohol om het snijmes, het stationaire mes en de etiketrol schoon te maken, aangezien hierdoor de niet-klevende coating kan worden verwijderd. Gebruik plakband om deze onderdelen in de printer lichtjes aan te drukken.
- Verwijder de labelrol en eventueel vastzittende labels uit de printer.
- Spuit ingeblikte lucht om eventueel vuil uit de printeropening, inclusief de zwarte lijnsensor , te verwijderen.
OPMERKING
Houd de ingeblikte lucht niet schuin om te voorkomen dat er vloeistof in de printer wordt geblazen.
| mC-Label3 |
|---|
|
3. Gebruik een wattenstaafje en een zachte doek, licht bevochtigd met isopropylalcohol, en veeg lichtjes over de roller en de thermische kop om eventuele resten te verwijderen.
4. Een ander reinigingsmiddel dat u kunt gebruiken is plakband, waarmee u lichtjes op de rol en de thermische kop drukt om eventuele resten te verwijderen.
| mC-Label3 |
|---|
|
5. Herhaal dit totdat het wattenstaafje en de zachte doek wit blijven of de plakband alle resten heeft verwijderd.
6. Laad de labelrol nadat de thermische kop volledig droog is en vrij van resten.
WAARSCHUWING
Het afdrukken van etiketten met een vochtige thermische kop zal de printer beschadigen.
