Labels Did Not Print Correctly
Table of Contents
Labels that preview on the app correctly but do not print correctly could be caused by an issue related to the app, printer profile, printer, or labels.
Incorrect printing may include:
- Print off center
- Print faded
- Skipping labels
- Printing over multiple labels
- Cutting label in wrong place, see Printer Calibration (X Series) or Printer Calibration (Lite)
Steps:
1. Download updates on the app of the device and then reprint labels.
How to Download Updates on the App
Downloading updates ensures the app has the most accurate data for printing and alerts you when a new version is available to download.
WARNING
Internet connection is required, see Connect Device to Wi-Fi or Connect Device to Ethernet.
NOTES
- Portal administrators and managers can allow staff the app permission to download updates, see Allowed to Download Updates Permission
- Time for downloading updates varies depending on internet speed, amount of data to update, and length of time from last download.
Last updated time is displayed on the app notification bar.
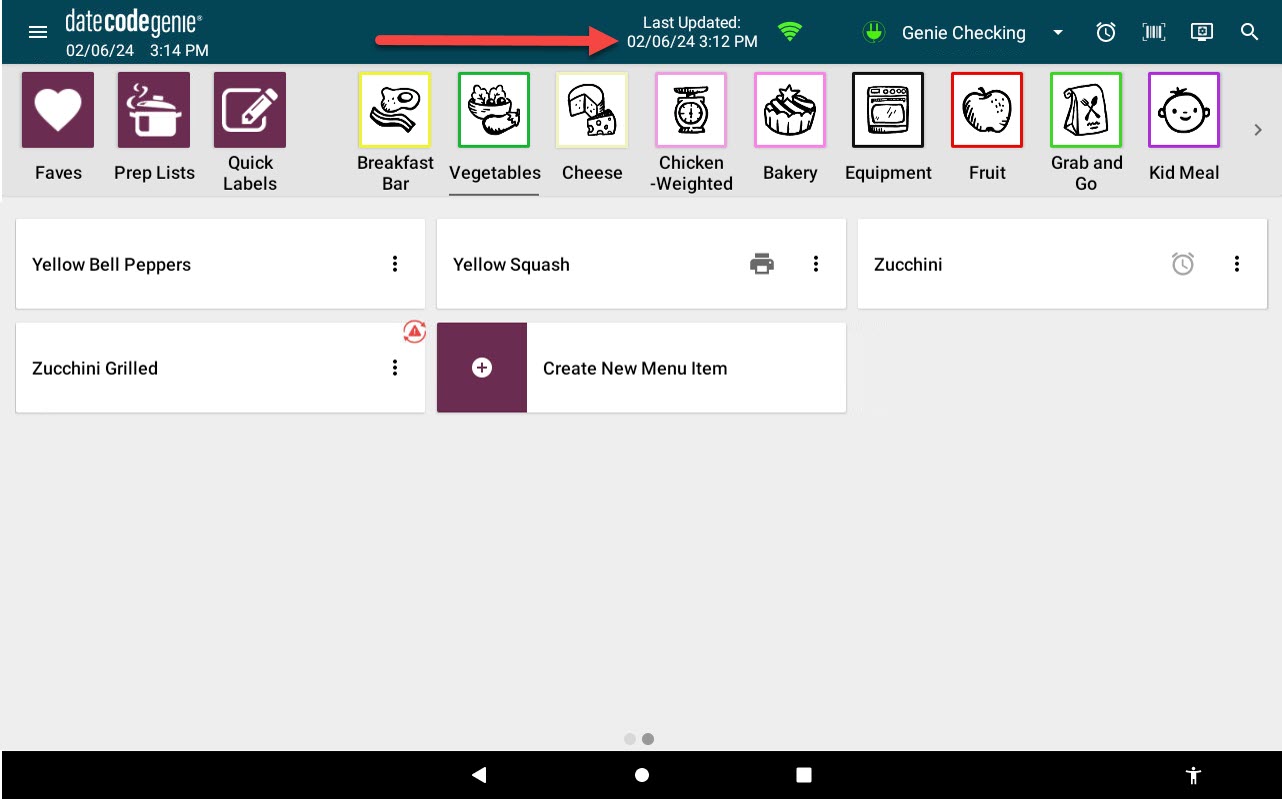
There are four ways to download updates:
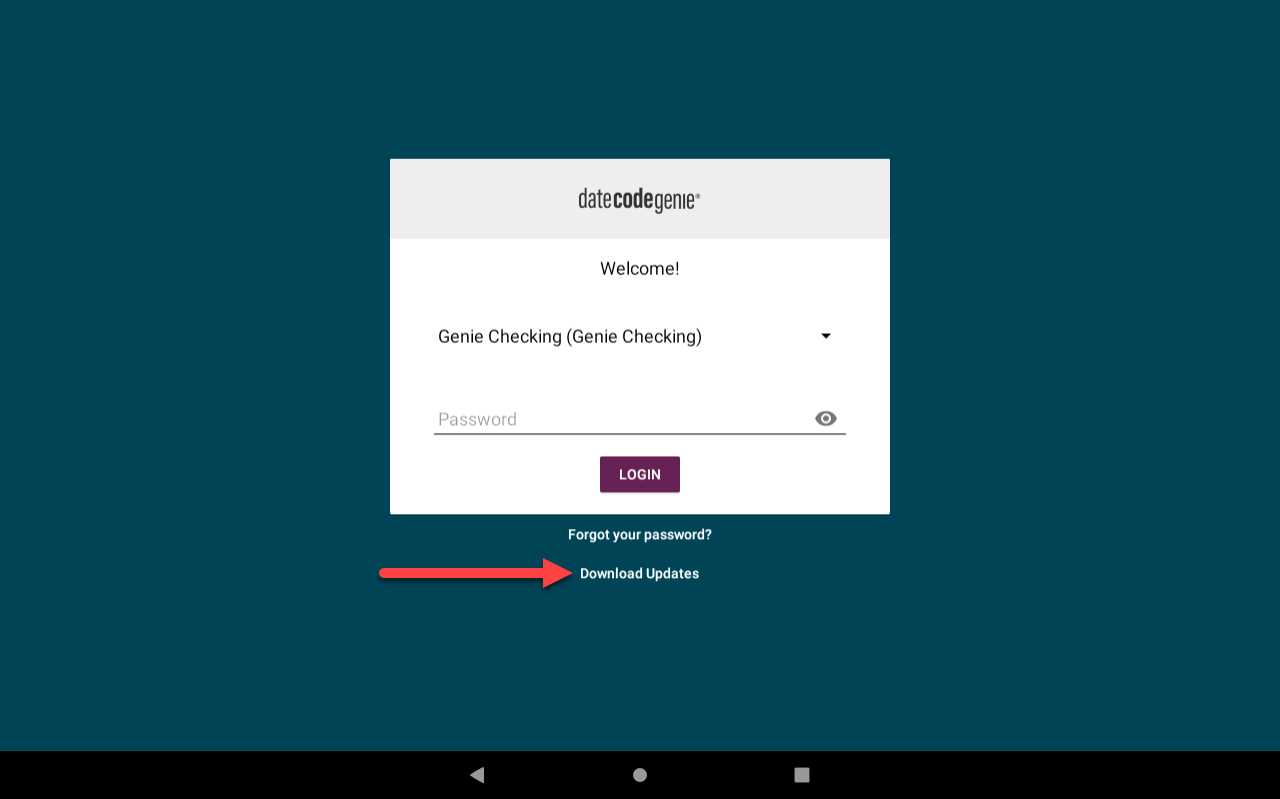
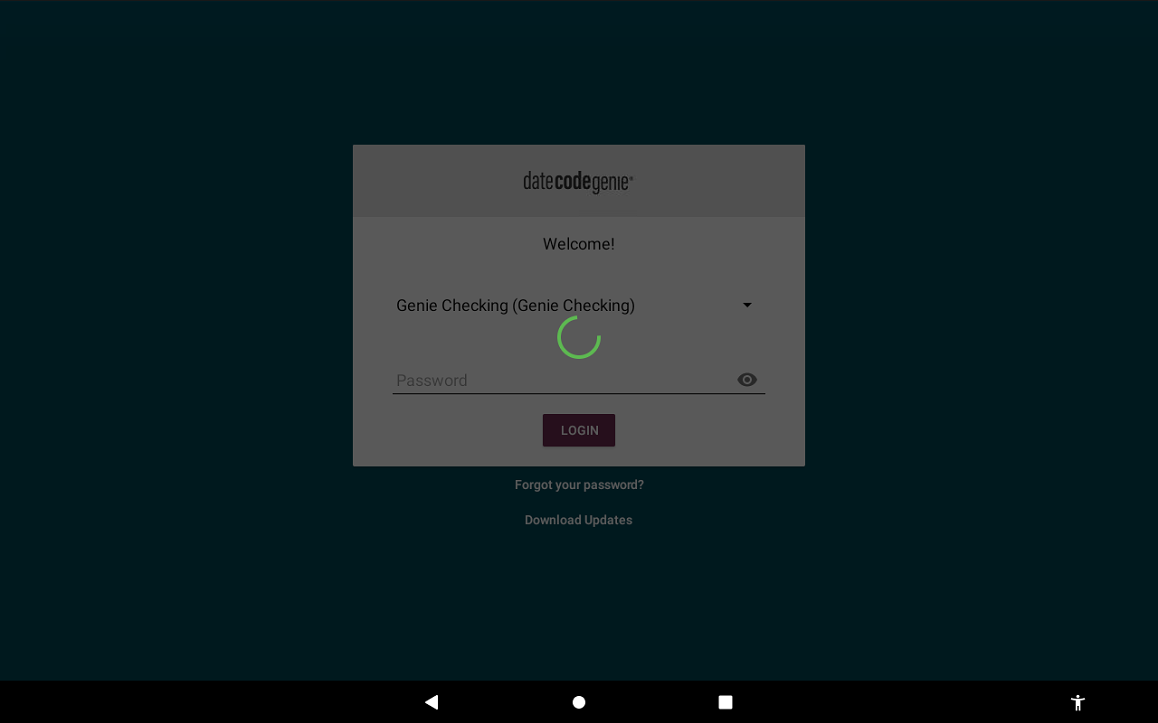
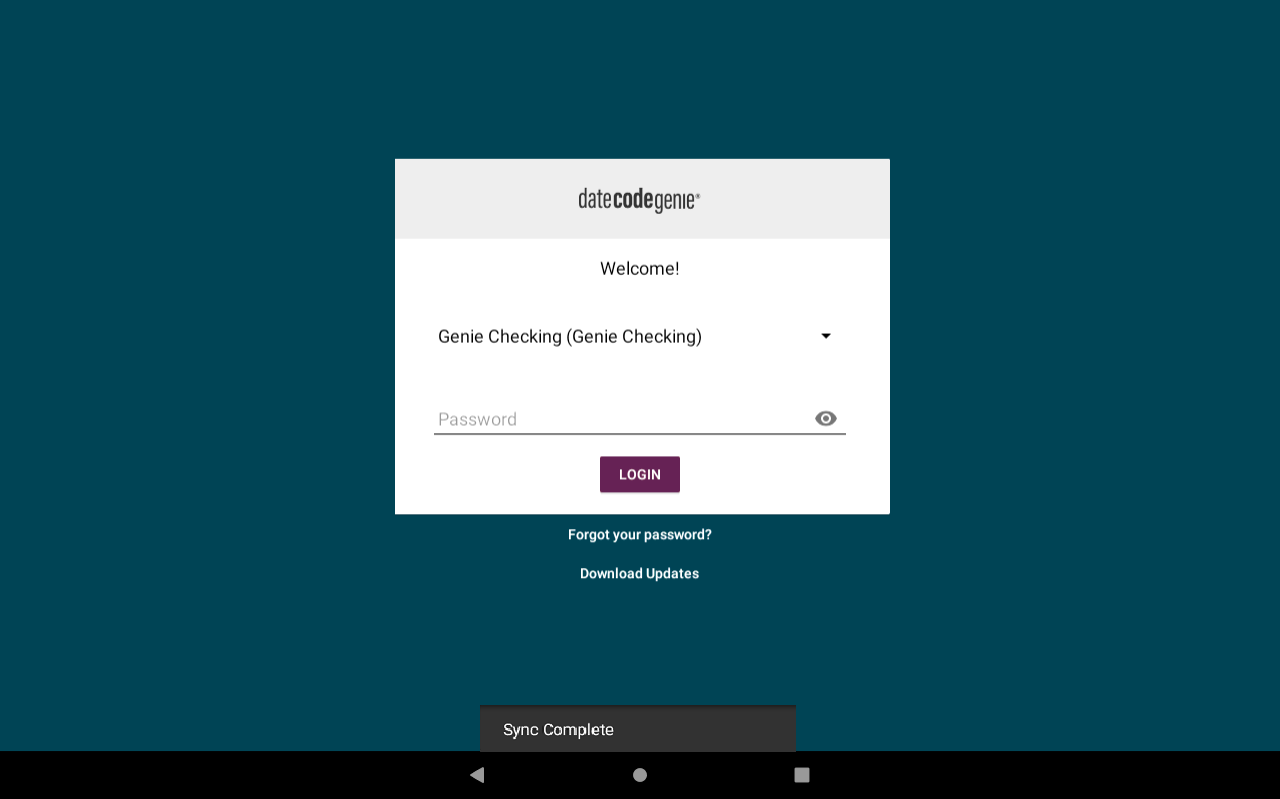
1. App Login Screen
1. Tap Download Updates on the app login screen.
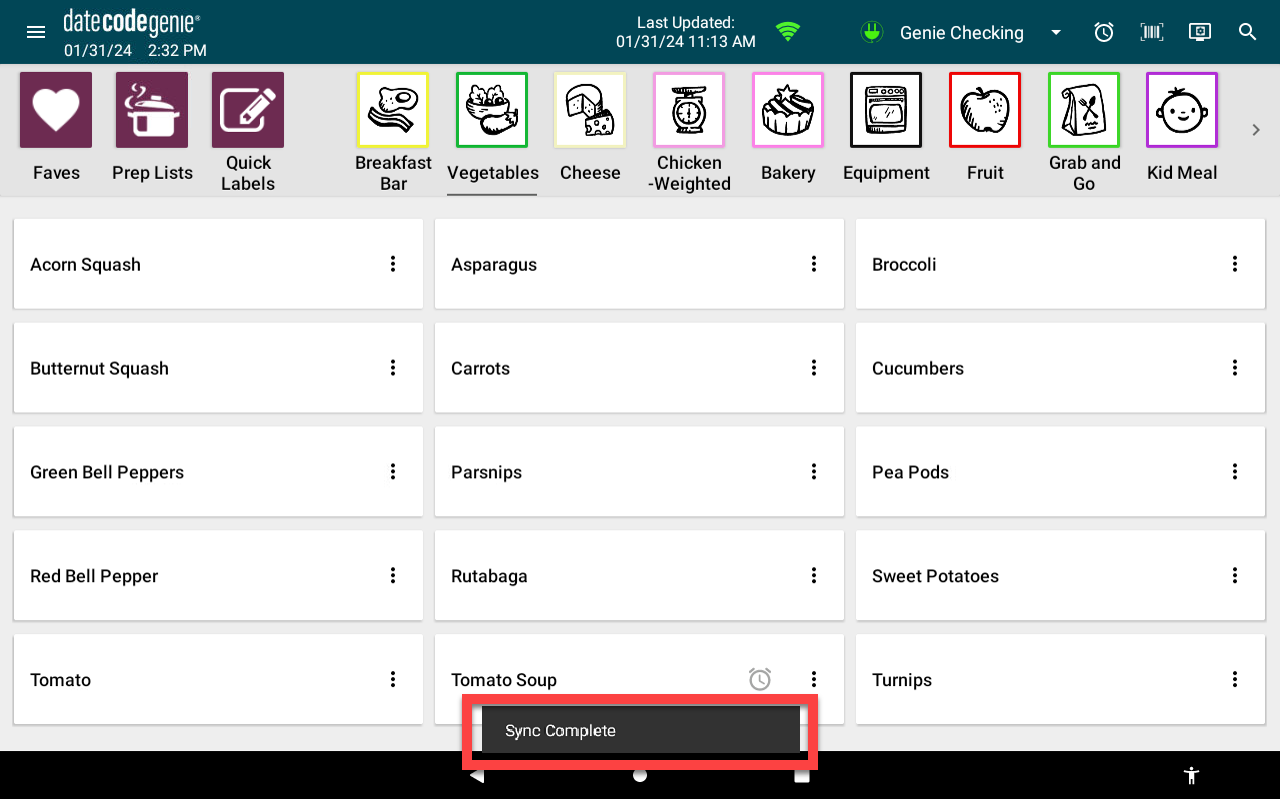
2. A green spinning circle icon will display and continue to spin while downloading. The screen darkens and is inactive.
3. The Sync Complete will display briefly at the bottom of app login screen that download is complete and active.
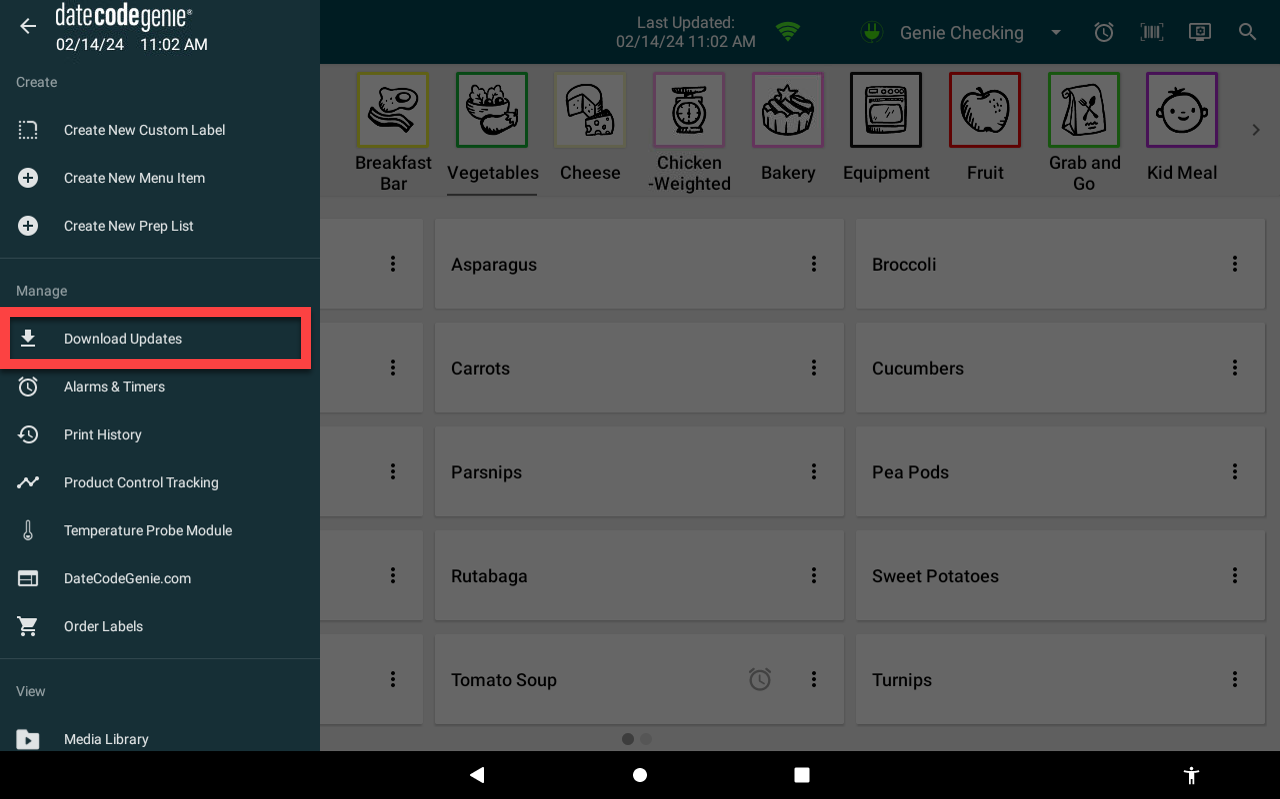
2. Navigation Options
1. Tap the navigation button (three-line icon).
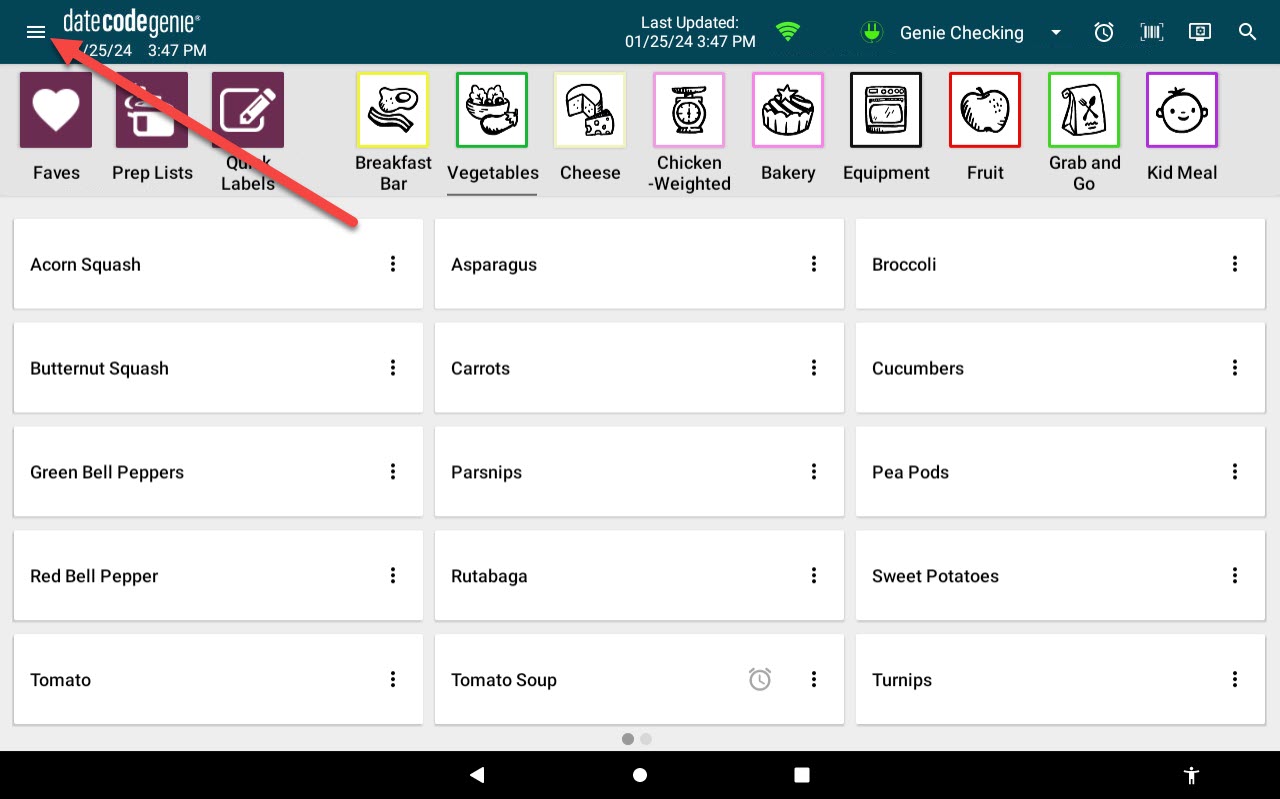
2. Tap Download Updates.
3. A green spinning circle icon will display and continue to spin while downloading. The screen darkens and is inactive.

4. The Sync Complete will display briefly at the bottom of app dashboard that the download is complete and active.
3. Download Button
1. Tap download button (red clockwise circle arrow icon), if displayed.
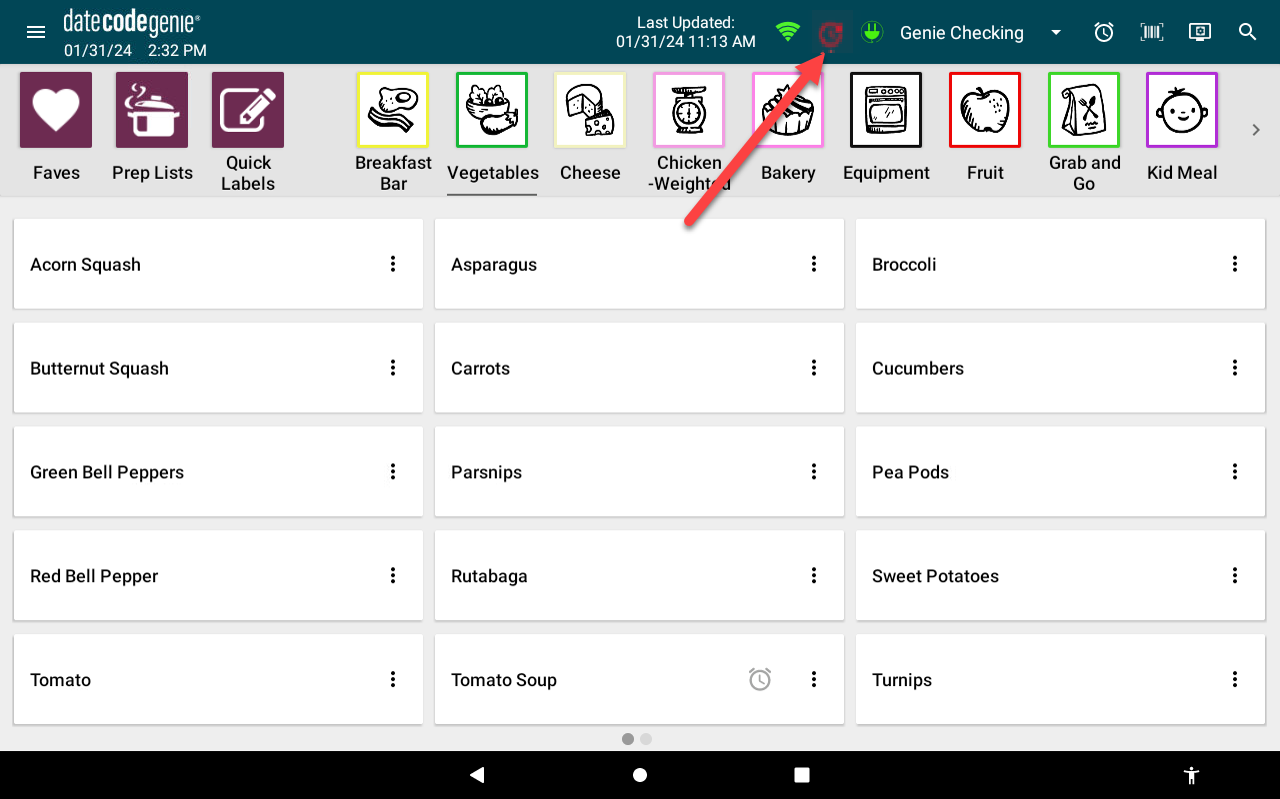
2. A green spinning circle icon will display and continue to spin while downloading. The screen darkens and is inactive.
3. The Sync Complete will display briefly at the bottom of app dashboard that download is complete and active.
4. Automatically Download Updates
Require staff to manually download updates before logging into the app following a set period of inactivity. Automatic app downloads are not available.
See Automatically Download Updates on the App
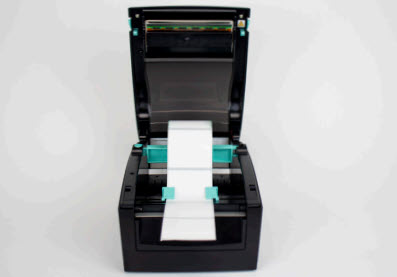
2. Verify the correct label size is loaded in the printer that matches the printer profile trying to print. Reprint.
How to Load Labels in the X Model Device
Loading labels in an X model device is easy. Follow the steps below or watch the video for assistance.
Steps:
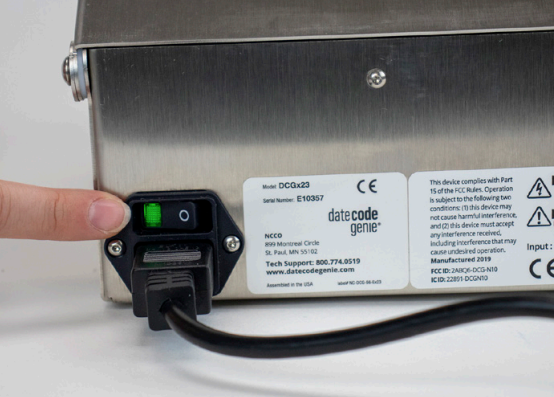
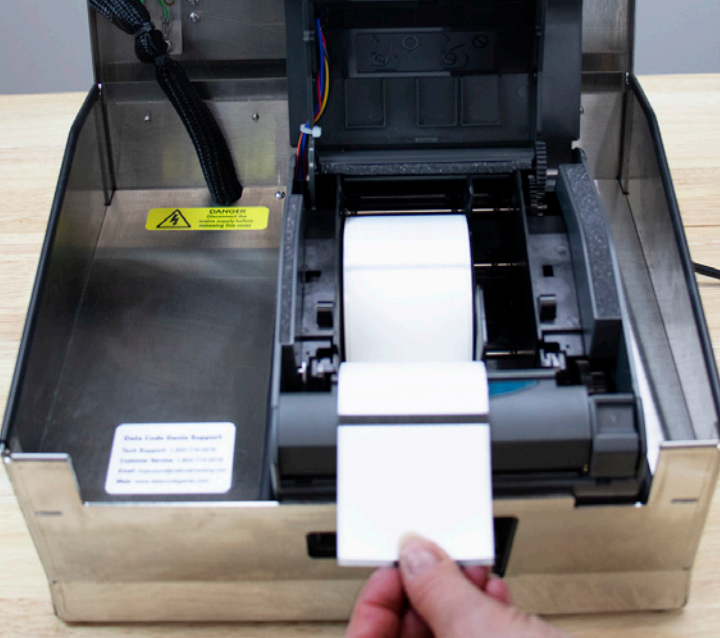
1. Confirm the power cord is plugged into a working outlet and the master power switch on the back of the device is illuminated green.
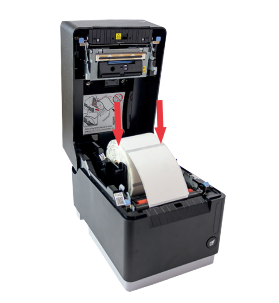
2. Open the case cover, separate the two black arms, and insert the label roll unrolling from the top with black lines facing down.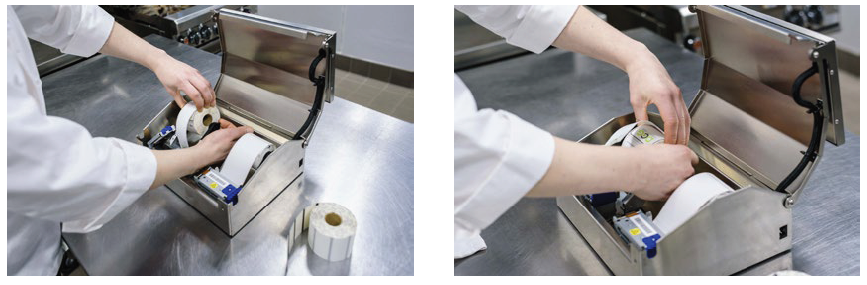
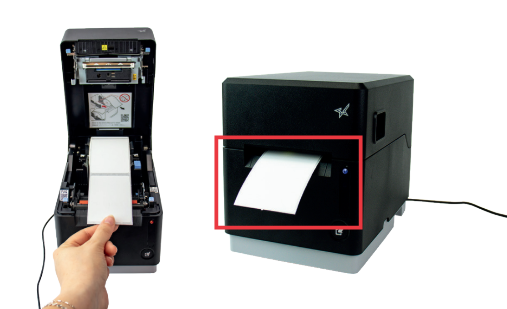
3. Press the blue/black tab to release the lever, extend labels over the edge of the opening, and close lever to snap in place.
 |
 |
4. Labels will automatically advance and cut to calibrate the printer. Repeat for second printer (if applicable).
5. Close case cover and begin printing.
2. Verify the correct label size is loaded in the printer that matches the printer profile trying to print. Reprint.
How to Load Labels in the Lite Model Device
Loading labels in a Lite model device is easy. Follow the steps below or watch the video for assistance.
Steps:
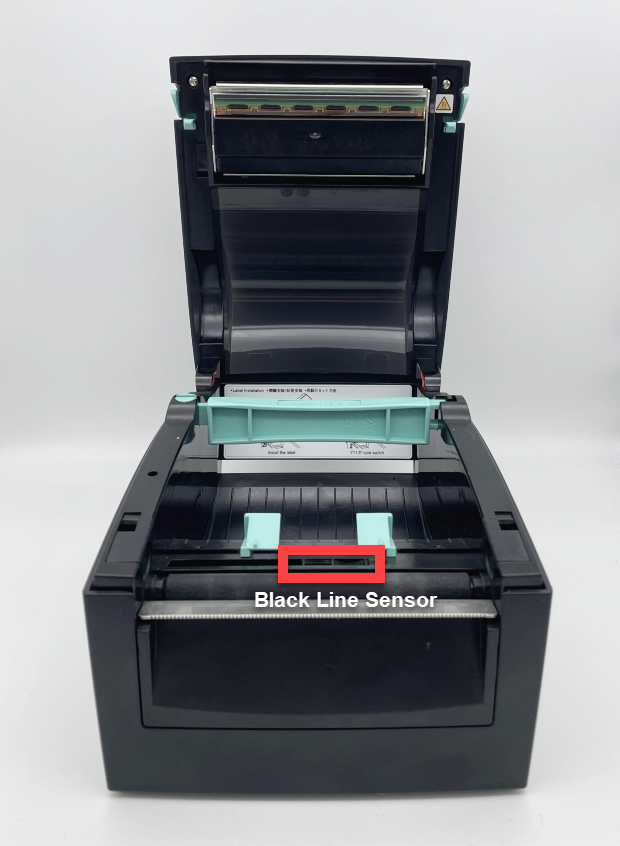
1. Gently pull the blue/green core bar from the right side and extend straight up. Slide the black line sensor to the far right of the opening
2. Slide the label roll on core bar with labels facing forward and unrolling from left. Snap the core bar closed.
3. Feed labels through the blue/ green guides and extend over edge of printer. Adjust guides to label width and snap printer lid closed.
4. Press the yellow feed button, as needed, to align on black line. Pull down to tear label.
2. Verify the correct label size is loaded in the printer that matches the printer profile trying to print. Reprint.
How to Load Labels in the 2.0 and Fit Model Devices
2.0 model is discontinued.
Load labels in the 2.0 and Fit model devices.
Steps:
1. Open the case cover if using a 2.0 device.
2. Press the printer release button to open.
3. Locate roll guide on the right side of the opening and lift to remove.
4. Take the label roll unrolling from the bottom with the black lines facing up and place in the left side of the opening. Extend the labels over the edge of the printer.
5. Place the roll guide on the right side of the label roll to hold in place.

6. Close the printer lid and the labels will automatically advance and cut to calibrate.
7. Close the case cover. Printer is ready to print.
3. Confirm the labels are DateCodeGenie® labels and meet label requirements.
DateCodeGenie® Labels
DateCodeGenie labels are manufactured specifically for DateCodeGenie devices. Labels are available in various shapes, sizes and adhesives using black line technology to print and cut.
Thermal Printing
DateCodeGenie printers use thermal printing to transfer text and images in black onto labels instead of ink. There is no ink or ink cartridges needed for DateCodeGenie devices.
Black Line Technology
DateCodeGenie labels use black lines on the back of the roll to print correctly. Labels with incorrect black lines will print incorrectly. For reference, see Black Line Issues on Labels.
Linerless Labels
DateCodeGenie linerless labels are used with the mC-Label3 printer only. They eliminate liner peeling and reduce waste by providing more labels per roll, leading to fewer roll changes and less need for purchasing or switching between different label sizes.
Purchasing
Labels can be purchased from the NCCO store site at https://store.ncco.com or through your distributor.
3. Confirm the labels are DateCodeGenie® labels and meet label requirements.
DateCodeGenie Label Print Quality Issues
All printers used in the DateCodeGenie use direct thermal technology. If a printed label’s quality is unsatisfactory or not clear, the label quality may be incorrect.
- Printed label quality is unsatisfactory
- Printed labels are not printing clearly
- Labels may lose their adhesiveness when placed on an object
- Printed label may be partially blank
Faded Labels
If dissolving labels are being used, verify the shelf life has not expired.
Steps:
1. Use a new label roll.
NOTE
Durapeel, Permanent, and Removable labels have a shelf life of one year (1 year). Dissolving labels that have a shelf life of six months (6 months). If possible, try using a non-dissolving label.
2. Clean DateCodeGenie printer thermal head free of debris and residue. See Device Placement and Care.
Half of Label Faded or Blank
The print on only half of a label is lighter, or only half of the label printed.
If using a Lite model, one of the clips is broken. The device will need a repair, see Contact & Support.


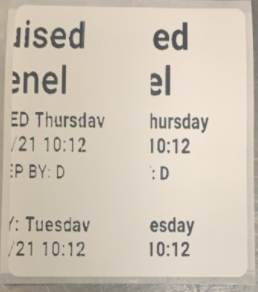
Misaligned Printing
Printing errors caused by a printer malfunction. However, labels may also cause an error.
Steps:
1. Try a new label roll that has a complete black line from side to side.
2. Take a picture of the front and back of the incorrect labels and provide the information below to Technical Support:
- Your Name
- Device Serial Number
- Label stock code, if known
Misaligned Color Coded
The black bar is not completely covering the day bars.
Steps:
1. Check all your label roll stock to verify how many rolls are affected.
2. Select a roll that has complete black lines not faded or too thin.
3. Load in your printer and reprint.
4. Take a picture of the front and back of the incorrect labels and provide the information below to Technical Support:
- Your Name
- Device Serial Number
- Label product code ordered
- Date and order # for labels
Missing Print
Printing errors caused by a few errors.
Steps:
1. Verify nothing is covering the thermal head on the printer:
- If so, read this article how to clean your printer thermal head. See Device Placement and Care.
- If not, try a new label roll to verify labels are not defective.
2. For labels with no label printed:
- Verify the labels are loaded in the printer correctly
- Verify no debris are covering the thermal head on the printer
- Try a new label roll to verify labels are not incorrect labels
3. Verify liquid has not damaged printer.
NOTE
If applicable, verify liquid detection indicators (LDI) for the specific device being used. See Where are liquid detection labels located?
4. Take a picture of the front and back of the incorrect labels and provide the information below to Technical Support:
- Your Name
- Device Serial Number
- Label stock code, if known
Lines Through Label
Void lines through the label.
|
Blank lines across your entire label that show no print indicate a failure of the print head. The printer may need to be replaced under your covered warranty, see DateCodeGenie® Device and Accessory Warranty
|
All of your print is visible but faded, cleaning the thermal head may resolve the issue. Thermal head placement varies by device model, see Device Placement and Care or printer, see Printer Placement and Care
|


3. Confirm the labels are DateCodeGenie® labels and meet label requirements.
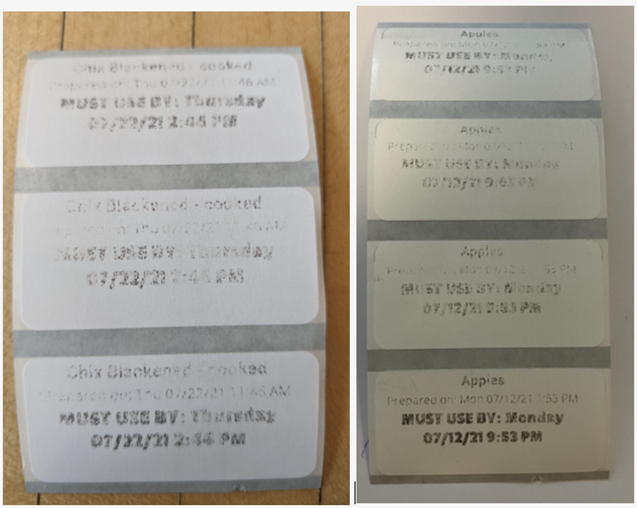
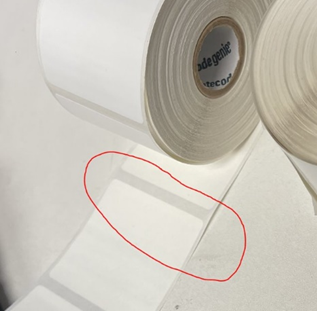
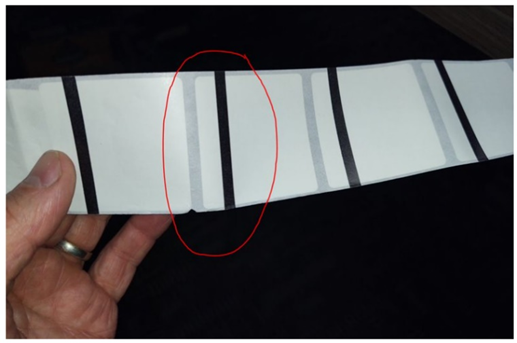
Faint Line on Label Front
Certain label SKUs may have a faint line on the front of the label, as shown below.
![]()
Handle call according to SKU as listed below:
2x3 Permanent labels (DCG-P23-4B)
SKU DCG-P23-4B is being sold at a markdown to customers who were made aware of the faded line defect when purchasing.
DCG-P23-4B is indicated by black sharpie line on the side of the label roll.
We will not be refunding this SKU since it is being sold as defective.

2x2 Dissolvable labels (DCG-D22)
Credit customer a new roll if their 2x2 dissolvable labels (SKU DCG-D22) has a faint line on the front.
For additional assistance see Contact & Support
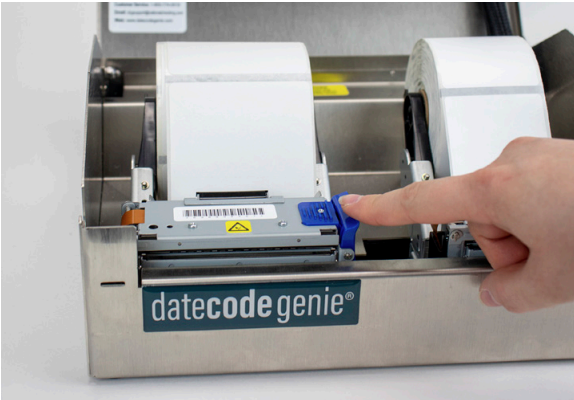
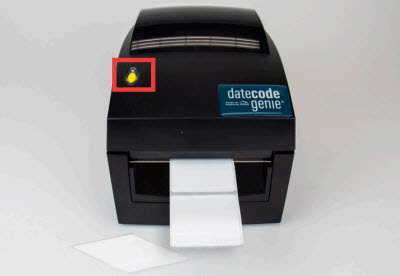
4. Calibrate the printer for a DateCodeGenie® X model device and reprint labels.
Printer Calibration (X Series)
Calibrating the DateCodeGenie® printer may help if the printer is not cutting or advancing labels correctly. This article goes over calibrating the X Series (X2, X22, X23) printer.
Steps:
1. Check that label roll is loaded with the labels facing upward and with the black line facing down. For more information on label loading, see Load Labels in the X Model Device.

2. Locate the 2 red or black buttons on the right side of each printer near the bottom housing.
NOTE
A pencil can be used to gently press the buttons on the right sided printer if you cannot reach.

3. Press and hold the SELECT button, the BACK button, until the labels advance, then release.
NOTE
If labels continually feed and do not stop, replace with a new roll with a solid black line on the back. For more information on correct and incorrect labels, see DateCodeGenie® Labels.
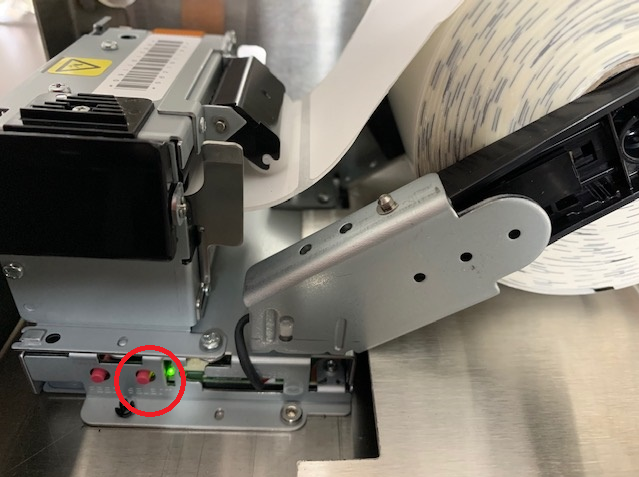
4. Press the FEED button, the FRONT button. Labels will advance to the black line and cut.
NOTE
If the printer doesn't cut on a black line, repeat this step.
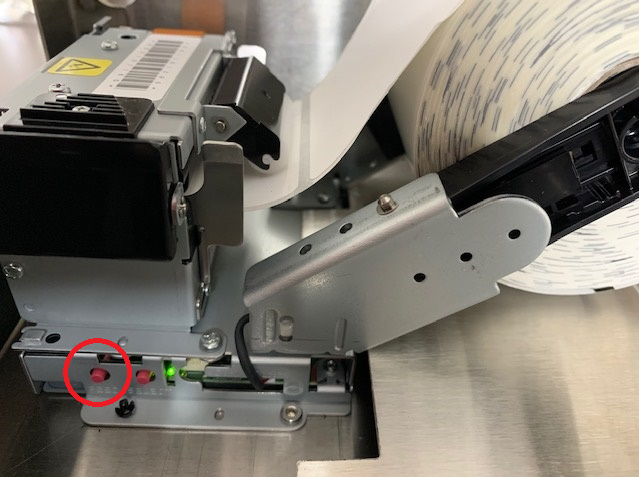
5. Repeat these steps for each printer.
Failed Sensitivity Errors: Failed sensitivity errors that occur during printer calibration can be caused by three things:
1. Missing or faded lines on the label
Check that there is a solid black line on the back of the label. To see incorrect labels, see the chart in DateCodeGenie® Labels.
2. Debris blocking the black line sensor
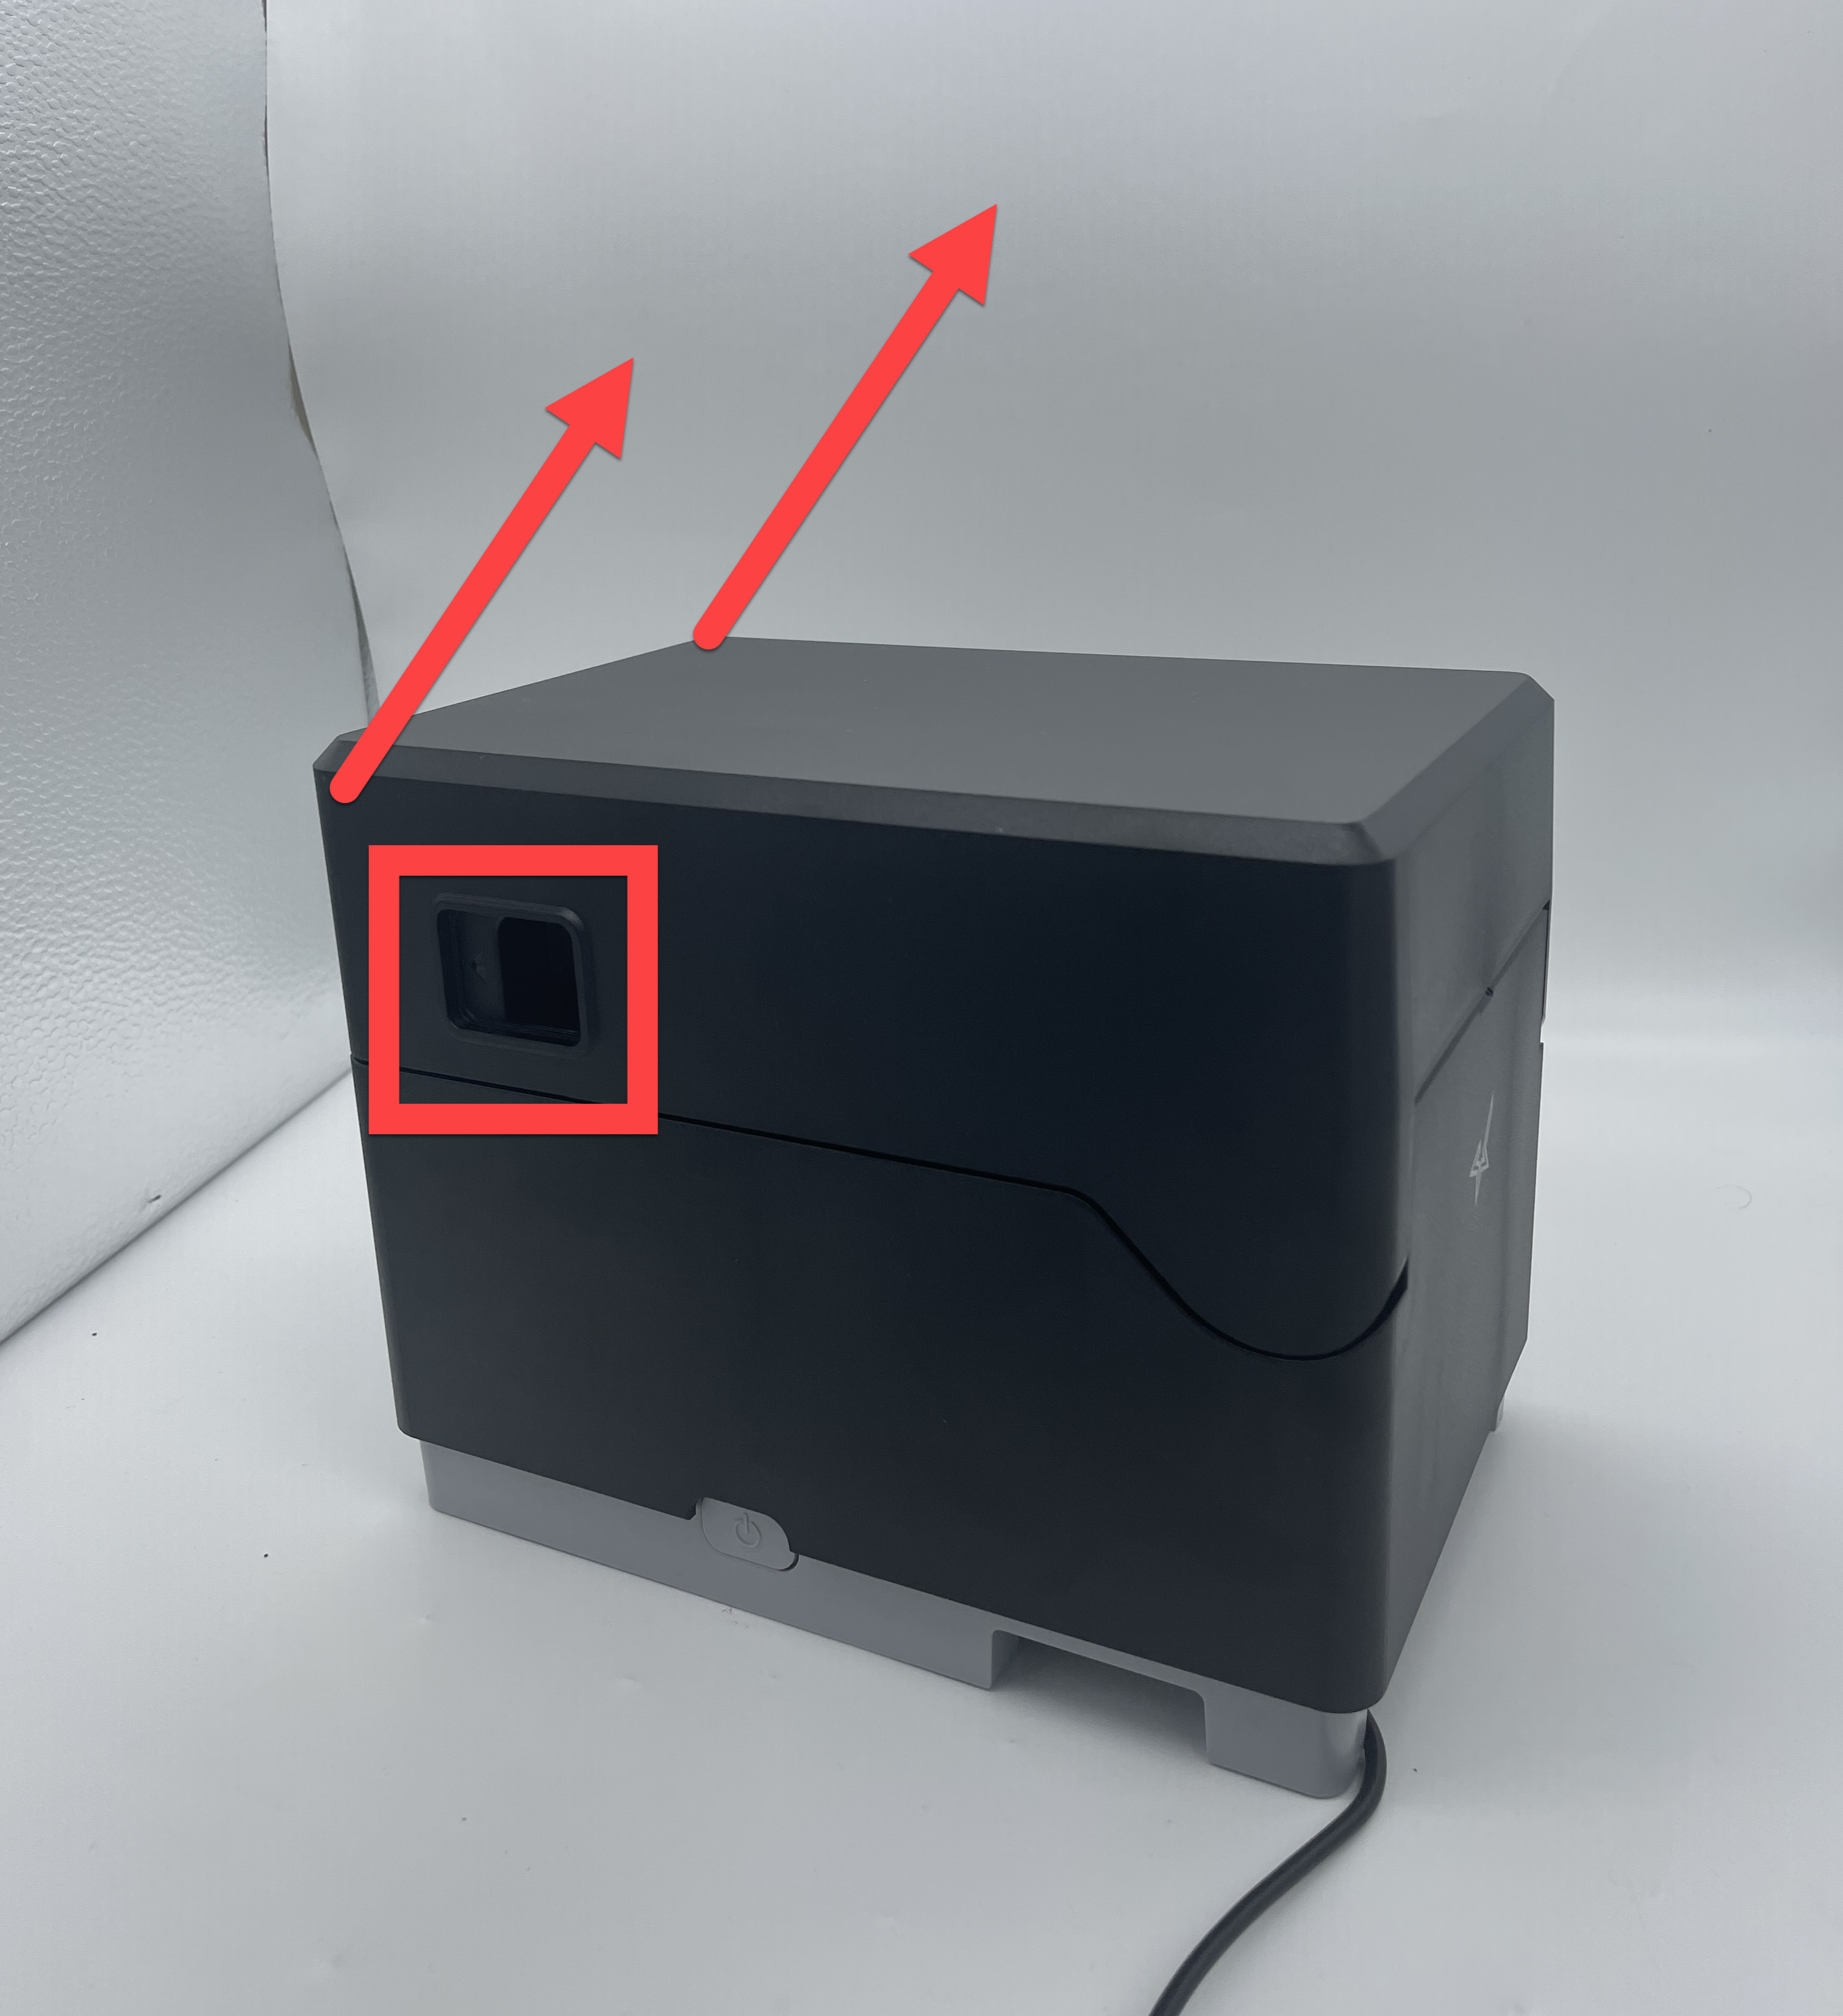
Clean the printer black line sensor and thermal head. See Device Placement, Maintenance and Cleaning.
4. Calibrate the printer for a DateCodeGenie® Lite model device and reprint labels.
Printer Calibration (Lite)
If labels are not printing, advancing or cutting correctly, calibrating the printer will reset the black line and tear for proper printing.
There are options for calibrate the printer:
Manual Printer Calibration
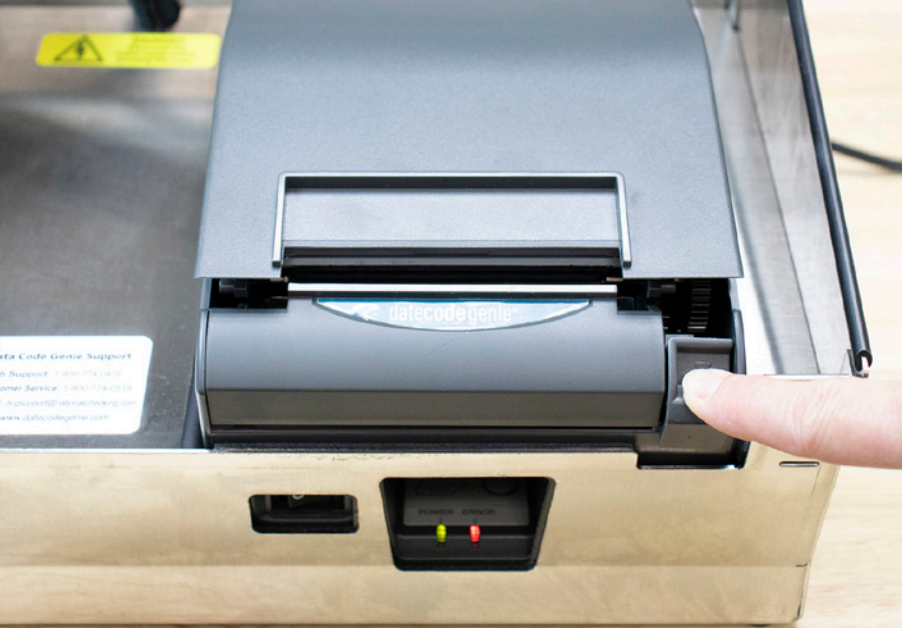
1. Open the printer by pressing the two blue/green printer release buttons at the same time and lifting upward.

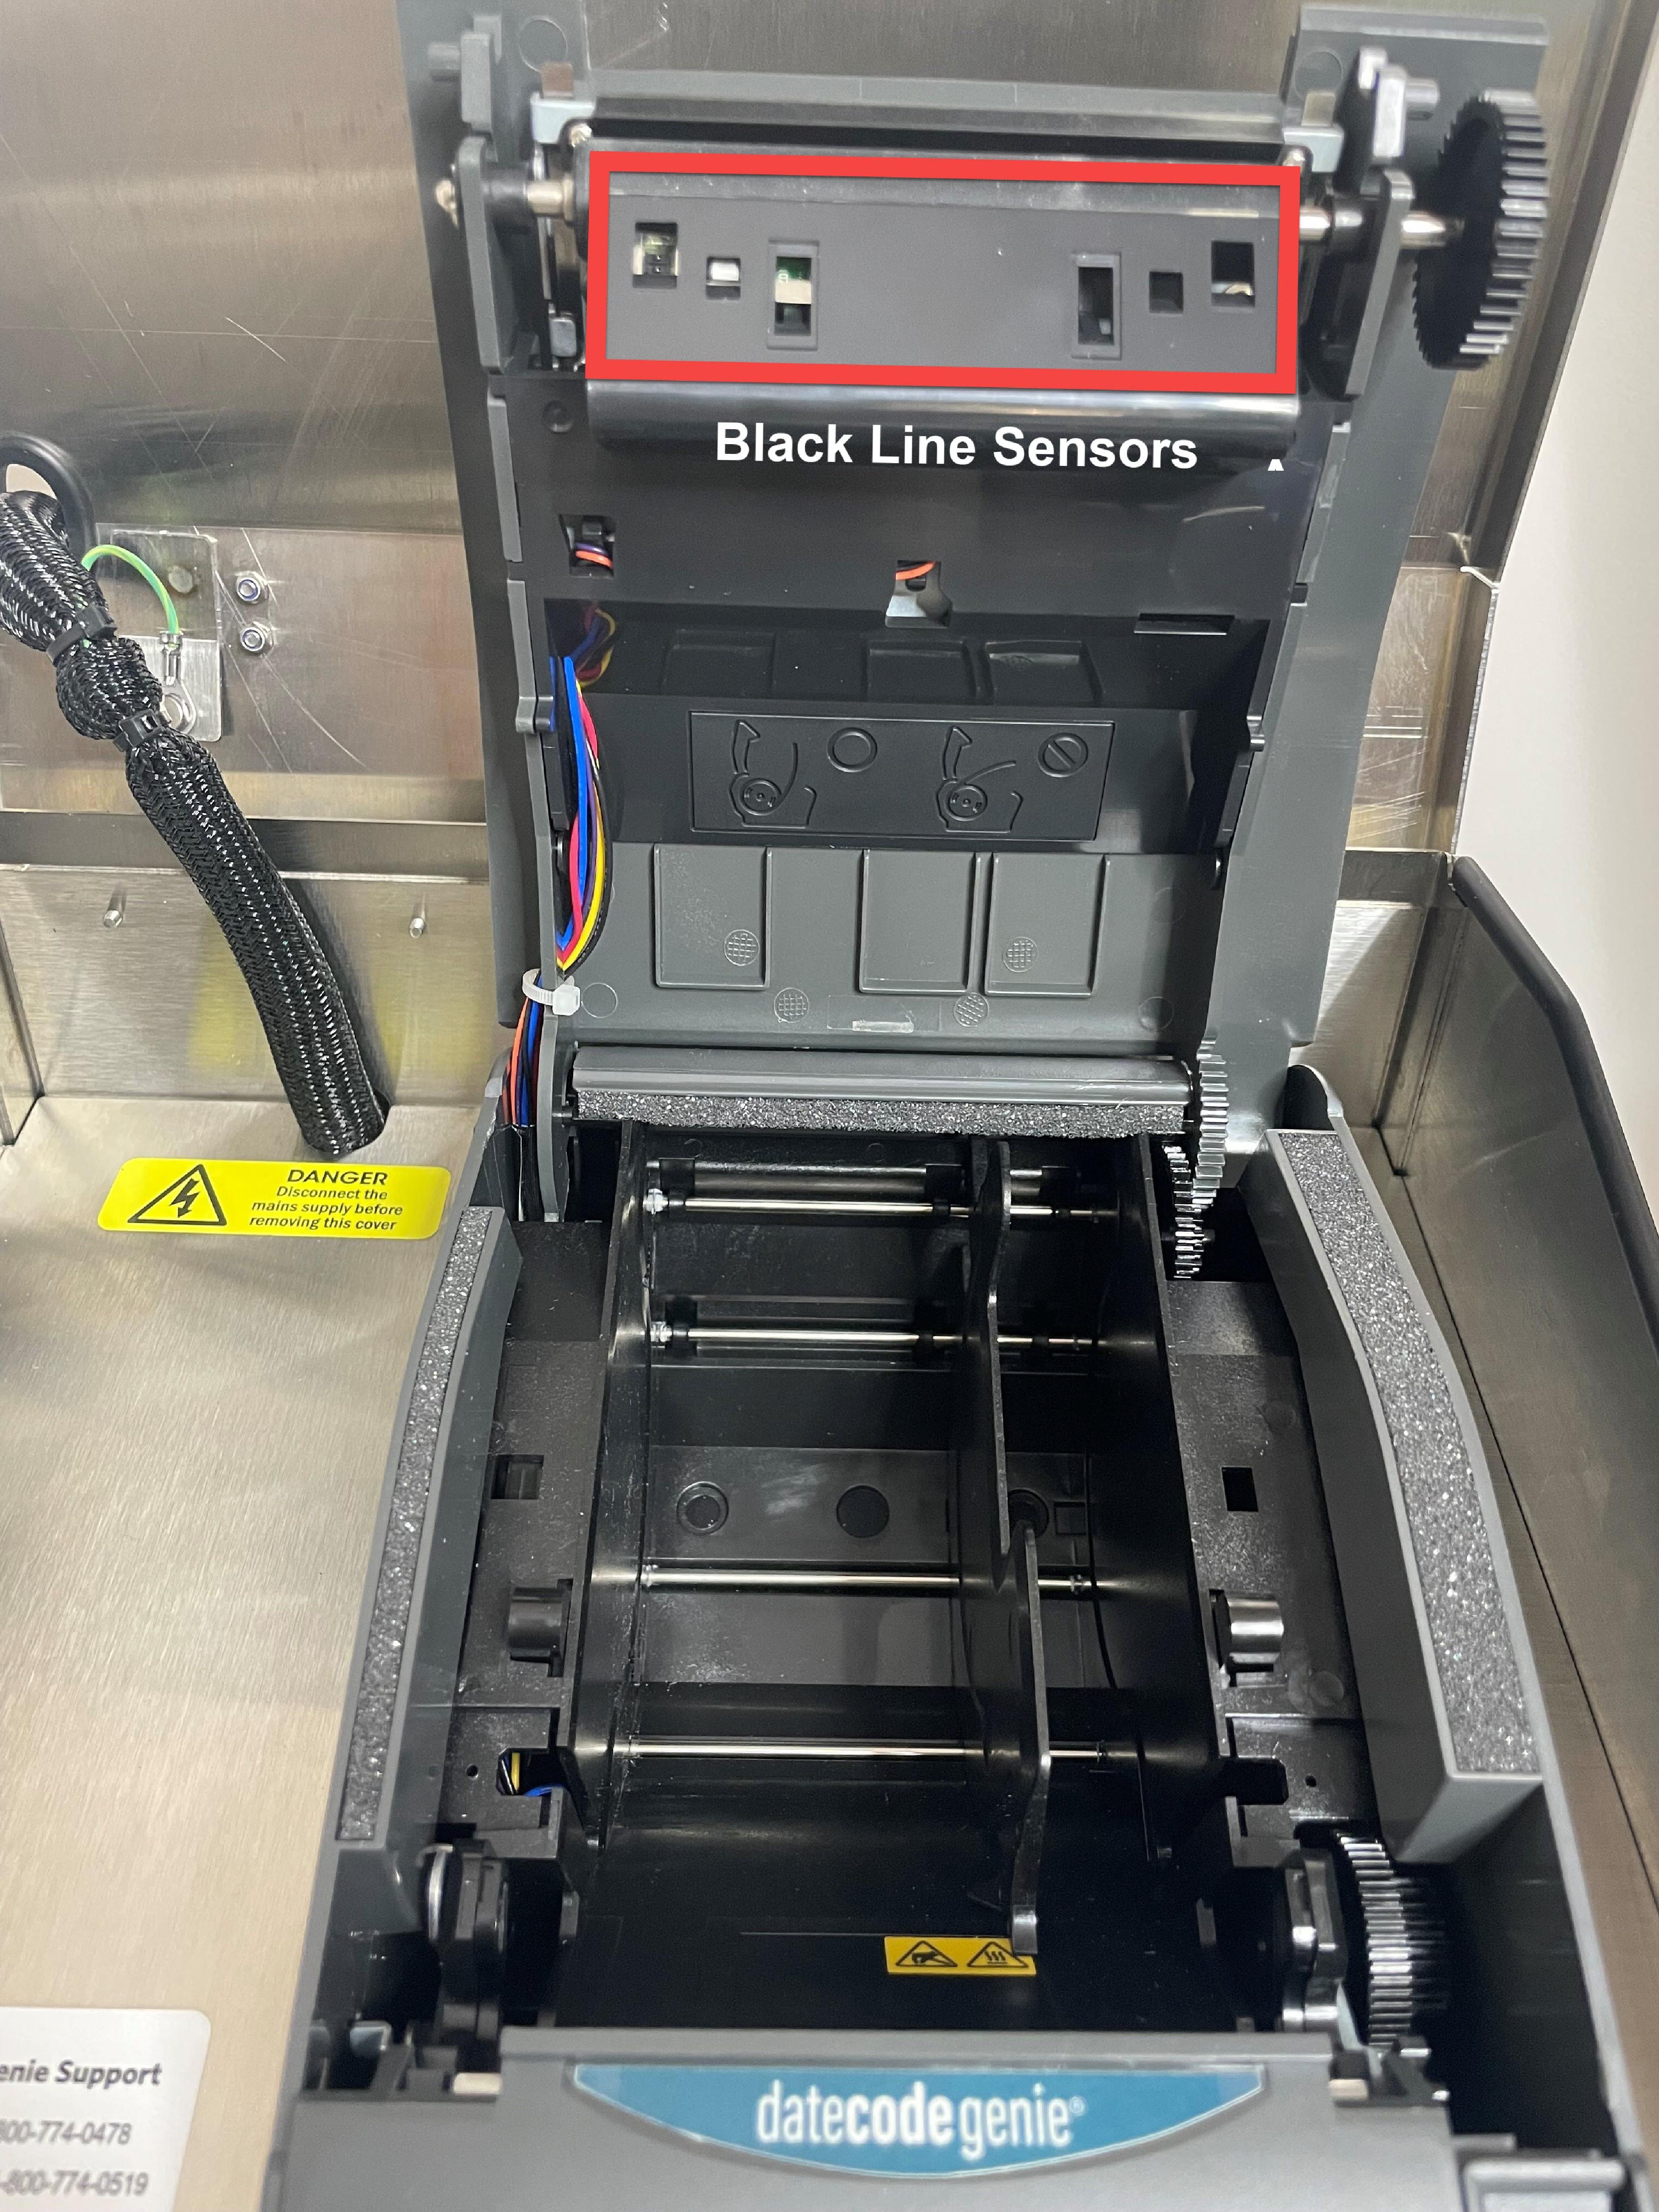
2. Slide the black line sensor to the far right of the opening.
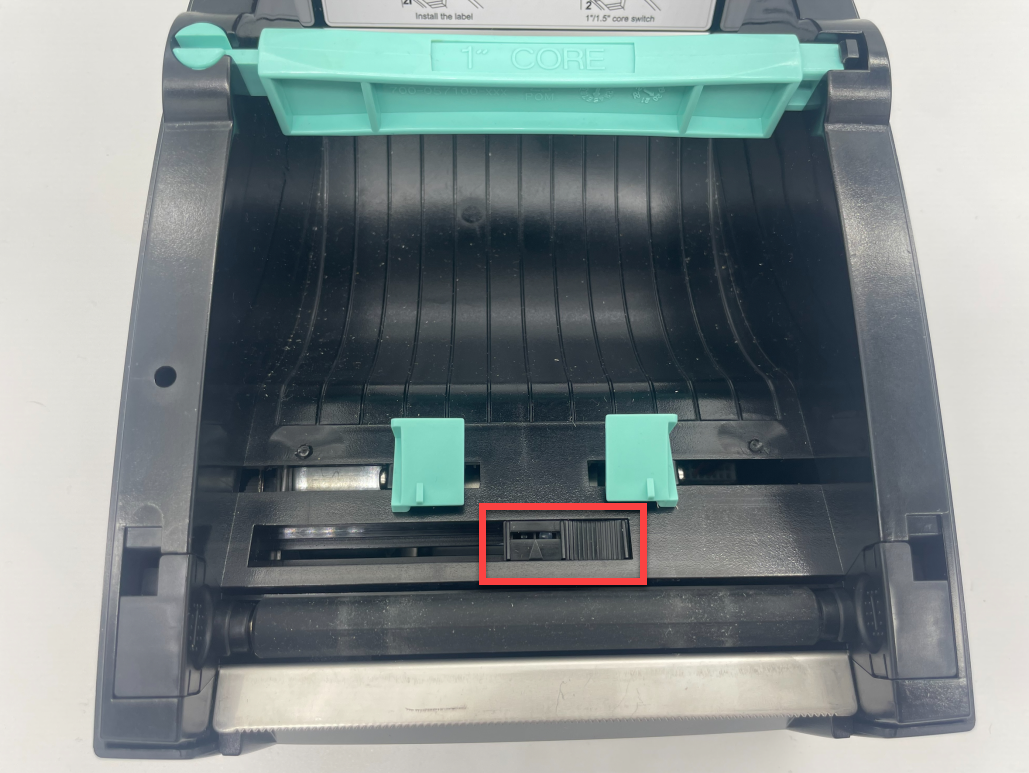
3. Feed labels through the blue/green guides and extend over edge of printer. Adjust guides to label width and snap printer lid closed.
NOTE
Need to load labels? See How to Load Labels in the Lite Model Device.
4. Press the power switch to the O position to turn off the printer.

5. Hold the yellow feed button down with one hand while turning the power back on with the other hand, releasing the feed button when you hear the beeps and the red light flashes. Self-test labels will print.

6. Press the feed button once more to advance labels to the black line and pull down to tear.

App Printer Calibration
1. Log in to the app with your username and password, if required.
2. Tap the Navigation Button (three line icon) in the upper left hand corner.
3. Tap Settings from the menu.
4. Tap Printer Setup.

5. Add Label Type if none is listed.
NOTE
Incorrect label type will result in the printer not calibrating correctly.
6. Tap Calibrate Printer.
NOTE
Status needs to be "Ready" to print labels. If having issues with printer connection, see Printer Connection Issue (Error 300x1) for Lite Device.
7. A self-test label will print.
5. Clean the printer black line sensor and thermal head and reprint labels.
Device Placement and Care
Proper placement, upkeep, and routine cleaning of your DateCodeGenie® device is a simple and effective way to maintain your device.
Device Care
Placement
- Room temperature environment only
- Place on a flat, stable surface or mount to a secure wall or shelf, away from vibrations, moisture, and liquids of any kind
Upkeep
All models
- Device can remain plugged into power with the tablet turned on to maintain the battery's charge
- Ensure rubber feet on certain models are attached to keep device in place
2.0 model
- Ensure liquid protection seal (black rubber flap) is in place on the 2.0 model device to protect from moisture and liquid
Fit model
- Ensure the splash cover is in place on the Fit model device to protect from moisture and liquid
Lite model
- Ensure the tablet silicone cover is in place on the Lite tablet to protect from accidental damage
Cleaning
Stainless Steel Housing
Cleaning Supplies Needed
- Lint-free or microfiber cloth
- Foaming degreaser
- Wipe down the stainless steel using a lint-free or microfiber cloth.
WARNING
- Never use abrasive cleaning pads, this will cause scratches and discoloration.
- Be sure the tablet is powered off and the device is unplugged from
the wall outlet before any cleaning.
- For a deeper clean, apply a small amount of foaming degreaser directly on the stainless steel and wipe immediately.
NOTE
Wipe any overspray from the tablet right away.
Tablet
Cleaning Supplies Needed
- Lint-free or microfiber cloth
- Alcohol-based glass cleaner
- Spray a soft, lint-free cloth with an alcohol-based glass cleaner and gently wipe the touchscreen.
WARNING
Never use an abrasive pad or spray directly on the touchscreen as this may damage the screen.
- Repeat if needed.
Printer
Cleaning Supplies Needed
- Isopropyl Alcohol
- Cotton swabs, soft clothes, or adhesive tape
- Canned air
WARNINGS
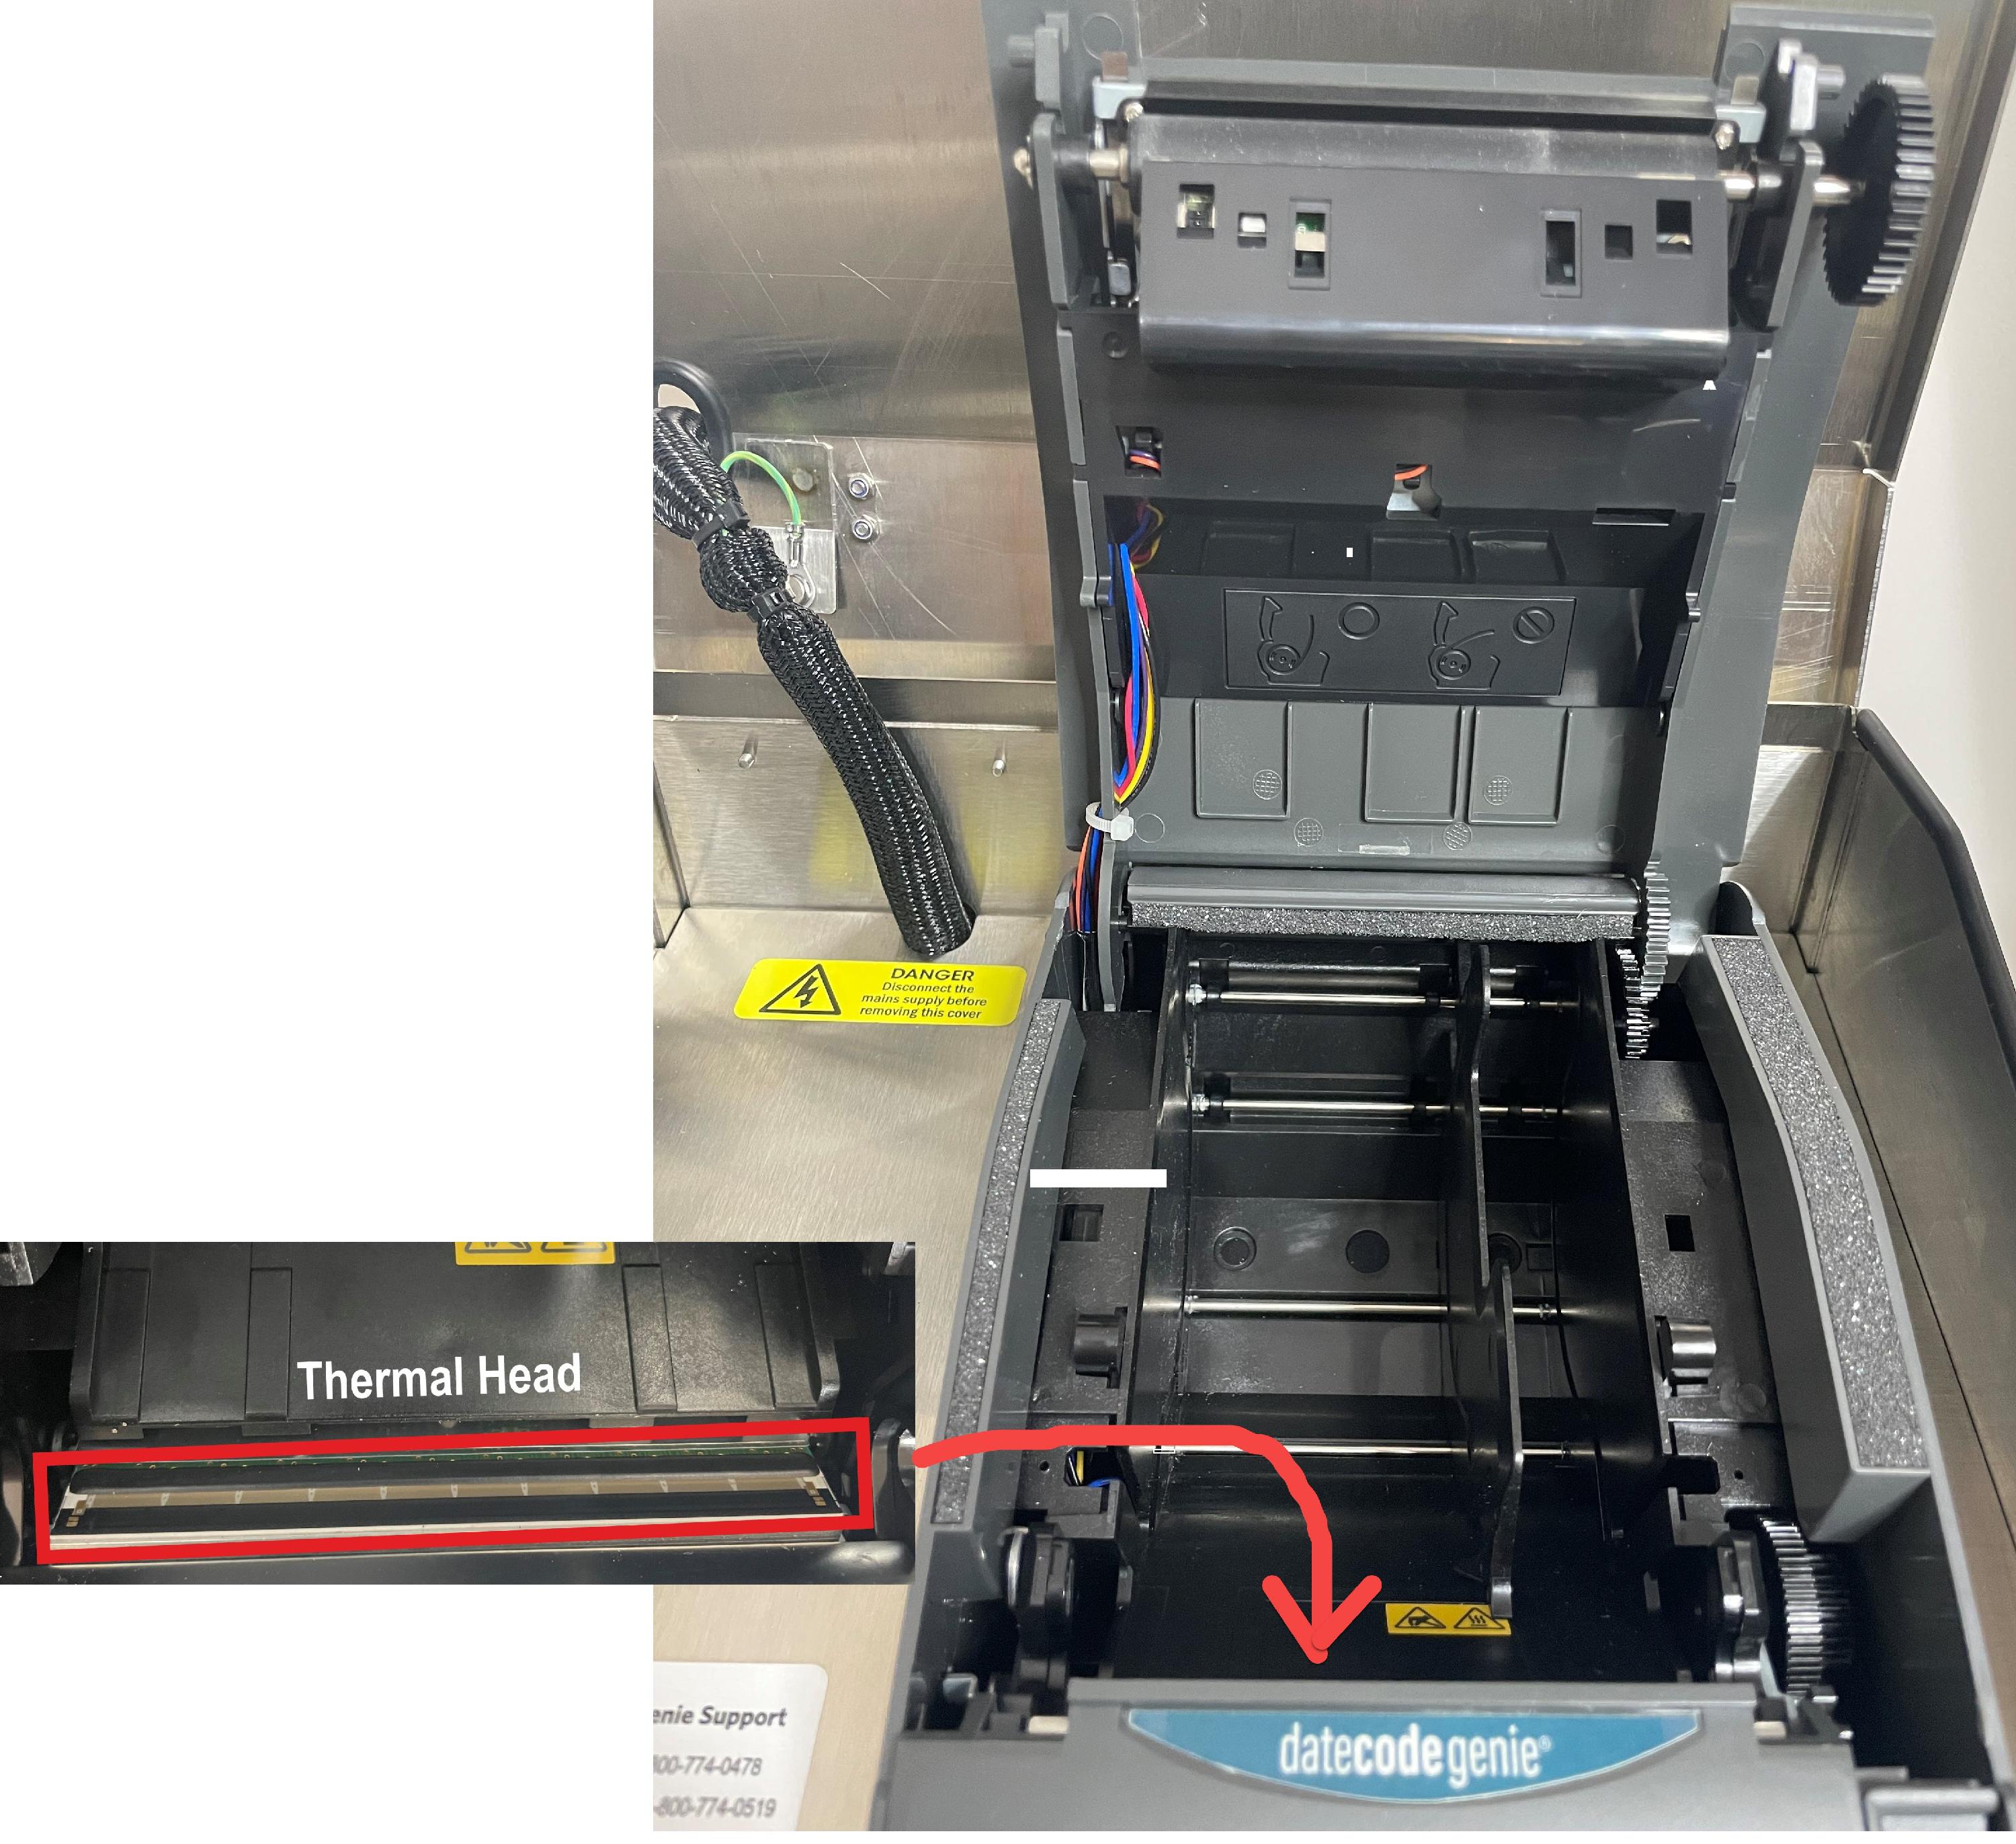
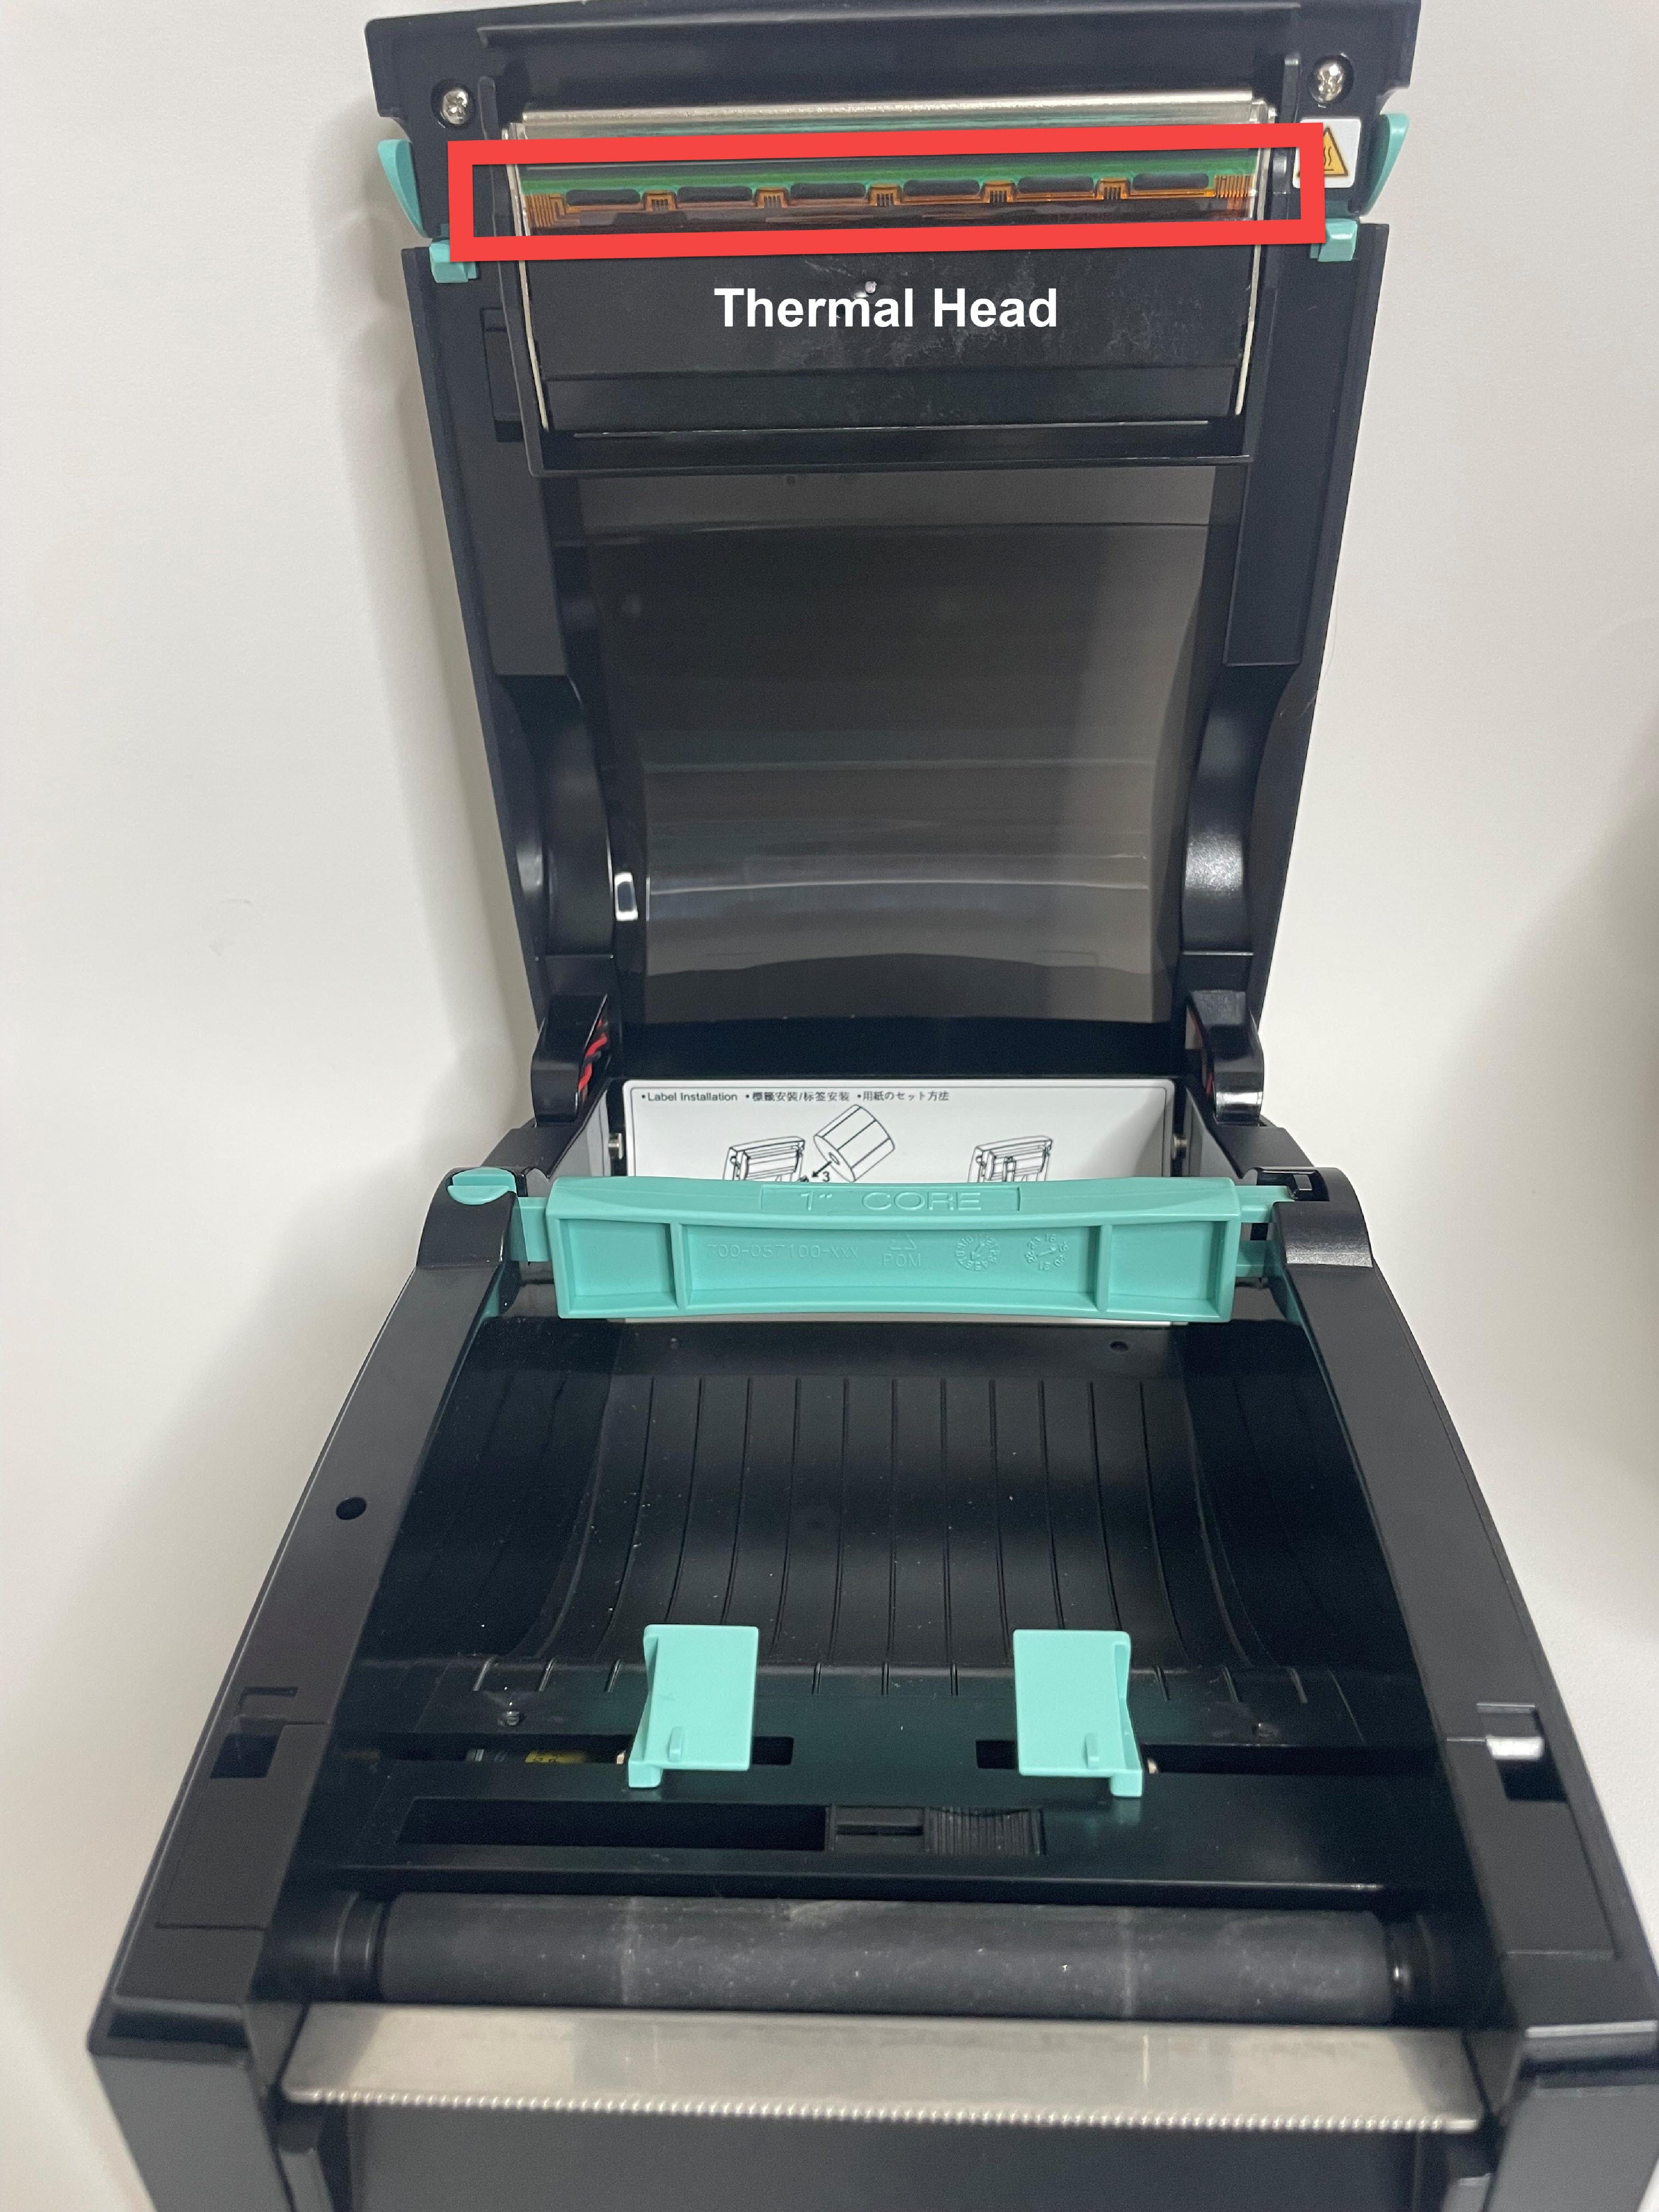
- Never clean the printer immediately after printing. Wait until the printer has cooled to avoid damage to the thermal head.
- Avoid scratching and exposing the thermal head to static electricity.
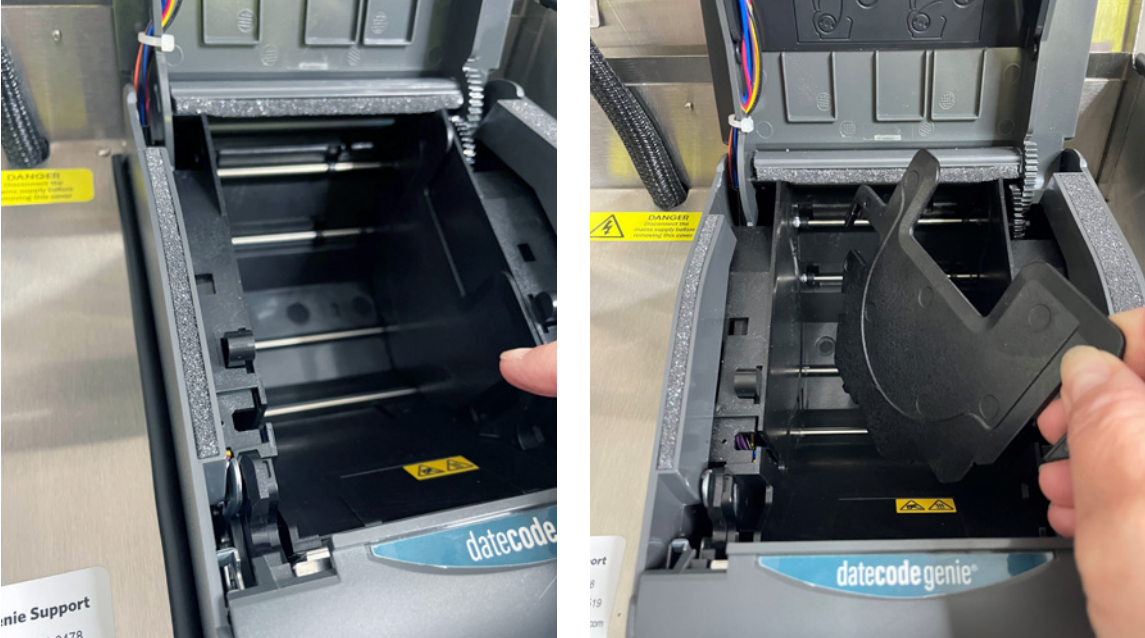
- Remove the label roll and any stuck labels inside the printer.
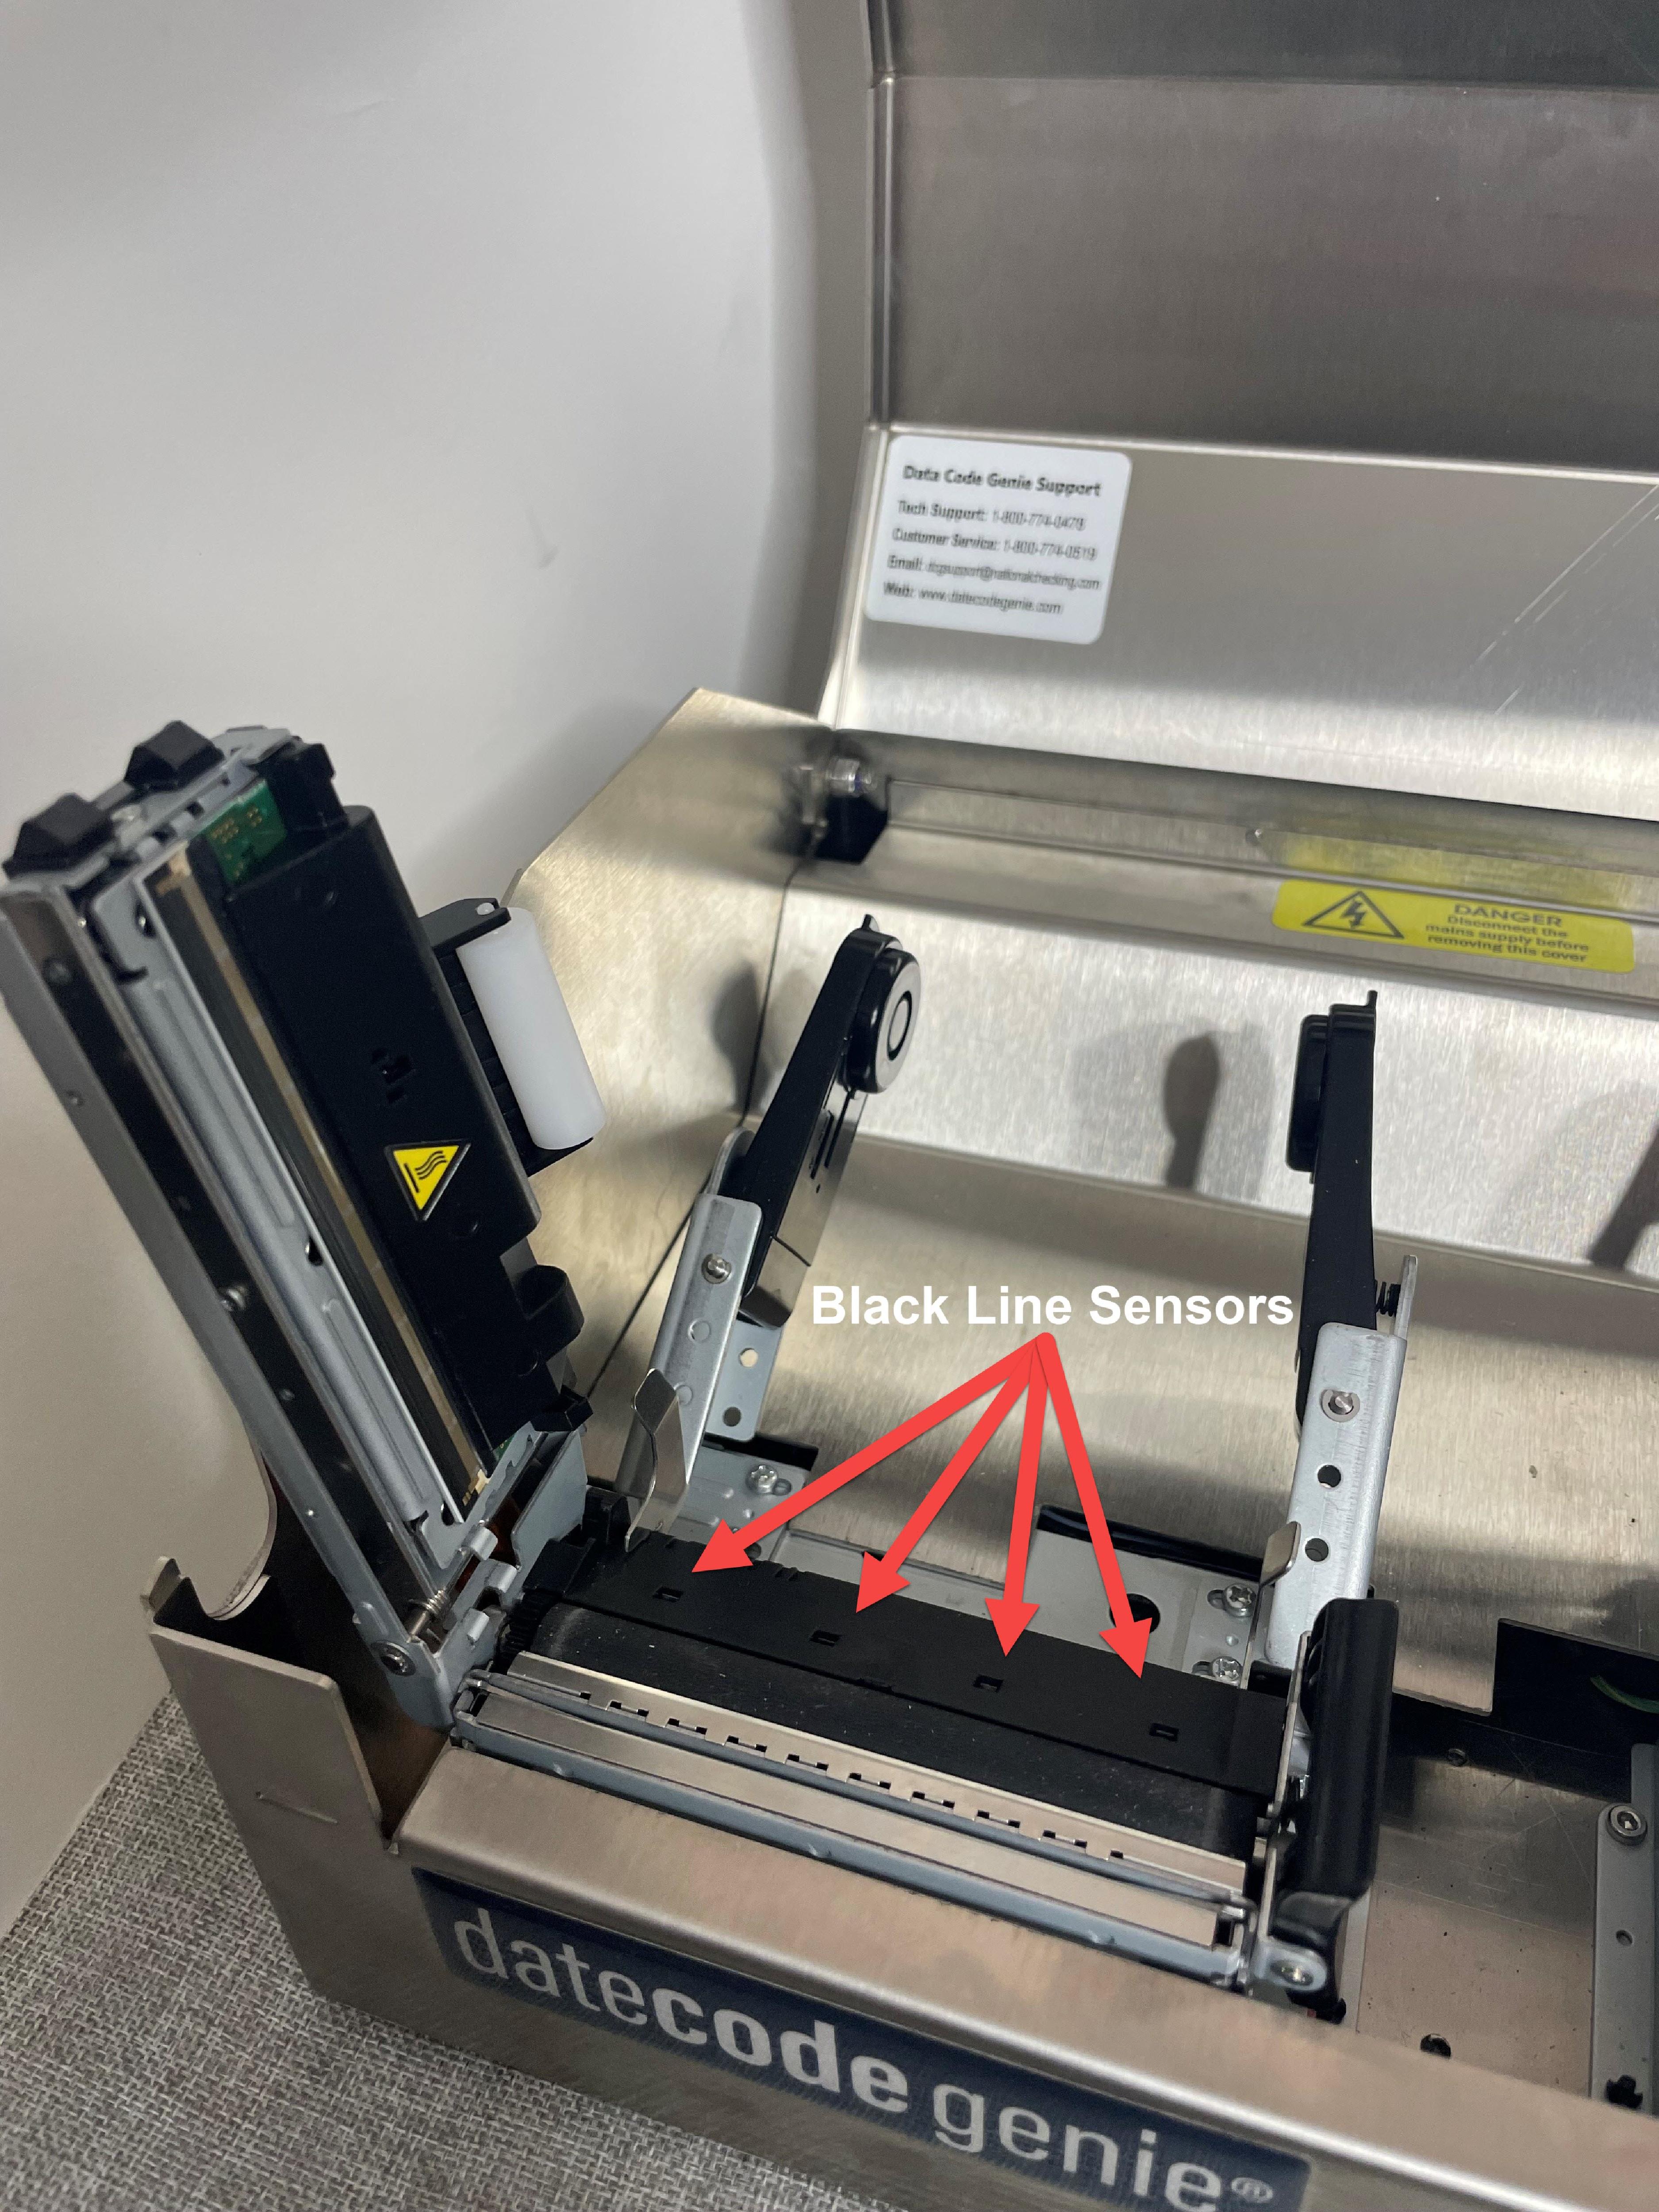
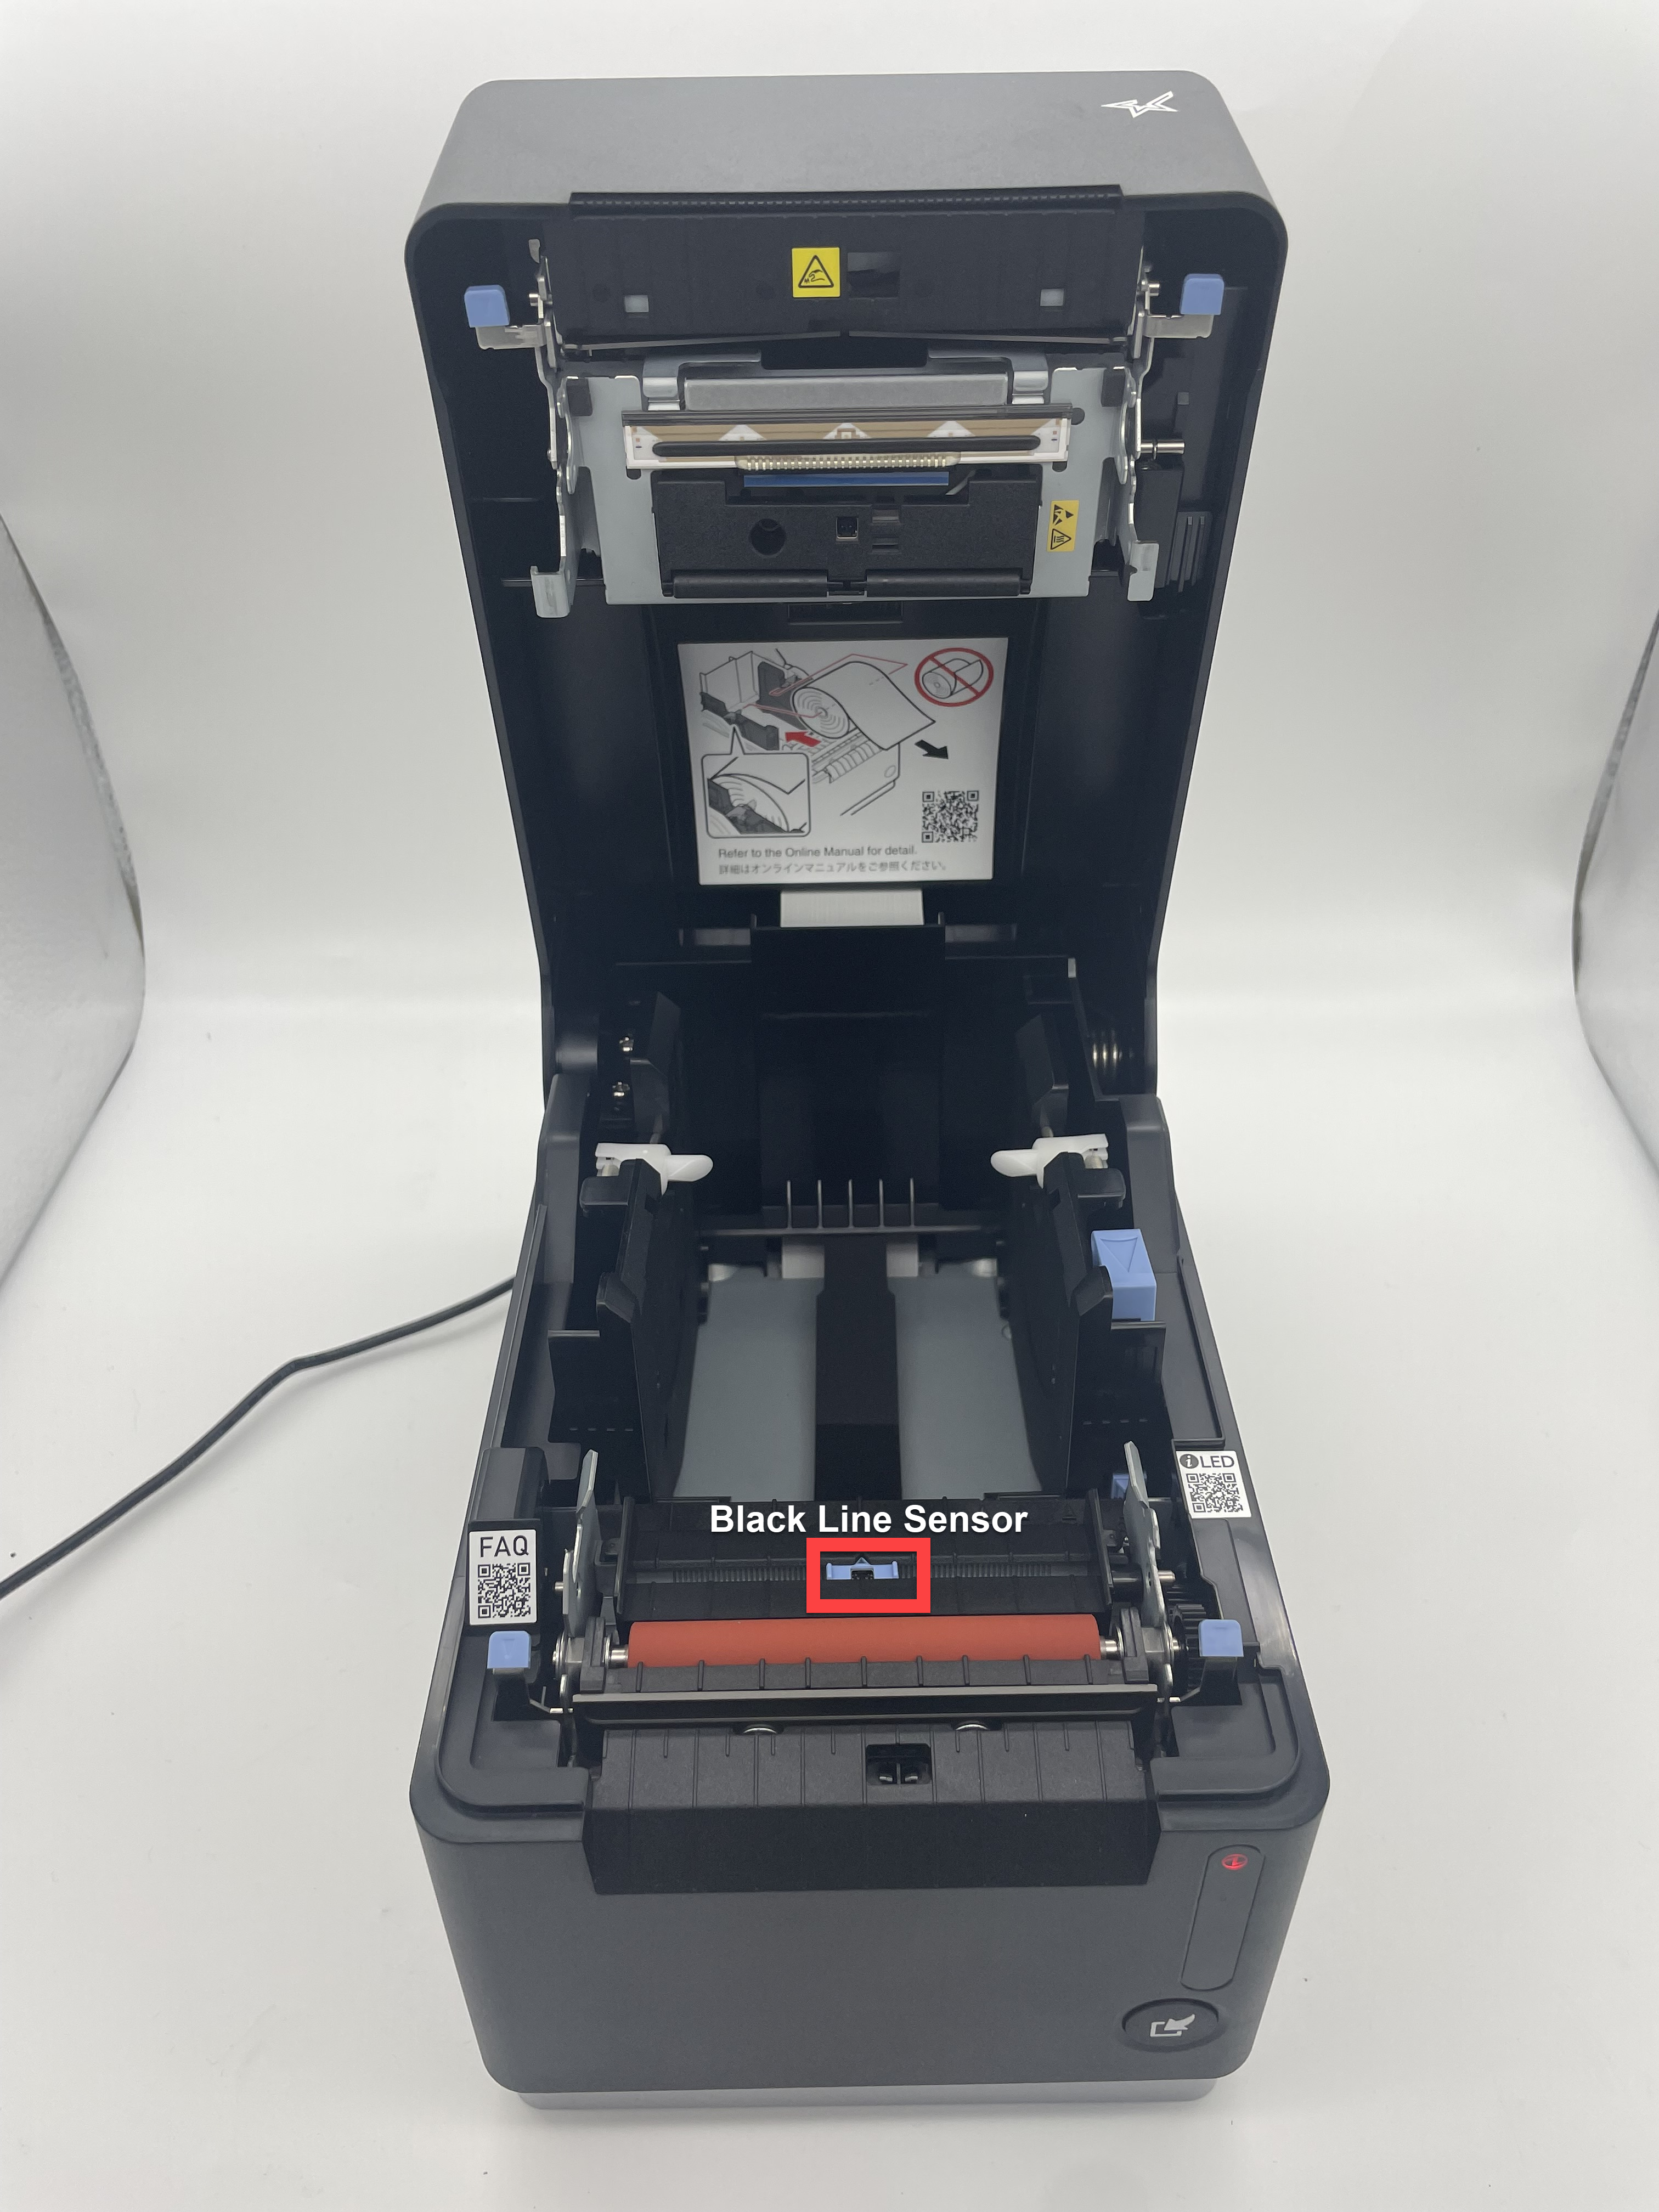
- Spray the canned air to clear any debris from inside the printer opening including the black line sensors.
NOTE
Do not tilt the canned air to avoid blowing liquid into the printer.
| 2.0 and Fit Model | X Model | Lite Model |
|---|---|---|
 |
 |
 |
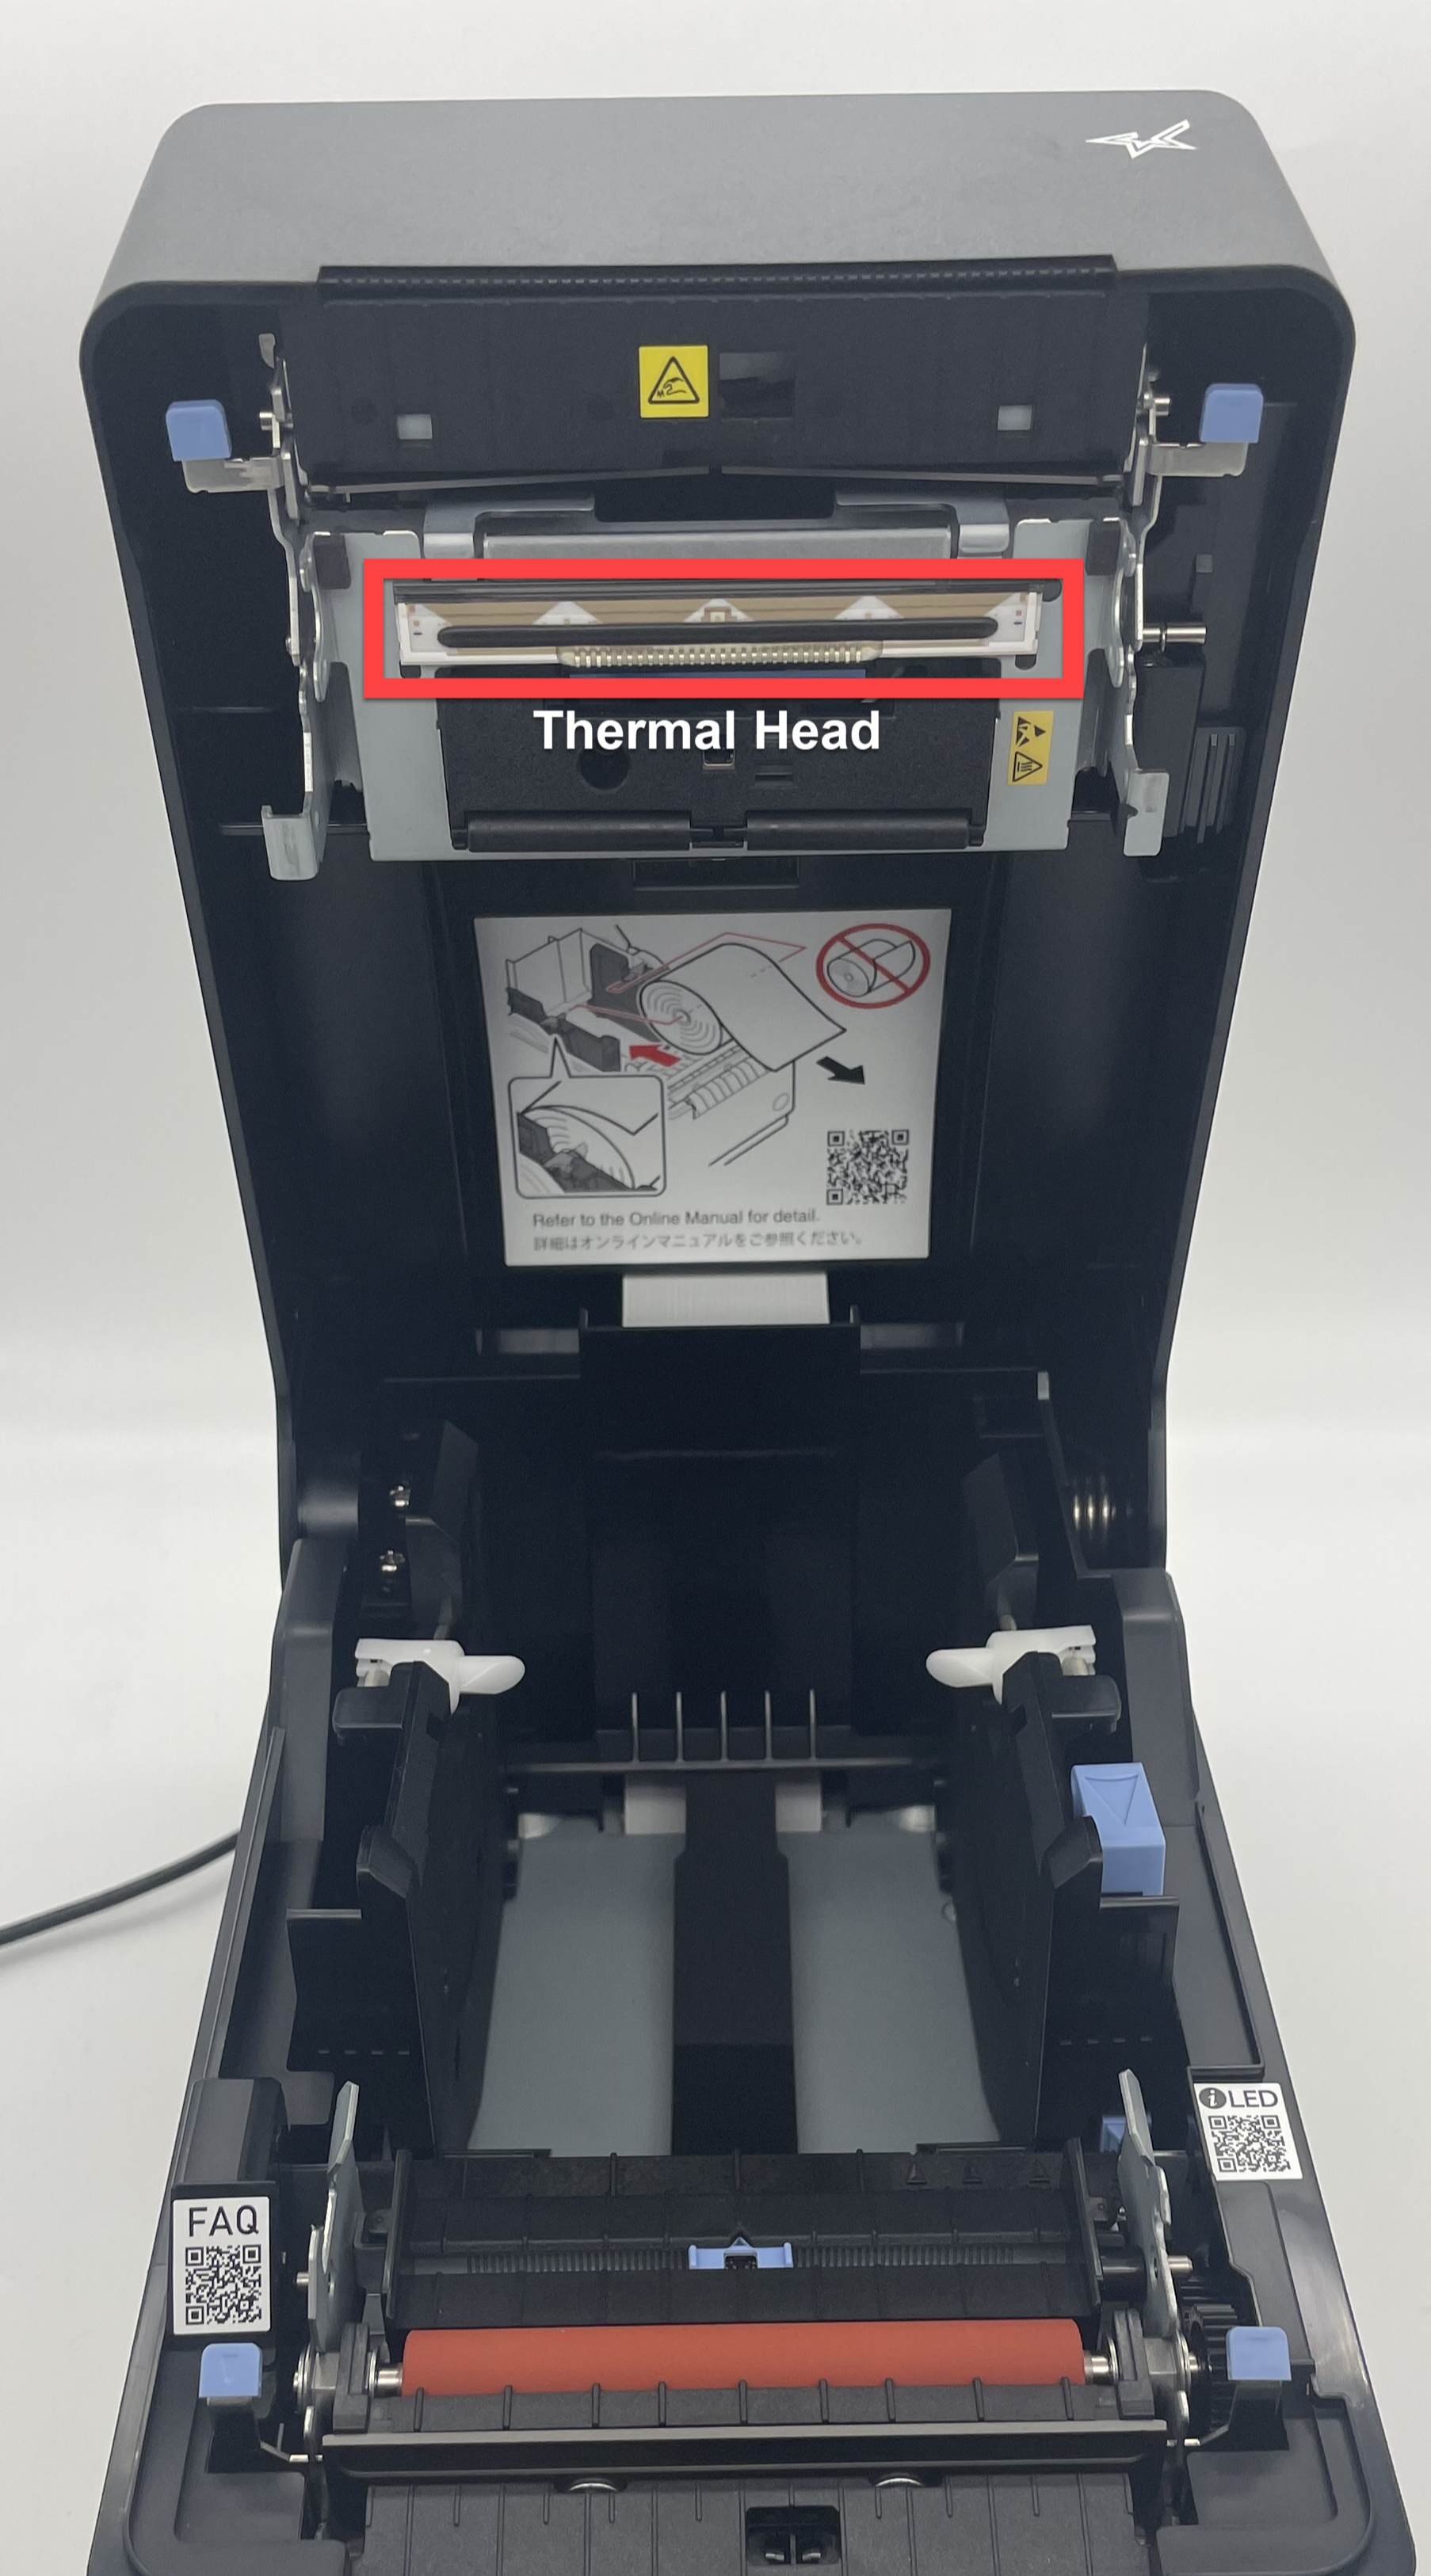
- Use a cotton swab and soft cloth, lightly damp with isopropyl alcohol, and wipe or use adhesive tape to lightly press on the roller and thermal head to remove any residue.
| 2.0 and Fit Model | X Model | Lite Model |
|---|---|---|
 |
 |
 |
- Repeat until cotton swab and soft cloth remain white or adhesive tape has removed any residue.
- Load label roll after thermal head is completely dry and clean of residue.
WARNING
Printing labels with a damp thermal head will damage the printer.
5. Clean the printer black line sensor and thermal head and reprint labels.
Printer Placement and Care
Proper placement, upkeep, and routine cleaning of your DateCodeGenie® printer is a simple and effective way to maintain your printer.
Printer Care
Placement
- Room temperature environment only
- Place on a flat, stable surface or mount to a secure wall or shelf, away from vibrations, moisture, and liquids of any kind
Cleaning
Printer
Ensure routine printer cleaning to prevent paper jams, print quality issues, and incorrect cutting of labels.
Cleaning Supplies Needed
- Isopropyl Alcohol
- Cotton swabs, soft clothes, or adhesive tape
- Canned air
WARNINGS
- Never clean the printer immediately after printing. Wait until the printer has cooled to avoid damage to the thermal head.
- Avoid scratching and exposing the thermal head to static electricity.
- Do not use Isopropyl alcohol to clean the cutting blade, stationary knife, and label roller as this may remove non-adhesive coating. Use adhesive tape to press on these parts inside printer lightly.
- Remove the label roll and any stuck labels inside the printer.
- Spray the canned air to clear any debris from inside the printer opening including the black line sensor.
NOTE
Do not tilt the canned air to avoid blowing liquid into the printer.
| mC-Label3 |
|---|
 |
3. Use a cotton swab and soft cloth, lightly damp with isopropyl alcohol, and lightly wipe on the roller and thermal head to remove any residue.
4. Another cleaning supply to use is adhesive tape to lightly press on the roller and thermal head to remove any residue.
| mC-Label3 |
|---|
 |
5. Repeat until cotton swab and soft cloth remain white or adhesive tape has removed any residue.
6. Load label roll after thermal head is completely dry and clean of residue.
WARNING
Printing labels with a damp thermal head will damage the printer.
3. Confirm the labels are DateCodeGenie® labels and meet label requirements.
Black Lines on DateCodeGenie® Labels
DateCodeGenie® labels use black line technology to indicate where a label should print and cut.
The black lines must have the correct color density, line thickness, line completion, and gap placement to print correctly, as shown.
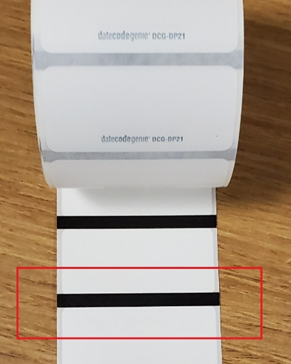
Incorrect black lines include:
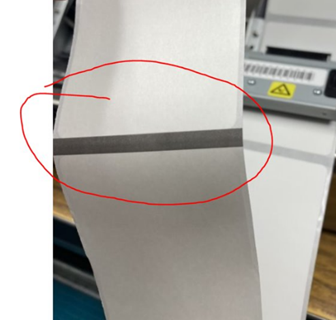
Color density
Black lines appear faded or gray in color and are not the correct color density required for the printer to print and cut correctly.
Line thickness
The black line is too thin and doesn't meet the correct line thickness required for the printer to print and cut correctly.
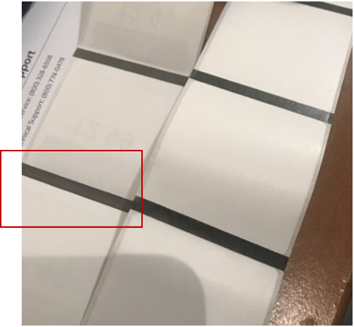
Complete line
The incomplete black line which includes not extending edge to edge or missing on the back of the label required for the printer to print and cut correctly.
Incomplete
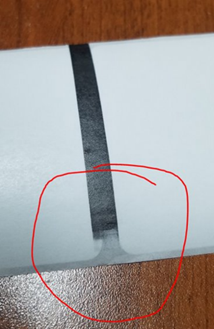
Partial Line
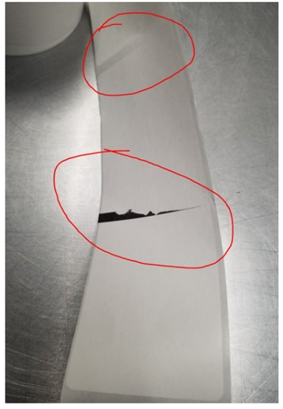
Missing
Gap placement
Black lines are printed on the back of the labels and meet the density, thickness and complete line specifications, however, the black line is not printed between the gap of the labels required for the printer to print and cut correctly.
Confirm your label roll has an incorrect black line, then send an email to repairs, see Contact & Support. Include the following information:
- Total number of label rolls affected
- Picture of the front and back of the labels
- Order number, date ordered, and product code for incorrect label rolls
- Label lot code, found on the master case
- Your name and phone number
- Device serial number
We will confirm whether black lines are incorrect, then replacement labels can be ordered and shipped within 1-5 business days via ground.
If requested, replacement labels can be shipped with a 2nd Day Air service that ships within 1-2 business days.
NOTES
- If labels meet black line requirements and do not print correctly, try a printer calibration, then see Device Troubleshooting for more solutions.
- If there is a visible stripe on the left side of a clear label, it is necessary, see Stripe on Clear Labels
2. Verify the correct label size is loaded in the printer that matches the printer profile trying to print. Reprint.
Load Labels in the mC-Label3 Printer
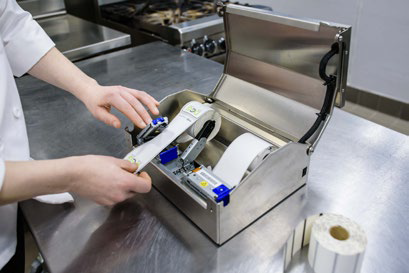
Load labels in an mC-Label3 printer.
Steps:
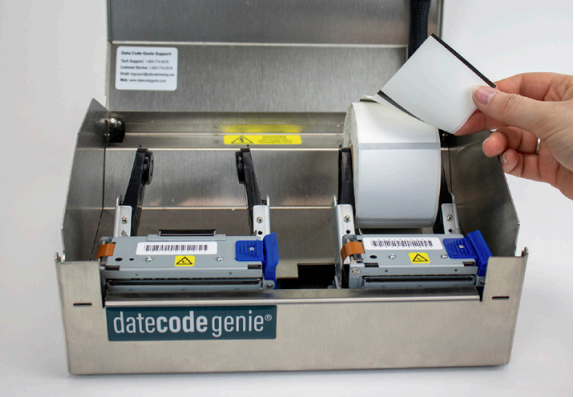
1. Push the lever on the right side of the printer to open lid.
2. Press the blue lever and place in label roll facing upward in between the guides to adjust to label roll width.

3. Gently push the label roll into the guides to insert shafts on each side of label roll to snap in place.
4. Extend labels over the edge of printer and close printer lid. Labels will automatically advance and cut to calibrate to be ready to print.
2. Verify the correct label size is loaded in the printer that matches the printer profile trying to print. Reprint.
How to Load Labels in the X Model Device
Loading labels in an X model device is easy. Follow the steps below or watch the video for assistance.
Steps:
1. Confirm the power cord is plugged into a working outlet and the master power switch on the back of the device is illuminated green.
2. Open the case cover, separate the two black arms, and insert the label roll unrolling from the top with black lines facing down.
3. Press the blue/black tab to release the lever, extend labels over the edge of the opening, and close lever to snap in place.
|
|
4. Labels will automatically advance and cut to calibrate the printer. Repeat for second printer (if applicable).
5. Close case cover and begin printing.
2. Verify the correct label size is loaded in the printer that matches the printer profile trying to print. Reprint.
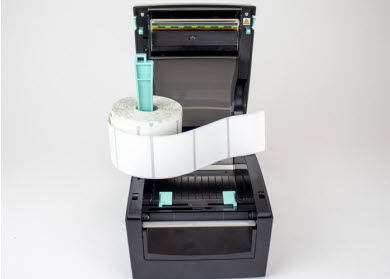
How to Load Labels in the Lite Model Device
Loading labels in a Lite model device is easy. Follow the steps below or watch the video for assistance.
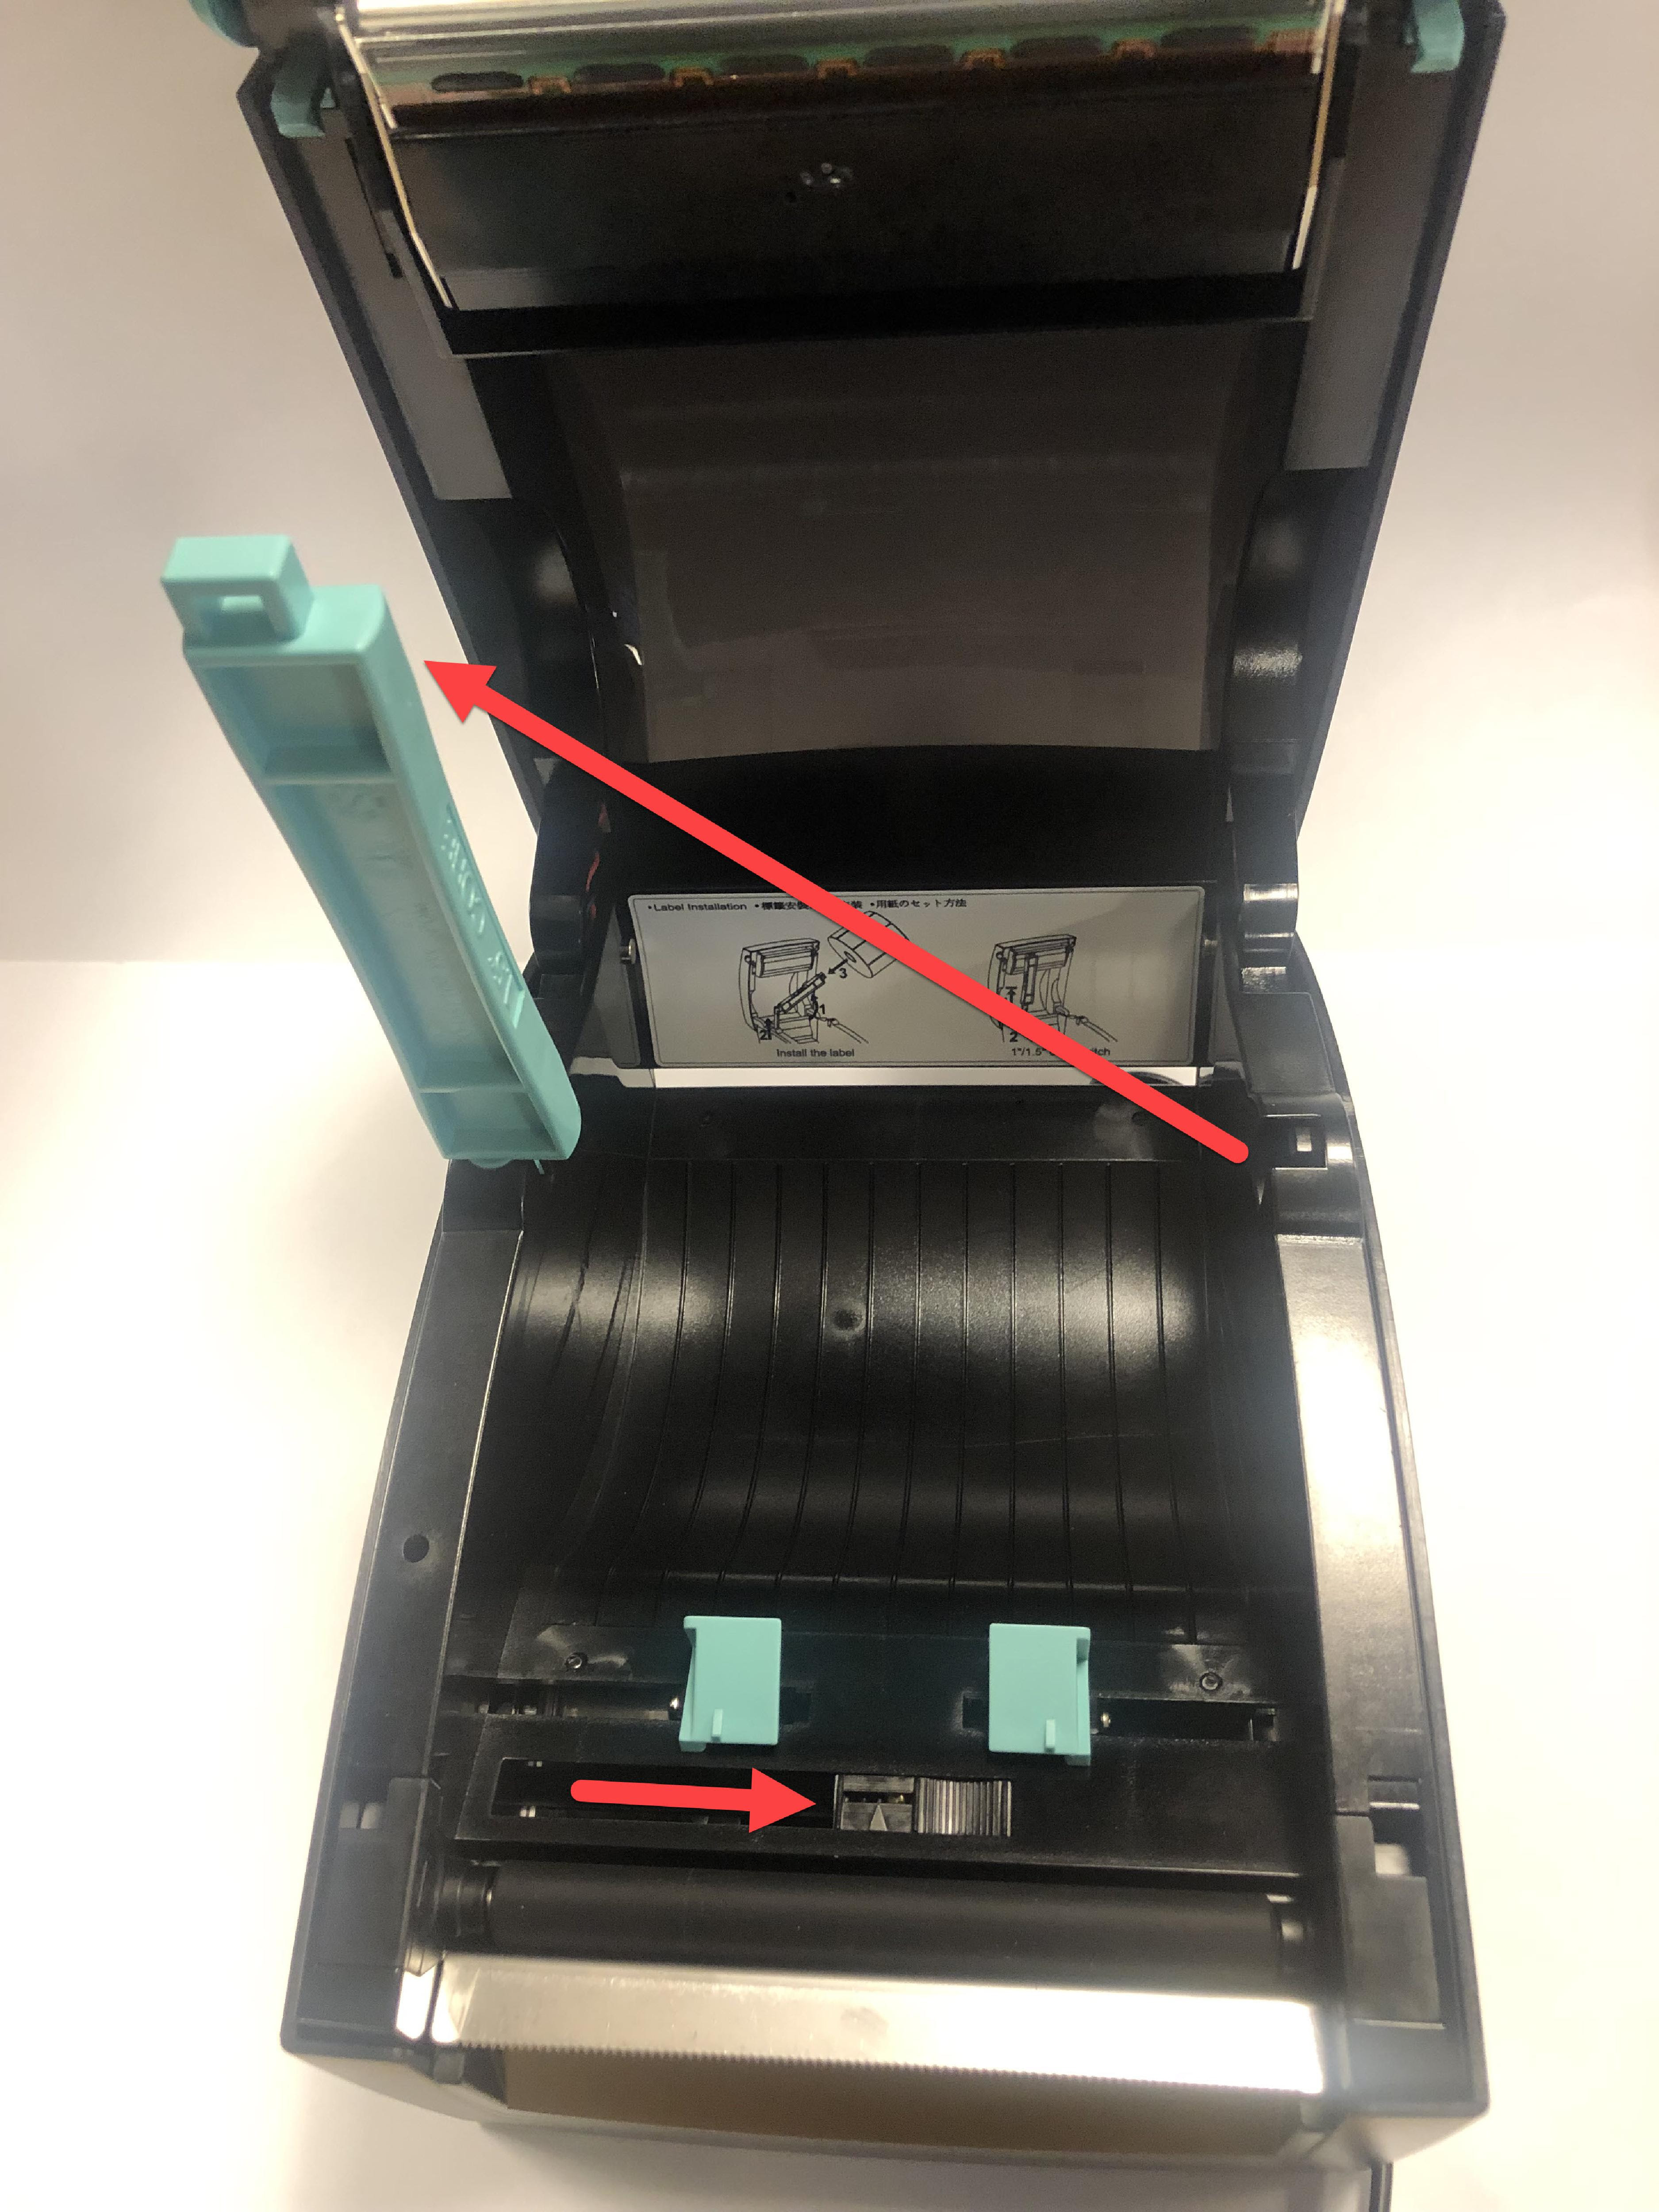
Steps:
1. Gently pull the blue/green core bar from the right side and extend straight up. Slide the black line sensor to the far right of the opening
2. Slide the label roll on core bar with labels facing forward and unrolling from left. Snap the core bar closed.
3. Feed labels through the blue/ green guides and extend over edge of printer. Adjust guides to label width and snap printer lid closed.
4. Press the yellow feed button, as needed, to align on black line. Pull down to tear label.
2. Verify the correct label size is loaded in the printer that matches the printer profile trying to print. Reprint.
How to Load Labels in the 2.0 and Fit Model Devices
2.0 model is discontinued.
Load labels in the 2.0 and Fit model devices.
Steps:
1. Open the case cover if using a 2.0 device.
2. Press the printer release button to open.
3. Locate roll guide on the right side of the opening and lift to remove.
4. Take the label roll unrolling from the bottom with the black lines facing up and place in the left side of the opening. Extend the labels over the edge of the printer.
5. Place the roll guide on the right side of the label roll to hold in place.
6. Close the printer lid and the labels will automatically advance and cut to calibrate.
7. Close the case cover. Printer is ready to print.
2. Verify the correct label size is loaded in the printer that matches the printer profile trying to print. Reprint.
Load Labels in the mC-Label3 Printer
Load labels in an mC-Label3 printer.
Steps:
1. Push the lever on the right side of the printer to open lid.
2. Press the blue lever and place in label roll facing upward in between the guides to adjust to label roll width.
3. Gently push the label roll into the guides to insert shafts on each side of label roll to snap in place.
4. Extend labels over the edge of printer and close printer lid. Labels will automatically advance and cut to calibrate to be ready to print.
3. Confirm the labels are DateCodeGenie® labels and meet label requirements.
DateCodeGenie® Labels
DateCodeGenie labels are manufactured specifically for DateCodeGenie devices. Labels are available in various shapes, sizes and adhesives using black line technology to print and cut.
Thermal Printing
DateCodeGenie printers use thermal printing to transfer text and images in black onto labels instead of ink. There is no ink or ink cartridges needed for DateCodeGenie devices.
Black Line Technology
DateCodeGenie labels use black lines on the back of the roll to print correctly. Labels with incorrect black lines will print incorrectly. For reference, see Black Line Issues on Labels.
Linerless Labels
DateCodeGenie linerless labels are used with the mC-Label3 printer only. They eliminate liner peeling and reduce waste by providing more labels per roll, leading to fewer roll changes and less need for purchasing or switching between different label sizes.
Purchasing
Labels can be purchased from the NCCO store site at https://store.ncco.com or through your distributor.
3. Confirm the labels are DateCodeGenie® labels and meet label requirements.
DateCodeGenie® Label Print Quality Issues
All printers used in the DateCodeGenie use direct thermal technology. If a printed label’s quality is unsatisfactory or not clear, the label quality may be incorrect.
- Printed label quality is unsatisfactory
- Printed labels are not printing clearly
- Labels may lose their adhesiveness when placed on an object
- Printed label may be partially blank
Faded Labels
If dissolving labels are being used, verify the shelf life has not expired.
Steps:
1. Use a new label roll.
NOTE
Durapeel, Permanent, and Removable labels have a shelf life of one year (1 year). Dissolving labels that have a shelf life of six months (6 months). If possible, try using a non-dissolving label.
2. Clean DateCodeGenie printer thermal head free of debris and residue. See Device Placement and Care.
Half of Label Faded or Blank
The print on only half of a label is lighter, or only half of the label printed.
If using a Lite model, one of the clips is broken. The device will need a repair, see Contact & Support.
Misaligned Printing
Printing errors caused by a printer malfunction. However, labels may also cause an error.
Steps:
1. Try a new label roll that has a complete black line from side to side.
2. Take a picture of the front and back of the incorrect labels and provide the information below to Technical Support:
- Your Name
- Device Serial Number
- Label stock code, if known
Misaligned Color Coded
The black bar is not completely covering the day bars.
Steps:
1. Check all your label roll stock to verify how many rolls are affected.
2. Select a roll that has complete black lines not faded or too thin.
3. Load in your printer and reprint.
4. Take a picture of the front and back of the incorrect labels and provide the information below to Technical Support:
- Your Name
- Device Serial Number
- Label product code ordered
- Date and order # for labels
Missing Print
Printing errors caused by a few errors.
Steps:
1. Verify nothing is covering the thermal head on the printer:
- If so, read this article how to clean your printer thermal head. See Device Placement and Care.
- If not, try a new label roll to verify labels are not defective.
2. For labels with no label printed:
- Verify the labels are loaded in the printer correctly
- Verify no debris are covering the thermal head on the printer
- Try a new label roll to verify labels are not incorrect labels
3. Verify liquid has not damaged printer.
NOTE
If applicable, verify liquid detection indicators (LDI) for the specific device being used. See Where are liquid detection labels located?
4. Take a picture of the front and back of the incorrect labels and provide the information below to Technical Support:
- Your Name
- Device Serial Number
- Label stock code, if known
Lines Through Label
Void lines through the label.
|
Blank lines across your entire label that show no print indicate a failure of the print head. The printer may need to be replaced under your covered warranty, see DateCodeGenie® Device and Accessory Warranty
|
All of your print is visible but faded, cleaning the thermal head may resolve the issue. Thermal head placement varies by device model, see Device Placement and Care or printer, see Printer Placement and Care
|
3. Confirm the labels are DateCodeGenie® labels and meet label requirements.
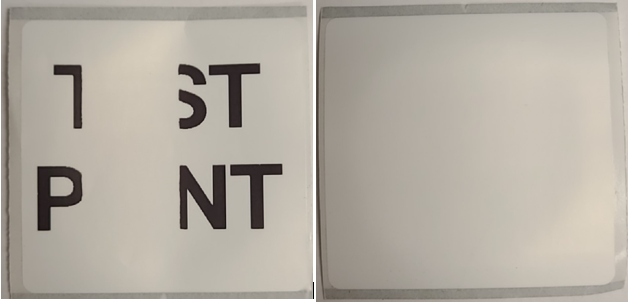
Faint Line on Label Front
Certain label SKUs may have a faint line on the front of the label, as shown below.
![]()
Handle call according to SKU as listed below:
2x3 Permanent labels (DCG-P23-4B)
SKU DCG-P23-4B is being sold at a markdown to customers who were made aware of the faded line defect when purchasing.
DCG-P23-4B is indicated by black sharpie line on the side of the label roll.
We will not be refunding this SKU since it is being sold as defective.
2x2 Dissolvable labels (DCG-D22)
Credit customer a new roll if their 2x2 dissolvable labels (SKU DCG-D22) has a faint line on the front.
For additional assistance see Contact & Support
3. Confirm the labels are DateCodeGenie® labels and meet label requirements.
Black Lines on DateCodeGenie® Labels
DateCodeGenie® labels use black line technology to indicate where a label should print and cut.
The black lines must have the correct color density, line thickness, line completion, and gap placement to print correctly, as shown.
Incorrect black lines include:
Color density
Black lines appear faded or gray in color and are not the correct color density required for the printer to print and cut correctly.
Line thickness
The black line is too thin and doesn't meet the correct line thickness required for the printer to print and cut correctly.
Complete line
The incomplete black line which includes not extending edge to edge or missing on the back of the label required for the printer to print and cut correctly.
Incomplete
Partial Line
Missing
Gap placement
Black lines are printed on the back of the labels and meet the density, thickness and complete line specifications, however, the black line is not printed between the gap of the labels required for the printer to print and cut correctly.
Confirm your label roll has an incorrect black line, then send an email to repairs, see Contact & Support. Include the following information:
- Total number of label rolls affected
- Picture of the front and back of the labels
- Order number, date ordered, and product code for incorrect label rolls
- Label lot code, found on the master case
- Your name and phone number
- Device serial number
We will confirm whether black lines are incorrect, then replacement labels can be ordered and shipped within 1-5 business days via ground.
If requested, replacement labels can be shipped with a 2nd Day Air service that ships within 1-2 business days.
NOTES
- If labels meet black line requirements and do not print correctly, try a printer calibration, then see Device Troubleshooting for more solutions.
- If there is a visible stripe on the left side of a clear label, it is necessary, see Stripe on Clear Labels
4. Calibrate the printer for a DateCodeGenie® X or Lite model device and reprint labels.
Printer Calibration (X Series)
Calibrating the DateCodeGenie® printer may help if the printer is not cutting or advancing labels correctly. This article goes over calibrating the X Series (X2, X22, X23) printer.
Steps:
1. Check that label roll is loaded with the labels facing upward and with the black line facing down. For more information on label loading, see Load Labels in the X Model Device.
2. Locate the 2 red or black buttons on the right side of each printer near the bottom housing.
NOTE
A pencil can be used to gently press the buttons on the right sided printer if you cannot reach.
3. Press and hold the SELECT button, the BACK button, until the labels advance, then release.
NOTE
If labels continually feed and do not stop, replace with a new roll with a solid black line on the back. For more information on correct and incorrect labels, see DateCodeGenie® Labels.
4. Press the FEED button, the FRONT button. Labels will advance to the black line and cut.
NOTE
If the printer doesn't cut on a black line, repeat this step.
5. Repeat these steps for each printer.
Failed Sensitivity Errors: Failed sensitivity errors that occur during printer calibration can be caused by three things:
1. Missing or faded lines on the label
Check that there is a solid black line on the back of the label. To see incorrect labels, see the chart in DateCodeGenie® Labels.
2. Debris blocking the black line sensor
Clean the printer black line sensor and thermal head. See Device Placement, Maintenance and Cleaning.
4. Calibrate the printer for a DateCodeGenie® X or Lite model device and reprint labels.
Printer Calibration (Lite)
If labels are not printing, advancing or cutting correctly, calibrating the printer will reset the black line and tear for proper printing.
There are options for calibrate the printer:
Manual Printer Calibration
1. Open the printer by pressing the two blue/green printer release buttons at the same time and lifting upward.
2. Slide the black line sensor to the far right of the opening.
3. Feed labels through the blue/green guides and extend over edge of printer. Adjust guides to label width and snap printer lid closed.
NOTE
Need to load labels? See How to Load Labels in the Lite Model Device.
4. Press the power switch to the O position to turn off the printer.
5. Hold the yellow feed button down with one hand while turning the power back on with the other hand, releasing the feed button when you hear the beeps and the red light flashes. Self-test labels will print.
6. Press the feed button once more to advance labels to the black line and pull down to tear.
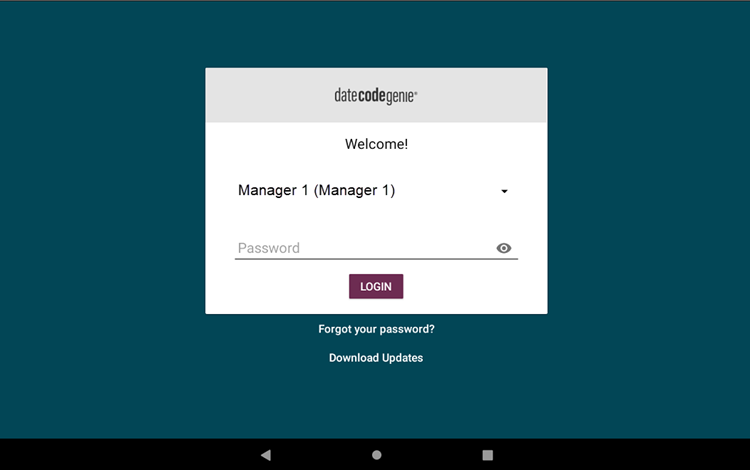
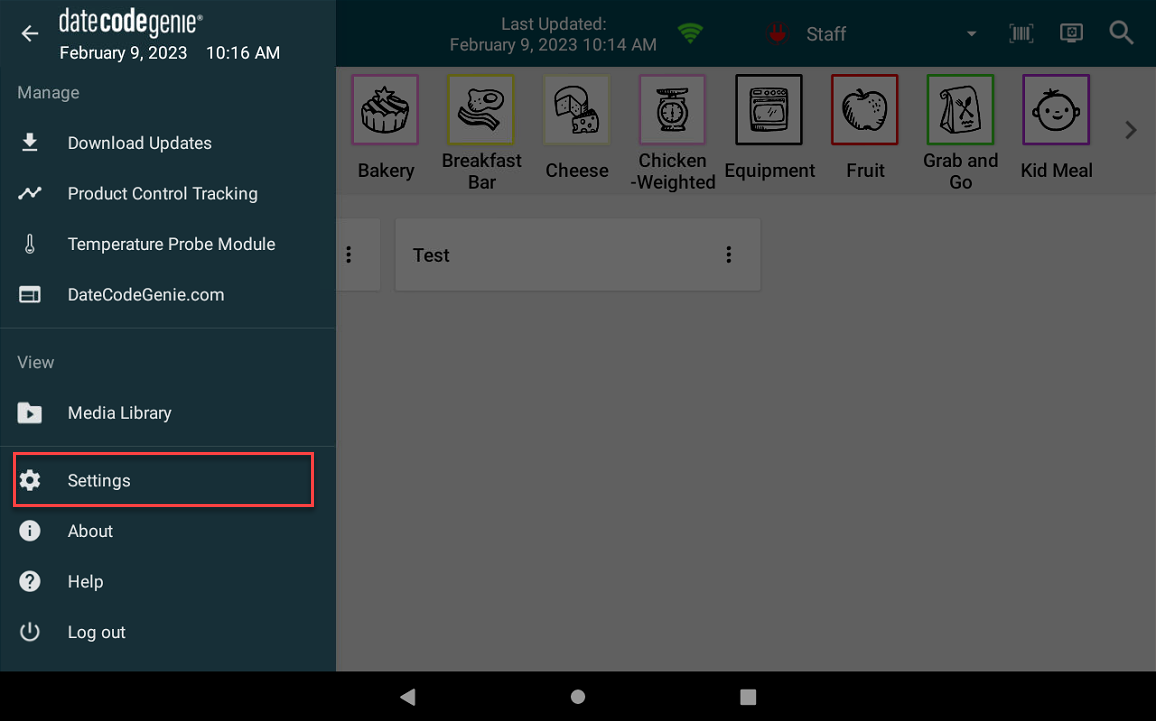
App Printer Calibration
1. Log in to the app with your username and password, if required.
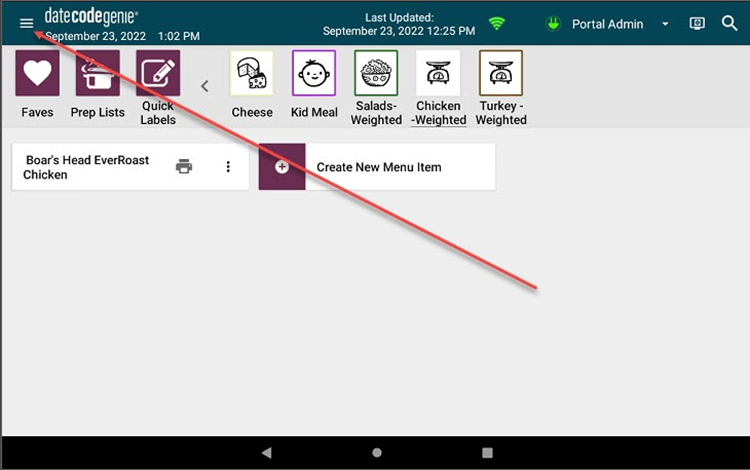
2. Tap the Navigation Button (three line icon) in the upper left hand corner.
3. Tap Settings from the menu.
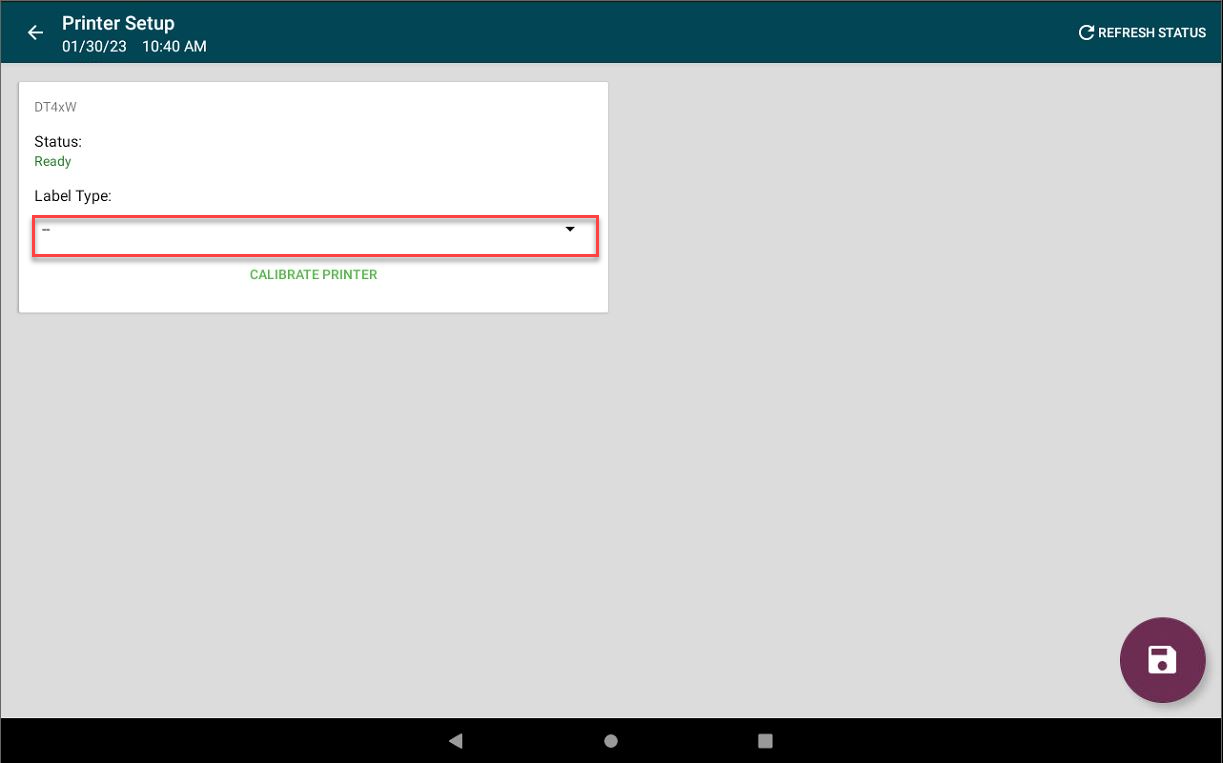
4. Tap Printer Setup.
5. Add Label Type if none is listed.
NOTE
Incorrect label type will result in the printer not calibrating correctly.
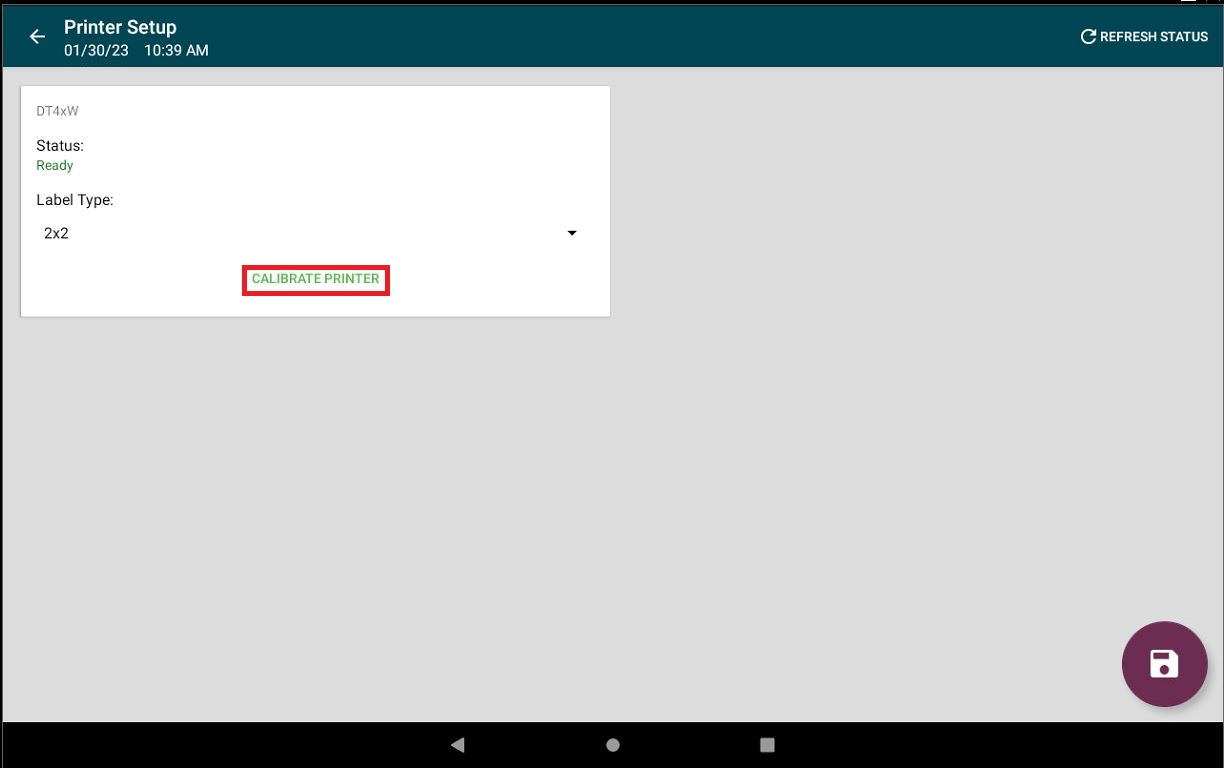
6. Tap Calibrate Printer.
NOTE
Status needs to be "Ready" to print labels. If having issues with printer connection, see Printer Connection Issue (Error 300x1) for Lite Device.
7. A self-test label will print.
5. Clean the printer black line sensor and thermal head and reprint labels.
Device Placement and Care
Proper placement, upkeep, and routine cleaning of your DateCodeGenie® device is a simple and effective way to maintain your device.
Device Care
Placement
- Room temperature environment only
- Place on a flat, stable surface or mount to a secure wall or shelf, away from vibrations, moisture, and liquids of any kind
Upkeep
All models
- Device can remain plugged into power with the tablet turned on to maintain the battery's charge
- Ensure rubber feet on certain models are attached to keep device in place
2.0 model
- Ensure liquid protection seal (black rubber flap) is in place on the 2.0 model device to protect from moisture and liquid
Fit model
- Ensure the splash cover is in place on the Fit model device to protect from moisture and liquid
Lite model
- Ensure the tablet silicone cover is in place on the Lite tablet to protect from accidental damage
Cleaning
Stainless Steel Housing
Cleaning Supplies Needed
- Lint-free or microfiber cloth
- Foaming degreaser
- Wipe down the stainless steel using a lint-free or microfiber cloth.
WARNING
- Never use abrasive cleaning pads, this will cause scratches and discoloration.
- Be sure the tablet is powered off and the device is unplugged from
the wall outlet before any cleaning.
- For a deeper clean, apply a small amount of foaming degreaser directly on the stainless steel and wipe immediately.
NOTE
Wipe any overspray from the tablet right away.
Tablet
Cleaning Supplies Needed
- Lint-free or microfiber cloth
- Alcohol-based glass cleaner
- Spray a soft, lint-free cloth with an alcohol-based glass cleaner and gently wipe the touchscreen.
WARNING
Never use an abrasive pad or spray directly on the touchscreen as this may damage the screen.
- Repeat if needed.
Printer
Cleaning Supplies Needed
- Isopropyl Alcohol
- Cotton swabs, soft clothes, or adhesive tape
- Canned air
WARNINGS
- Never clean the printer immediately after printing. Wait until the printer has cooled to avoid damage to the thermal head.
- Avoid scratching and exposing the thermal head to static electricity.
- Remove the label roll and any stuck labels inside the printer.
- Spray the canned air to clear any debris from inside the printer opening including the black line sensors.
NOTE
Do not tilt the canned air to avoid blowing liquid into the printer.
| 2.0 and Fit Model | X Model | Lite Model |
|---|---|---|
|
|
|
- Use a cotton swab and soft cloth, lightly damp with isopropyl alcohol, and wipe or use adhesive tape to lightly press on the roller and thermal head to remove any residue.
| 2.0 and Fit Model | X Model | Lite Model |
|---|---|---|
|
|
|
- Repeat until cotton swab and soft cloth remain white or adhesive tape has removed any residue.
- Load label roll after thermal head is completely dry and clean of residue.
WARNING
Printing labels with a damp thermal head will damage the printer.
5. Clean the printer black line sensor and thermal head and reprint labels.
Printer Placement and Care
Proper placement, upkeep, and routine cleaning of your DateCodeGenie® printer is a simple and effective way to maintain your printer.
Printer Care
Placement
- Room temperature environment only
- Place on a flat, stable surface or mount to a secure wall or shelf, away from vibrations, moisture, and liquids of any kind
Cleaning
Printer
Ensure routine printer cleaning to prevent paper jams, print quality issues, and incorrect cutting of labels.
Cleaning Supplies Needed
- Isopropyl Alcohol
- Cotton swabs, soft clothes, or adhesive tape
- Canned air
WARNINGS
- Never clean the printer immediately after printing. Wait until the printer has cooled to avoid damage to the thermal head.
- Avoid scratching and exposing the thermal head to static electricity.
- Do not use Isopropyl alcohol to clean the cutting blade, stationary knife, and label roller as this may remove non-adhesive coating. Use adhesive tape to press on these parts inside printer lightly.
- Remove the label roll and any stuck labels inside the printer.
- Spray the canned air to clear any debris from inside the printer opening including the black line sensor.
NOTE
Do not tilt the canned air to avoid blowing liquid into the printer.
| mC-Label3 |
|---|
|
3. Use a cotton swab and soft cloth, lightly damp with isopropyl alcohol, and lightly wipe on the roller and thermal head to remove any residue.
4. Another cleaning supply to use is adhesive tape to lightly press on the roller and thermal head to remove any residue.
| mC-Label3 |
|---|
|
5. Repeat until cotton swab and soft cloth remain white or adhesive tape has removed any residue.
6. Load label roll after thermal head is completely dry and clean of residue.
WARNING
Printing labels with a damp thermal head will damage the printer.
3. Confirm the labels are DateCodeGenie® labels and meet label requirements.
DateCodeGenie® Labels
DateCodeGenie labels are manufactured specifically for DateCodeGenie devices. Labels are available in various shapes, sizes and adhesives using black line technology to print and cut.
Thermal Printing
DateCodeGenie printers use thermal printing to transfer text and images in black onto labels instead of ink. There is no ink or ink cartridges needed for DateCodeGenie devices.
Black Line Technology
DateCodeGenie labels use black lines on the back of the roll to print correctly. Labels with incorrect black lines will print incorrectly. For reference, see Black Line Issues on Labels.
Linerless Labels
DateCodeGenie linerless labels are used with the mC-Label3 printer only. They eliminate liner peeling and reduce waste by providing more labels per roll, leading to fewer roll changes and less need for purchasing or switching between different label sizes.
Purchasing
Labels can be purchased from the NCCO store site at https://store.ncco.com or through your distributor.
3. Confirm the labels are DateCodeGenie® labels and meet label requirements.
DateCodeGenie Label Print Quality Issues
All printers used in the DateCodeGenie use direct thermal technology. If a printed label’s quality is unsatisfactory or not clear, the label quality may be incorrect.
- Printed label quality is unsatisfactory
- Printed labels are not printing clearly
- Labels may lose their adhesiveness when placed on an object
- Printed label may be partially blank
Faded Labels
If dissolving labels are being used, verify the shelf life has not expired.
Steps:
1. Use a new label roll.
NOTE
Durapeel, Permanent, and Removable labels have a shelf life of one year (1 year). Dissolving labels that have a shelf life of six months (6 months). If possible, try using a non-dissolving label.
2. Clean DateCodeGenie printer thermal head free of debris and residue. See Device Placement and Care.
Half of Label Faded or Blank
The print on only half of a label is lighter, or only half of the label printed.
If using a Lite model, one of the clips is broken. The device will need a repair, see Contact & Support.
Misaligned Printing
Printing errors caused by a printer malfunction. However, labels may also cause an error.
Steps:
1. Try a new label roll that has a complete black line from side to side.
2. Take a picture of the front and back of the incorrect labels and provide the information below to Technical Support:
- Your Name
- Device Serial Number
- Label stock code, if known
Misaligned Color Coded
The black bar is not completely covering the day bars.
Steps:
1. Check all your label roll stock to verify how many rolls are affected.
2. Select a roll that has complete black lines not faded or too thin.
3. Load in your printer and reprint.
4. Take a picture of the front and back of the incorrect labels and provide the information below to Technical Support:
- Your Name
- Device Serial Number
- Label product code ordered
- Date and order # for labels
Missing Print
Printing errors caused by a few errors.
Steps:
1. Verify nothing is covering the thermal head on the printer:
- If so, read this article how to clean your printer thermal head. See Device Placement and Care.
- If not, try a new label roll to verify labels are not defective.
2. For labels with no label printed:
- Verify the labels are loaded in the printer correctly
- Verify no debris are covering the thermal head on the printer
- Try a new label roll to verify labels are not incorrect labels
3. Verify liquid has not damaged printer.
NOTE
If applicable, verify liquid detection indicators (LDI) for the specific device being used. See Where are liquid detection labels located?
4. Take a picture of the front and back of the incorrect labels and provide the information below to Technical Support:
- Your Name
- Device Serial Number
- Label stock code, if known
Lines Through Label
Void lines through the label.
|
Blank lines across your entire label that show no print indicate a failure of the print head. The printer may need to be replaced under your covered warranty, see DateCodeGenie® Device and Accessory Warranty
|
All of your print is visible but faded, cleaning the thermal head may resolve the issue. Thermal head placement varies by device model, see Device Placement and Care or printer, see Printer Placement and Care
|
3. Confirm the labels are DateCodeGenie® labels and meet label requirements.
Faint Line on Label Front
Certain label SKUs may have a faint line on the front of the label, as shown below.
![]()
Handle call according to SKU as listed below:
2x3 Permanent labels (DCG-P23-4B)
SKU DCG-P23-4B is being sold at a markdown to customers who were made aware of the faded line defect when purchasing.
DCG-P23-4B is indicated by black sharpie line on the side of the label roll.
We will not be refunding this SKU since it is being sold as defective.
2x2 Dissolvable labels (DCG-D22)
Credit customer a new roll if their 2x2 dissolvable labels (SKU DCG-D22) has a faint line on the front.
For additional assistance see Contact & Support
3. Confirm the labels are DateCodeGenie® labels and meet label requirements.
Black Lines on DateCodeGenie® Labels
DateCodeGenie® labels use black line technology to indicate where a label should print and cut.
The black lines must have the correct color density, line thickness, line completion, and gap placement to print correctly, as shown.
Incorrect black lines include:
Color density
Black lines appear faded or gray in color and are not the correct color density required for the printer to print and cut correctly.
Line thickness
The black line is too thin and doesn't meet the correct line thickness required for the printer to print and cut correctly.
Complete line
The incomplete black line which includes not extending edge to edge or missing on the back of the label required for the printer to print and cut correctly.
Incomplete
Partial Line
Missing
Gap placement
Black lines are printed on the back of the labels and meet the density, thickness and complete line specifications, however, the black line is not printed between the gap of the labels required for the printer to print and cut correctly.
Confirm your label roll has an incorrect black line, then send an email to repairs, see Contact & Support. Include the following information:
- Total number of label rolls affected
- Picture of the front and back of the labels
- Order number, date ordered, and product code for incorrect label rolls
- Label lot code, found on the master case
- Your name and phone number
- Device serial number
We will confirm whether black lines are incorrect, then replacement labels can be ordered and shipped within 1-5 business days via ground.
If requested, replacement labels can be shipped with a 2nd Day Air service that ships within 1-2 business days.
NOTES
- If labels meet black line requirements and do not print correctly, try a printer calibration, then see Device Troubleshooting for more solutions.
- If there is a visible stripe on the left side of a clear label, it is necessary, see Stripe on Clear Labels
4. Calibrate the printer for a DateCodeGenie® X or Lite model device and reprint labels.
Printer Calibration (X Series)
Calibrating the DateCodeGenie® printer may help if the printer is not cutting or advancing labels correctly. This article goes over calibrating the X Series (X2, X22, X23) printer.
Steps:
1. Check that label roll is loaded with the labels facing upward and with the black line facing down. For more information on label loading, see Load Labels in the X Model Device.
2. Locate the 2 red or black buttons on the right side of each printer near the bottom housing.
NOTE
A pencil can be used to gently press the buttons on the right sided printer if you cannot reach.
3. Press and hold the SELECT button, the BACK button, until the labels advance, then release.
NOTE
If labels continually feed and do not stop, replace with a new roll with a solid black line on the back. For more information on correct and incorrect labels, see DateCodeGenie® Labels.
4. Press the FEED button, the FRONT button. Labels will advance to the black line and cut.
NOTE
If the printer doesn't cut on a black line, repeat this step.
5. Repeat these steps for each printer.
Failed Sensitivity Errors: Failed sensitivity errors that occur during printer calibration can be caused by three things:
1. Missing or faded lines on the label
Check that there is a solid black line on the back of the label. To see incorrect labels, see the chart in DateCodeGenie® Labels.
2. Debris blocking the black line sensor
Clean the printer black line sensor and thermal head. See Device Placement, Maintenance and Cleaning.
4. Calibrate the printer for a DateCodeGenie® X or Lite model device and reprint labels.
Printer Calibration (Lite)
If labels are not printing, advancing or cutting correctly, calibrating the printer will reset the black line and tear for proper printing.
There are options for calibrate the printer:
Manual Printer Calibration
1. Open the printer by pressing the two blue/green printer release buttons at the same time and lifting upward.
2. Slide the black line sensor to the far right of the opening.
3. Feed labels through the blue/green guides and extend over edge of printer. Adjust guides to label width and snap printer lid closed.
NOTE
Need to load labels? See How to Load Labels in the Lite Model Device.
4. Press the power switch to the O position to turn off the printer.
5. Hold the yellow feed button down with one hand while turning the power back on with the other hand, releasing the feed button when you hear the beeps and the red light flashes. Self-test labels will print.
6. Press the feed button once more to advance labels to the black line and pull down to tear.
App Printer Calibration
1. Log in to the app with your username and password, if required.
2. Tap the Navigation Button (three line icon) in the upper left hand corner.
3. Tap Settings from the menu.
4. Tap Printer Setup.
5. Add Label Type if none is listed.
NOTE
Incorrect label type will result in the printer not calibrating correctly.
6. Tap Calibrate Printer.
NOTE
Status needs to be "Ready" to print labels. If having issues with printer connection, see Printer Connection Issue (Error 300x1) for Lite Device.
7. A self-test label will print.
5. Clean the printer black line sensor and thermal head and reprint labels.
Device Placement and Care
Proper placement, upkeep, and routine cleaning of your DateCodeGenie® device is a simple and effective way to maintain your device.
Device Care
Placement
- Room temperature environment only
- Place on a flat, stable surface or mount to a secure wall or shelf, away from vibrations, moisture, and liquids of any kind
Upkeep
All models
- Device can remain plugged into power with the tablet turned on to maintain the battery's charge
- Ensure rubber feet on certain models are attached to keep device in place
2.0 model
- Ensure liquid protection seal (black rubber flap) is in place on the 2.0 model device to protect from moisture and liquid
Fit model
- Ensure the splash cover is in place on the Fit model device to protect from moisture and liquid
Lite model
- Ensure the tablet silicone cover is in place on the Lite tablet to protect from accidental damage
Cleaning
Stainless Steel Housing
Cleaning Supplies Needed
- Lint-free or microfiber cloth
- Foaming degreaser
- Wipe down the stainless steel using a lint-free or microfiber cloth.
WARNING
- Never use abrasive cleaning pads, this will cause scratches and discoloration.
- Be sure the tablet is powered off and the device is unplugged from
the wall outlet before any cleaning.
- For a deeper clean, apply a small amount of foaming degreaser directly on the stainless steel and wipe immediately.
NOTE
Wipe any overspray from the tablet right away.
Tablet
Cleaning Supplies Needed
- Lint-free or microfiber cloth
- Alcohol-based glass cleaner
- Spray a soft, lint-free cloth with an alcohol-based glass cleaner and gently wipe the touchscreen.
WARNING
Never use an abrasive pad or spray directly on the touchscreen as this may damage the screen.
- Repeat if needed.
Printer
Cleaning Supplies Needed
- Isopropyl Alcohol
- Cotton swabs, soft clothes, or adhesive tape
- Canned air
WARNINGS
- Never clean the printer immediately after printing. Wait until the printer has cooled to avoid damage to the thermal head.
- Avoid scratching and exposing the thermal head to static electricity.
- Remove the label roll and any stuck labels inside the printer.
- Spray the canned air to clear any debris from inside the printer opening including the black line sensors.
NOTE
Do not tilt the canned air to avoid blowing liquid into the printer.
| 2.0 and Fit Model | X Model | Lite Model |
|---|---|---|
|
|
|
- Use a cotton swab and soft cloth, lightly damp with isopropyl alcohol, and wipe or use adhesive tape to lightly press on the roller and thermal head to remove any residue.
| 2.0 and Fit Model | X Model | Lite Model |
|---|---|---|
|
|
|
- Repeat until cotton swab and soft cloth remain white or adhesive tape has removed any residue.
- Load label roll after thermal head is completely dry and clean of residue.
WARNING
Printing labels with a damp thermal head will damage the printer.
5. Clean the printer black line sensor and thermal head and reprint labels.
Printer Placement and Care
Proper placement, upkeep, and routine cleaning of your DateCodeGenie® printer is a simple and effective way to maintain your printer.
Printer Care
Placement
- Room temperature environment only
- Place on a flat, stable surface or mount to a secure wall or shelf, away from vibrations, moisture, and liquids of any kind
Cleaning
Printer
Ensure routine printer cleaning to prevent paper jams, print quality issues, and incorrect cutting of labels.
Cleaning Supplies Needed
- Isopropyl Alcohol
- Cotton swabs, soft clothes, or adhesive tape
- Canned air
WARNINGS
- Never clean the printer immediately after printing. Wait until the printer has cooled to avoid damage to the thermal head.
- Avoid scratching and exposing the thermal head to static electricity.
- Do not use Isopropyl alcohol to clean the cutting blade, stationary knife, and label roller as this may remove non-adhesive coating. Use adhesive tape to press on these parts inside printer lightly.
- Remove the label roll and any stuck labels inside the printer.
- Spray the canned air to clear any debris from inside the printer opening including the black line sensor.
NOTE
Do not tilt the canned air to avoid blowing liquid into the printer.
| mC-Label3 |
|---|
|
3. Use a cotton swab and soft cloth, lightly damp with isopropyl alcohol, and lightly wipe on the roller and thermal head to remove any residue.
4. Another cleaning supply to use is adhesive tape to lightly press on the roller and thermal head to remove any residue.
| mC-Label3 |
|---|
|
5. Repeat until cotton swab and soft cloth remain white or adhesive tape has removed any residue.
6. Load label roll after thermal head is completely dry and clean of residue.
WARNING
Printing labels with a damp thermal head will damage the printer.
4. Calibrate the printer for a DateCodeGenie® X or Lite model device and reprint labels.
Printer Calibration (X Series)
Calibrating the DateCodeGenie® printer may help if the printer is not cutting or advancing labels correctly. This article goes over calibrating the X Series (X2, X22, X23) printer.
Steps:
1. Check that label roll is loaded with the labels facing upward and with the black line facing down. For more information on label loading, see Load Labels in the X Model Device.
2. Locate the 2 red or black buttons on the right side of each printer near the bottom housing.
NOTE
A pencil can be used to gently press the buttons on the right sided printer if you cannot reach.
3. Press and hold the SELECT button, the BACK button, until the labels advance, then release.
NOTE
If labels continually feed and do not stop, replace with a new roll with a solid black line on the back. For more information on correct and incorrect labels, see DateCodeGenie® Labels.
4. Press the FEED button, the FRONT button. Labels will advance to the black line and cut.
NOTE
If the printer doesn't cut on a black line, repeat this step.
5. Repeat these steps for each printer.
Failed Sensitivity Errors: Failed sensitivity errors that occur during printer calibration can be caused by three things:
1. Missing or faded lines on the label
Check that there is a solid black line on the back of the label. To see incorrect labels, see the chart in DateCodeGenie® Labels.
2. Debris blocking the black line sensor
Clean the printer black line sensor and thermal head. See Device Placement, Maintenance and Cleaning.
4. Calibrate the printer for a DateCodeGenie® X or Lite model device and reprint labels.
Printer Calibration (Lite)
If labels are not printing, advancing or cutting correctly, calibrating the printer will reset the black line and tear for proper printing.
There are options for calibrate the printer:
Manual Printer Calibration
1. Open the printer by pressing the two blue/green printer release buttons at the same time and lifting upward.
2. Slide the black line sensor to the far right of the opening.
3. Feed labels through the blue/green guides and extend over edge of printer. Adjust guides to label width and snap printer lid closed.
NOTE
Need to load labels? See How to Load Labels in the Lite Model Device.
4. Press the power switch to the O position to turn off the printer.
5. Hold the yellow feed button down with one hand while turning the power back on with the other hand, releasing the feed button when you hear the beeps and the red light flashes. Self-test labels will print.
6. Press the feed button once more to advance labels to the black line and pull down to tear.
App Printer Calibration
1. Log in to the app with your username and password, if required.
2. Tap the Navigation Button (three line icon) in the upper left hand corner.
3. Tap Settings from the menu.
4. Tap Printer Setup.
5. Add Label Type if none is listed.
NOTE
Incorrect label type will result in the printer not calibrating correctly.
6. Tap Calibrate Printer.
NOTE
Status needs to be "Ready" to print labels. If having issues with printer connection, see Printer Connection Issue (Error 300x1) for Lite Device.
7. A self-test label will print.
5. Clean the printer black line sensor and thermal head and reprint labels.
Device Placement and Care
Proper placement, upkeep, and routine cleaning of your DateCodeGenie® device is a simple and effective way to maintain your device.
Device Care
Placement
- Room temperature environment only
- Place on a flat, stable surface or mount to a secure wall or shelf, away from vibrations, moisture, and liquids of any kind
Upkeep
All models
- Device can remain plugged into power with the tablet turned on to maintain the battery's charge
- Ensure rubber feet on certain models are attached to keep device in place
2.0 model
- Ensure liquid protection seal (black rubber flap) is in place on the 2.0 model device to protect from moisture and liquid
Fit model
- Ensure the splash cover is in place on the Fit model device to protect from moisture and liquid
Lite model
- Ensure the tablet silicone cover is in place on the Lite tablet to protect from accidental damage
Cleaning
Stainless Steel Housing
Cleaning Supplies Needed
- Lint-free or microfiber cloth
- Foaming degreaser
- Wipe down the stainless steel using a lint-free or microfiber cloth.
WARNING
- Never use abrasive cleaning pads, this will cause scratches and discoloration.
- Be sure the tablet is powered off and the device is unplugged from
the wall outlet before any cleaning.
- For a deeper clean, apply a small amount of foaming degreaser directly on the stainless steel and wipe immediately.
NOTE
Wipe any overspray from the tablet right away.
Tablet
Cleaning Supplies Needed
- Lint-free or microfiber cloth
- Alcohol-based glass cleaner
- Spray a soft, lint-free cloth with an alcohol-based glass cleaner and gently wipe the touchscreen.
WARNING
Never use an abrasive pad or spray directly on the touchscreen as this may damage the screen.
- Repeat if needed.
Printer
Cleaning Supplies Needed
- Isopropyl Alcohol
- Cotton swabs, soft clothes, or adhesive tape
- Canned air
WARNINGS
- Never clean the printer immediately after printing. Wait until the printer has cooled to avoid damage to the thermal head.
- Avoid scratching and exposing the thermal head to static electricity.
- Remove the label roll and any stuck labels inside the printer.
- Spray the canned air to clear any debris from inside the printer opening including the black line sensors.
NOTE
Do not tilt the canned air to avoid blowing liquid into the printer.
| 2.0 and Fit Model | X Model | Lite Model |
|---|---|---|
|
|
|
- Use a cotton swab and soft cloth, lightly damp with isopropyl alcohol, and wipe or use adhesive tape to lightly press on the roller and thermal head to remove any residue.
| 2.0 and Fit Model | X Model | Lite Model |
|---|---|---|
|
|
|
- Repeat until cotton swab and soft cloth remain white or adhesive tape has removed any residue.
- Load label roll after thermal head is completely dry and clean of residue.
WARNING
Printing labels with a damp thermal head will damage the printer.
5. Clean the printer black line sensor and thermal head and reprint labels.
Printer Placement and Care
Proper placement, upkeep, and routine cleaning of your DateCodeGenie® printer is a simple and effective way to maintain your printer.
Printer Care
Placement
- Room temperature environment only
- Place on a flat, stable surface or mount to a secure wall or shelf, away from vibrations, moisture, and liquids of any kind
Cleaning
Printer
Ensure routine printer cleaning to prevent paper jams, print quality issues, and incorrect cutting of labels.
Cleaning Supplies Needed
- Isopropyl Alcohol
- Cotton swabs, soft clothes, or adhesive tape
- Canned air
WARNINGS
- Never clean the printer immediately after printing. Wait until the printer has cooled to avoid damage to the thermal head.
- Avoid scratching and exposing the thermal head to static electricity.
- Do not use Isopropyl alcohol to clean the cutting blade, stationary knife, and label roller as this may remove non-adhesive coating. Use adhesive tape to press on these parts inside printer lightly.
- Remove the label roll and any stuck labels inside the printer.
- Spray the canned air to clear any debris from inside the printer opening including the black line sensor.
NOTE
Do not tilt the canned air to avoid blowing liquid into the printer.
| mC-Label3 |
|---|
|
3. Use a cotton swab and soft cloth, lightly damp with isopropyl alcohol, and lightly wipe on the roller and thermal head to remove any residue.
4. Another cleaning supply to use is adhesive tape to lightly press on the roller and thermal head to remove any residue.
| mC-Label3 |
|---|
|
5. Repeat until cotton swab and soft cloth remain white or adhesive tape has removed any residue.
6. Load label roll after thermal head is completely dry and clean of residue.
WARNING
Printing labels with a damp thermal head will damage the printer.
5. Clean the printer black line sensor and thermal head and reprint labels.
Device Placement and Care
Proper placement, upkeep, and routine cleaning of your DateCodeGenie® device is a simple and effective way to maintain your device.
Device Care
Placement
- Room temperature environment only
- Place on a flat, stable surface or mount to a secure wall or shelf, away from vibrations, moisture, and liquids of any kind
Upkeep
All models
- Device can remain plugged into power with the tablet turned on to maintain the battery's charge
- Ensure rubber feet on certain models are attached to keep device in place
2.0 model
- Ensure liquid protection seal (black rubber flap) is in place on the 2.0 model device to protect from moisture and liquid
Fit model
- Ensure the splash cover is in place on the Fit model device to protect from moisture and liquid
Lite model
- Ensure the tablet silicone cover is in place on the Lite tablet to protect from accidental damage
Cleaning
Stainless Steel Housing
Cleaning Supplies Needed
- Lint-free or microfiber cloth
- Foaming degreaser
- Wipe down the stainless steel using a lint-free or microfiber cloth.
WARNING
- Never use abrasive cleaning pads, this will cause scratches and discoloration.
- Be sure the tablet is powered off and the device is unplugged from
the wall outlet before any cleaning.
- For a deeper clean, apply a small amount of foaming degreaser directly on the stainless steel and wipe immediately.
NOTE
Wipe any overspray from the tablet right away.
Tablet
Cleaning Supplies Needed
- Lint-free or microfiber cloth
- Alcohol-based glass cleaner
- Spray a soft, lint-free cloth with an alcohol-based glass cleaner and gently wipe the touchscreen.
WARNING
Never use an abrasive pad or spray directly on the touchscreen as this may damage the screen.
- Repeat if needed.
Printer
Cleaning Supplies Needed
- Isopropyl Alcohol
- Cotton swabs, soft clothes, or adhesive tape
- Canned air
WARNINGS
- Never clean the printer immediately after printing. Wait until the printer has cooled to avoid damage to the thermal head.
- Avoid scratching and exposing the thermal head to static electricity.
- Remove the label roll and any stuck labels inside the printer.
- Spray the canned air to clear any debris from inside the printer opening including the black line sensors.
NOTE
Do not tilt the canned air to avoid blowing liquid into the printer.
| 2.0 and Fit Model | X Model | Lite Model |
|---|---|---|
|
|
|
- Use a cotton swab and soft cloth, lightly damp with isopropyl alcohol, and wipe or use adhesive tape to lightly press on the roller and thermal head to remove any residue.
| 2.0 and Fit Model | X Model | Lite Model |
|---|---|---|
|
|
|
- Repeat until cotton swab and soft cloth remain white or adhesive tape has removed any residue.
- Load label roll after thermal head is completely dry and clean of residue.
WARNING
Printing labels with a damp thermal head will damage the printer.
5. Clean the printer black line sensor and thermal head and reprint labels.
Printer Placement and Care
Proper placement, upkeep, and routine cleaning of your DateCodeGenie® printer is a simple and effective way to maintain your printer.
Printer Care
Placement
- Room temperature environment only
- Place on a flat, stable surface or mount to a secure wall or shelf, away from vibrations, moisture, and liquids of any kind
Cleaning
Printer
Ensure routine printer cleaning to prevent paper jams, print quality issues, and incorrect cutting of labels.
Cleaning Supplies Needed
- Isopropyl Alcohol
- Cotton swabs, soft clothes, or adhesive tape
- Canned air
WARNINGS
- Never clean the printer immediately after printing. Wait until the printer has cooled to avoid damage to the thermal head.
- Avoid scratching and exposing the thermal head to static electricity.
- Do not use Isopropyl alcohol to clean the cutting blade, stationary knife, and label roller as this may remove non-adhesive coating. Use adhesive tape to press on these parts inside printer lightly.
- Remove the label roll and any stuck labels inside the printer.
- Spray the canned air to clear any debris from inside the printer opening including the black line sensor.
NOTE
Do not tilt the canned air to avoid blowing liquid into the printer.
| mC-Label3 |
|---|
|
3. Use a cotton swab and soft cloth, lightly damp with isopropyl alcohol, and lightly wipe on the roller and thermal head to remove any residue.
4. Another cleaning supply to use is adhesive tape to lightly press on the roller and thermal head to remove any residue.
| mC-Label3 |
|---|
|
5. Repeat until cotton swab and soft cloth remain white or adhesive tape has removed any residue.
6. Load label roll after thermal head is completely dry and clean of residue.
WARNING
Printing labels with a damp thermal head will damage the printer.