US English (US)
FR French
DE German
ES Spanish
IT Italian
NL Dutch
menu

Contact Us

No results found. Still need help? Contact us

  • Scheduled Assistance
  • Contact Us
English (US)
US English (US)
FR French
DE German
ES Spanish
IT Italian
NL Dutch
arrow_back
  • Getting Started
  • Devices
  • App
  • Portal
  • Admin Settings
  • Accessories
  • Labels
  • Repairs
  • APIs
  • Task Manager
  • Scheduled Assistance
  • Contact Us

Run Product Control Tracking Reports in the Portal

Contact Us

If you still have questions or prefer to get help directly from an agent, please submit a request.
We’ll get back to you as soon as possible.

  • Getting Started
    Getting Started Guides Set Up Training
  • Devices
    Troubleshooting Device Overview 2.0 Model X Series Model Fit Model Lite Model mC-Label3 Printer Device Tablet Internet Connection Warranty & Support
  • App
    Error Codes Troubleshooting App Overview Mobile App Subscription Prep Lists Product Control Rosters Scale Temperature Probe Print History Settings Language Location Overrides
  • Portal
    Portal Overview Locations Categories Menu Items Printer Profiles Users Settings Quick Labels Prep List Print History Mass Import and Export Media Library Location Overrides Product Control Rosters Scale Temperature Probe Groups
  • Admin Settings
    Start with Admin Settings Admin Settings Overview Locations Devices and Licenses
  • Accessories
    Bluetooth Scanner USB Scanner Temperature Probe Scale Label Rewinder Fit Printer Shelf Warranty
  • Labels
    Overview Troubleshooting
  • Repairs
    2.0 Model X Series Model Lite Model DateCodeGenie® Tablet
  • APIs
    Inbound APIs Outbound APIs
  • Task Manager
    Task Manager Overview Venues Forms Users Resources Task Manager App
+ More
  • Home
  • Portal
  • Product Control

Portal Administrators and managers with portal access can customize and export product control reports in the portal.

Use reports to see prepped and wasted menu items based on filters set.

Steps:

1. Login to www.datecodegenie.com using the recommended browser, see What Internet Browser Should I Use to Access My DateCodeGenie® Portal?

2. Click on the Product Control tab on the side bar.

3. Adjust the filters on the top of the page to set up the Product Control Tracking report as needed.

4. Click the Select Columns button and check which columns to display in the report. Click Select.
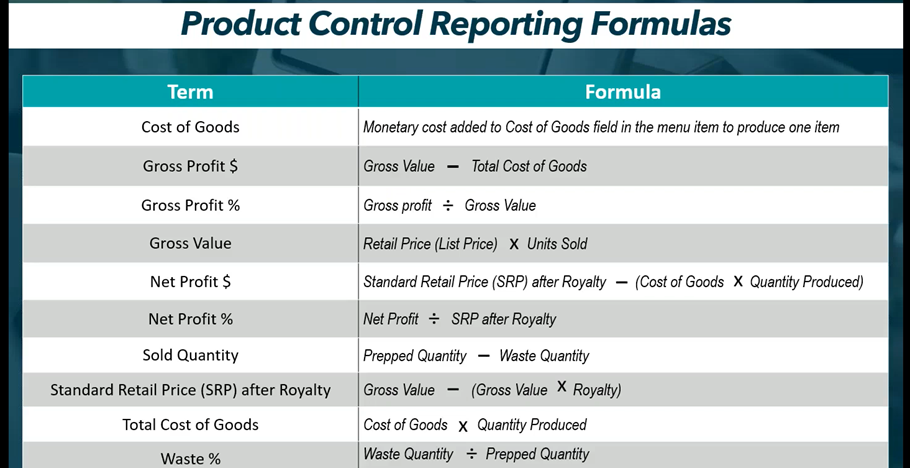
TIPS & TRICKS

Use the formulas from the table below to help decide which columns to display.


5. Click Save Report if these filters will be used often. Enter the New Report Name and click Save. From now on, this report can be recreated by selecting it from the dropdown under Select Report.

6. Click Export to generate the report.

7. Click the downloaded file in the bottom left-corner of the browser to open the CSV file.

8. The report will open in a CSV file with the columns selected in step 4. Click the Enable Editing button in the yellow ribbon to allow editing the report.

Related Articles

  • Product Control Tracking
  • Set Up Product Control Tracking in the Portal
  • Use Product Control on the App
  • Allowed Prepped Quantity Override Permission

Was this article helpful?

Yes
No
Give feedback about this article

Related Articles

  • Product Control Tracking
  • Set Up Product Control Tracking in the Portal
  • Use Product Control on the App
  • Allowed Prepped Quantity Override Permission
© 2025 DateCodeGenie

899 Montreal Circle, St. Paul, MN 55102

Privacy Policy

contact us
About NCCO

Knowledge Base Software powered by Helpjuice

Expand