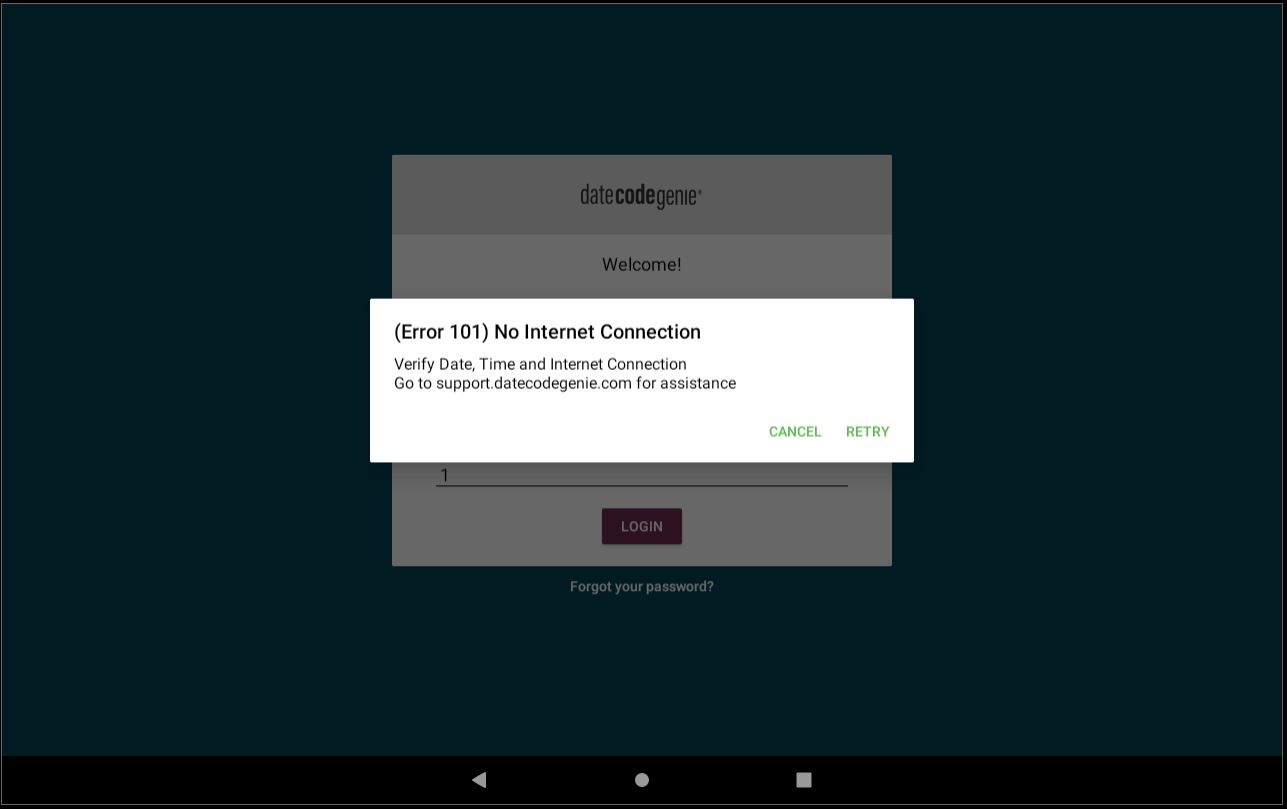
(Error 101) No Internet Connection
Table of Contents
An app error code displayed on a device indicating no internet connection to download updates on the app.
Steps:
Error 101 Troubleshooting
Are you using an integrated printer device, or your own tablet with the mobile app subscription?
1. Verify the Wi-Fi is turned on.
Connect Device to Wi-Fi
Connect Device to Wi-Fi
Connecting your DateCodeGenie® device to Wi-Fi is easy and only takes minutes. Be sure your tablet is charged and turned on.
NOTES
- These steps are for DateCodeGenie® devices with integrated printers devices only. For mobile app users, refer to your tablet's manufacturer information for tablet setup assistance.
- Contact your company for correct network and password requirements.
- See Setting Up Specific or Hidden Wi-Fi to connect to hidden networks.
Steps:
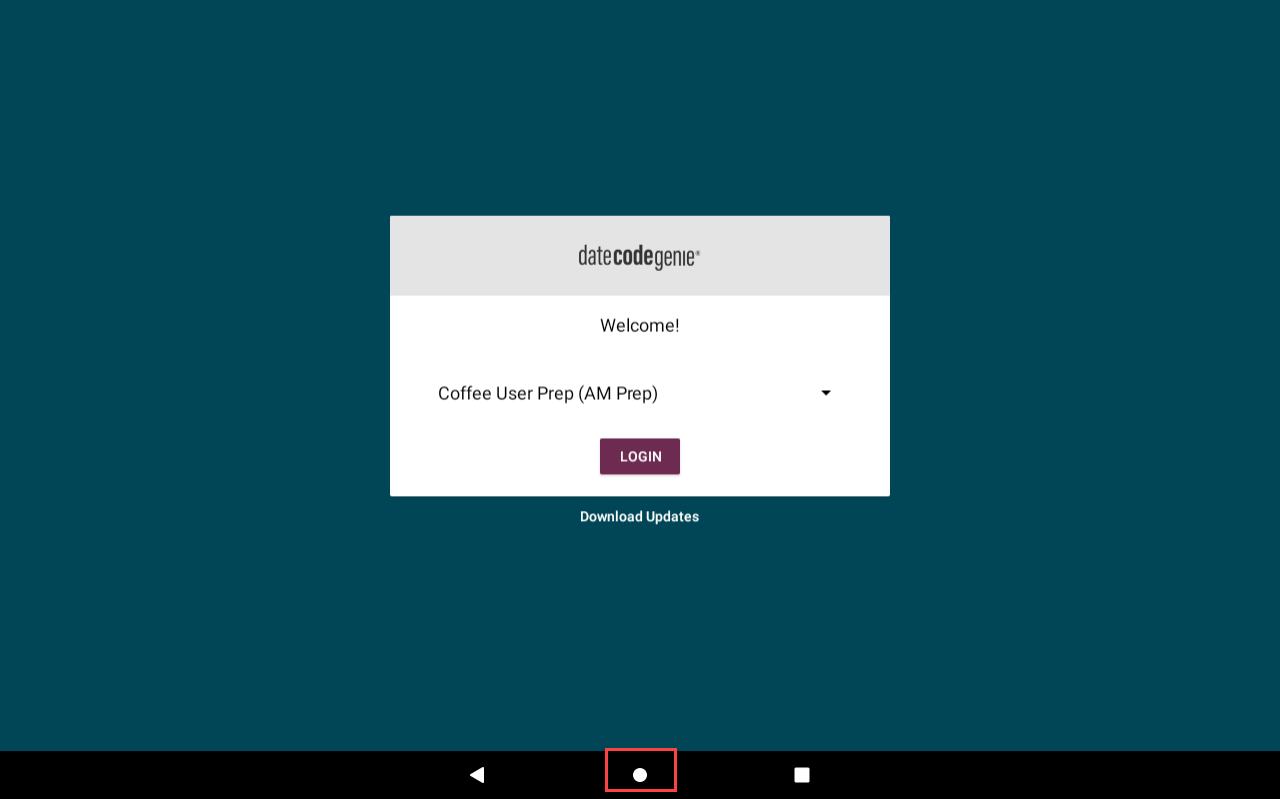
1. Tap the home button (circle icon or house icon) at the bottom of the tablet to return to the tablet home screen.
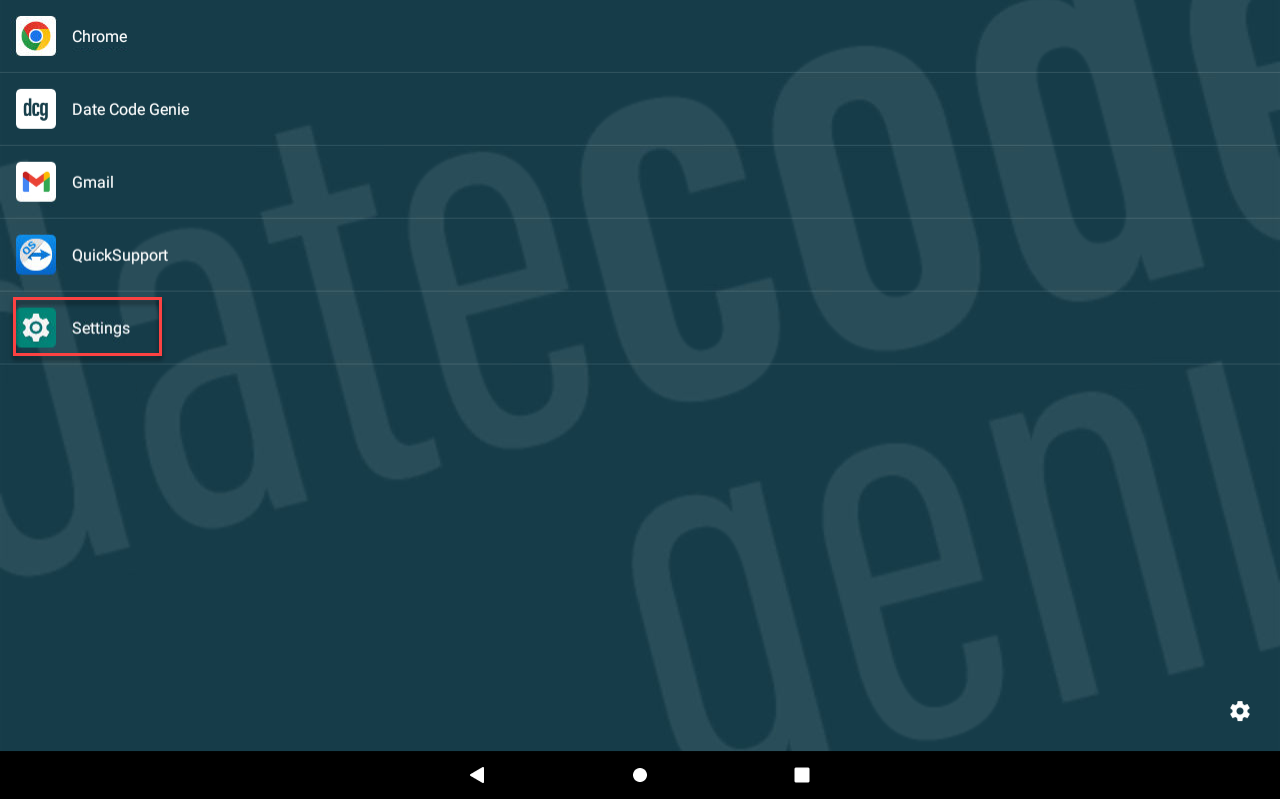
2. Tap Settings.
NOTE
If Settings does not display on the app list, see Using KioskHome for Tablet Access
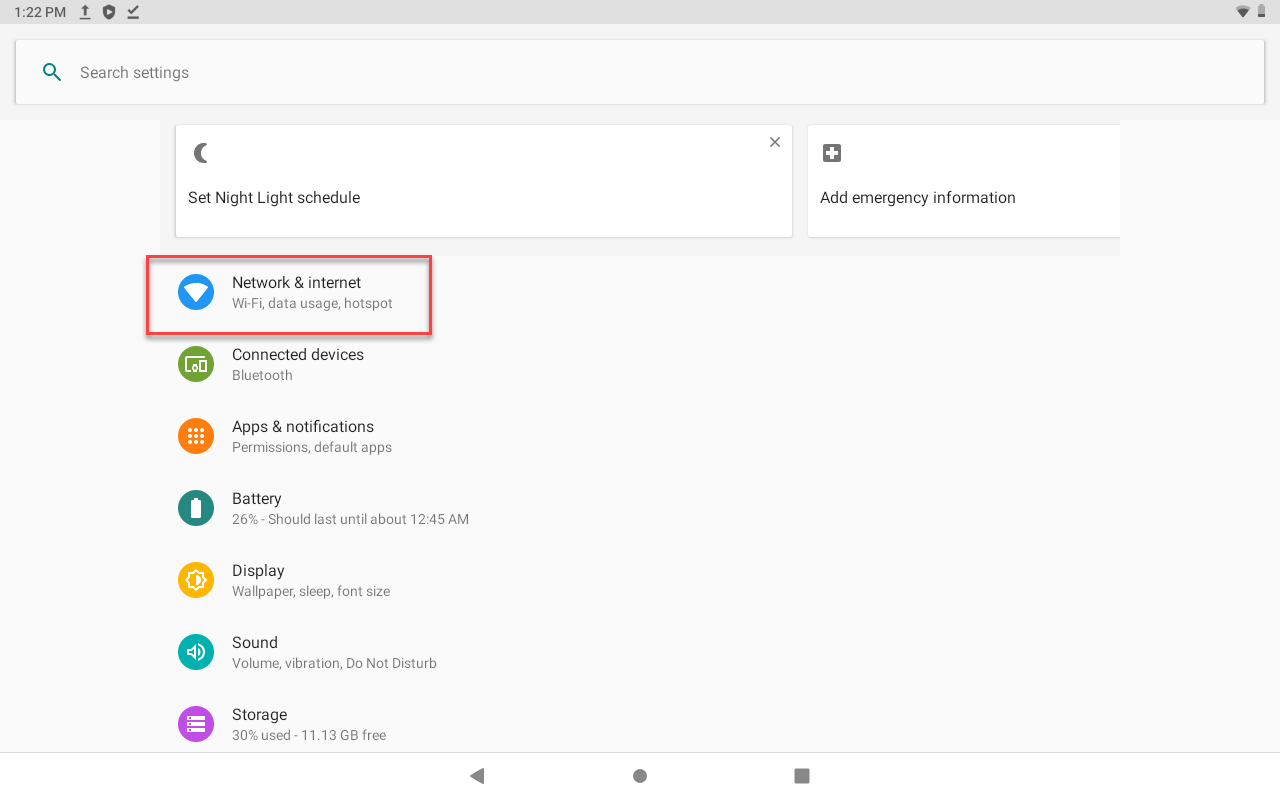
3. Tap Network & Internet.
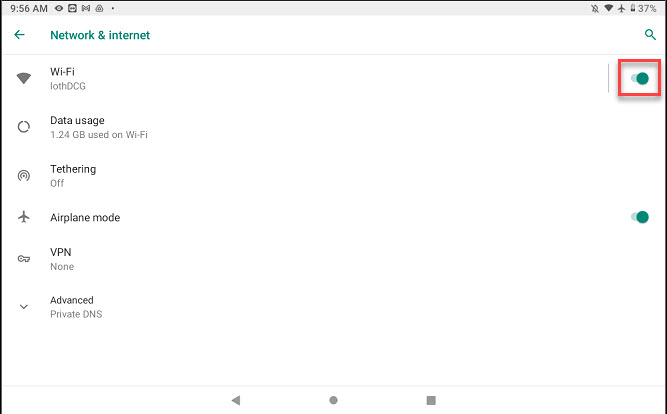
4. Tap the Wi-Fi toggle to turn green.
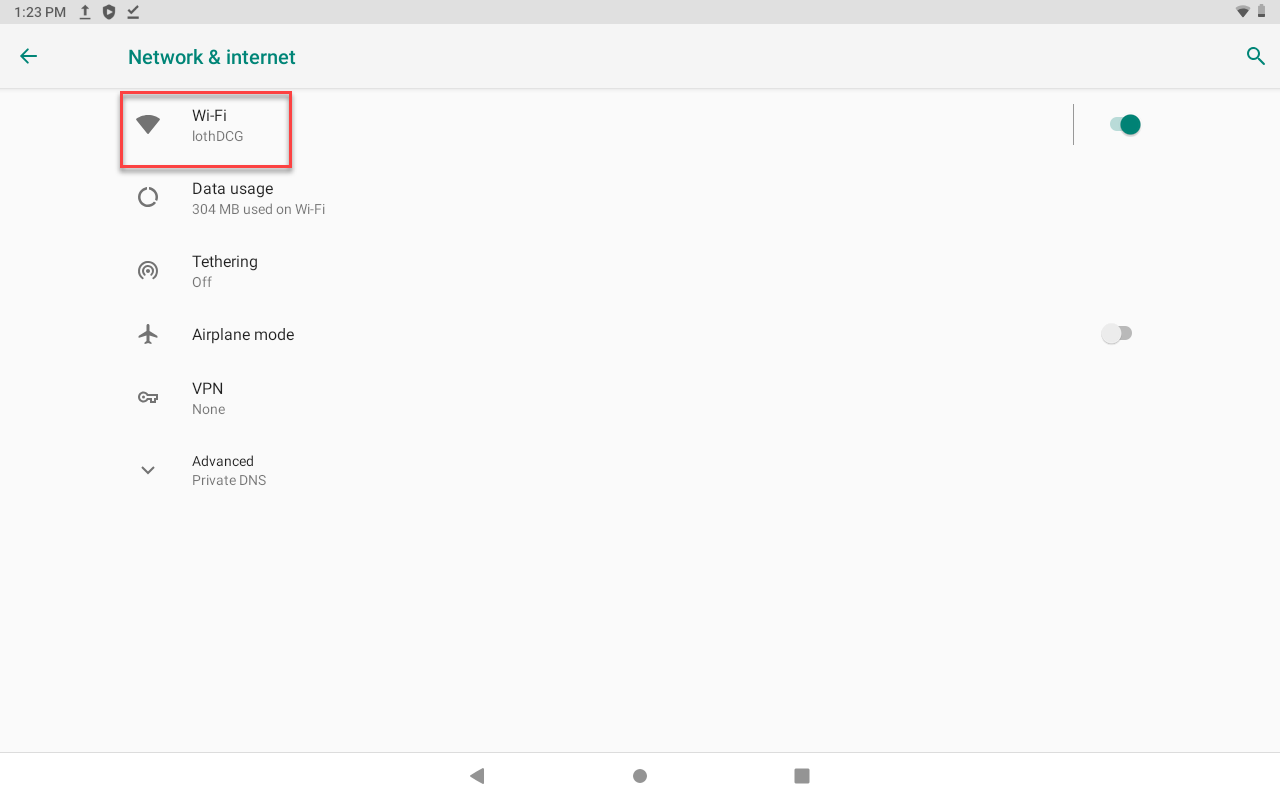
5. Tap Wi-Fi to display the network list and select your network.
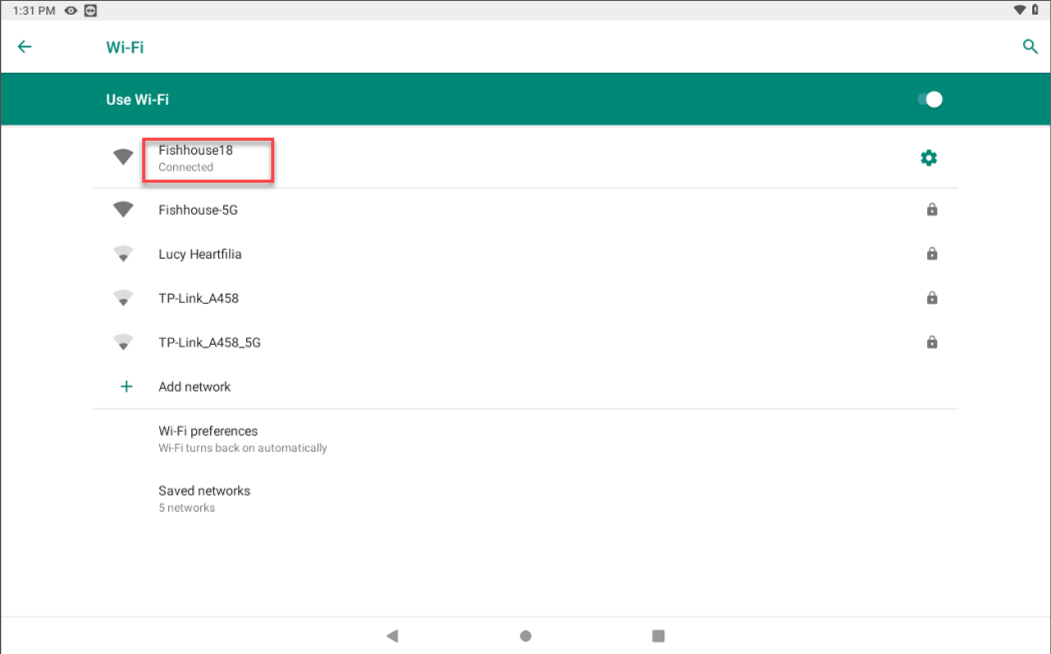
6. Connected will display when successfully connected. Tap the home button to return to the home screen.
NOTE
Not connecting to Wi-Fi? See Incorrect Date and Time or Wi-Fi Authentication for Guest or Public Networks. Contact your company for assistance with connection to your network.
2. Verify correct date and time.
Incorrect Date and Time
Incorrect Date and Time
If the date and time is incorrect on the tablet or the DateCodeGenie® app, your tablet may:
- Not connect to Wi-Fi
- Display an error 600 message
- Print the incorrect dates on your labels
NOTE
- These steps are for DateCodeGenie devices with integrated printers devices only. For mobile app users, refer to your tablet's manufacturer information for tablet setup assistance.
- Verify if the date and time are incorrect by launching the Chrome browser.
Steps:
1. Tap the home button (circle or outline of house icon) at the bottom of the tablet to return to the tablet home screen.

2. Scroll to Settings (gear icon) and tap to open.
NOTE
If Settings is not displayed in the left column of tablet home screen, tap Optional Settings (gear icon) in the bottom right corner of the touchscreen to access DCG KioskHome. Access Manager Settings, learn more about Using DCG KioskHome for Tablet Access

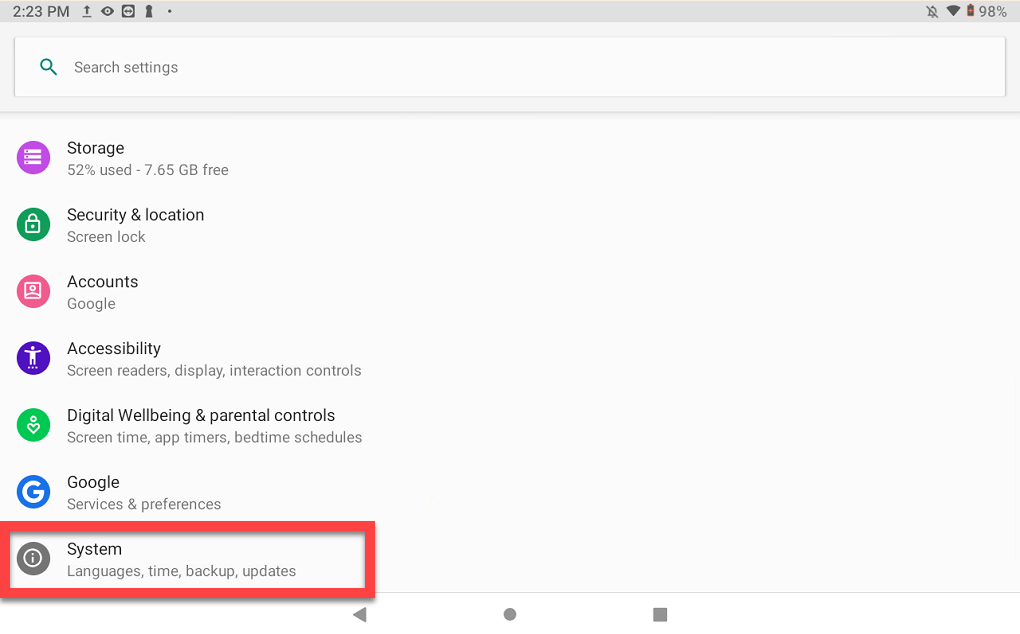
3. Scroll and tap System to open.
4. Tap Date & Time and tap Automatic date & time to turn Off.


5. Configure Set date, Set time and Select time zone for your area.

6. Tap Automatic date & time again and tap Use network-provided time.

7. Tap the home button to return to the tablet home screen.
8. Tap the DateCodeGenie app to open, download updates or log in to the app to download updates, and begin printing.
3. Check internet connection using browser.
Wi-Fi Authentication for Guest or Public Networks
Wi-Fi Authentication for Guest or Public Networks
Some Wi-Fi networks, such as guest or public networks, may require additional authentication for connection.
NOTE
These steps are for DateCodeGenie® devices with integrated printers devices only. For mobile app users, refer to your tablet's manufacturer information for tablet setup assistance.
Steps:
1. Tap Chrome browser from the tablet home screen to open.
NOTES
- If opening Chrome for the first time, you will need to accept terms and conditions that display in order to continue.
- Do not sign in or connect to an email if prompted.
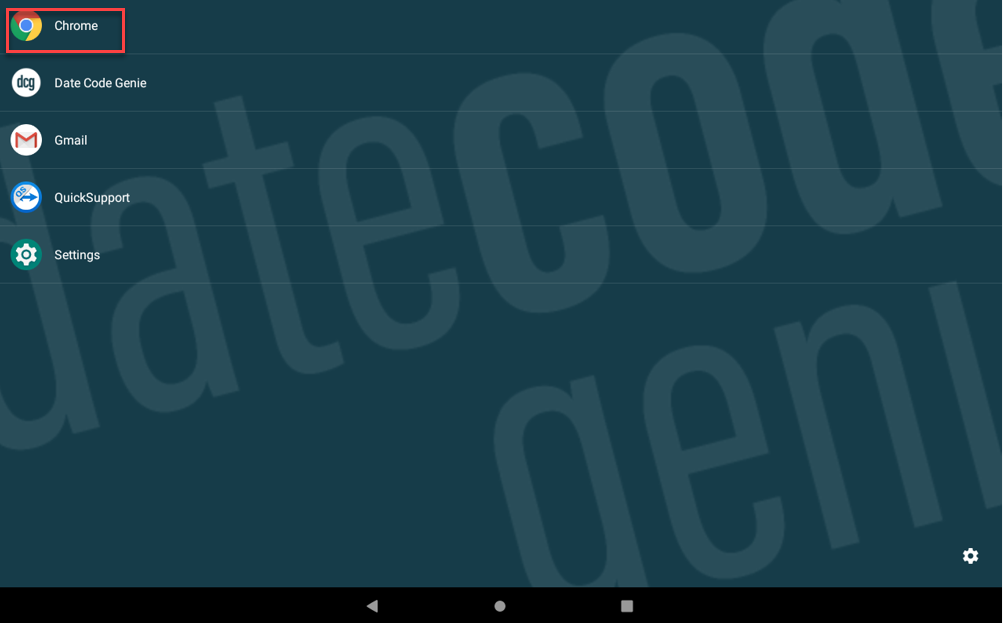
2. Type "weather" in the search bar.
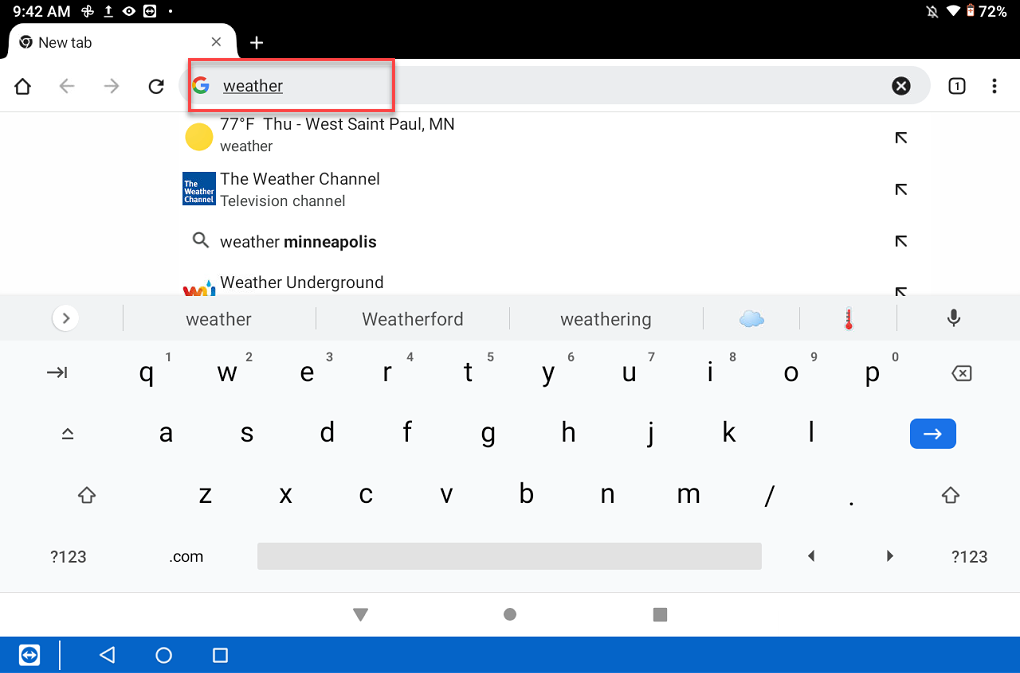
3. If your search does not appear, you will need to authenticate. You will be prompted to provide additional information on the screen to connect to the network.
NOTE
Contact your company for assistance with connection to your network.
4. Download updates on the DateCodeGenie app.
Download Updates on the App
Download Updates on the App
Downloading updates ensures the app has the most accurate data for printing and alerts you when a new version is available to download.
WARNING
Internet connection is required, see Connect Device to Wi-Fi or Connect Device to Ethernet.
NOTES
- Portal administrators and managers can allow staff the app permission to download updates, see Allowed to Download Updates Permission
- Time for downloading updates varies depending on internet speed, amount of data to update, and length of time from last download.
Last updated time is displayed on the app notification bar.
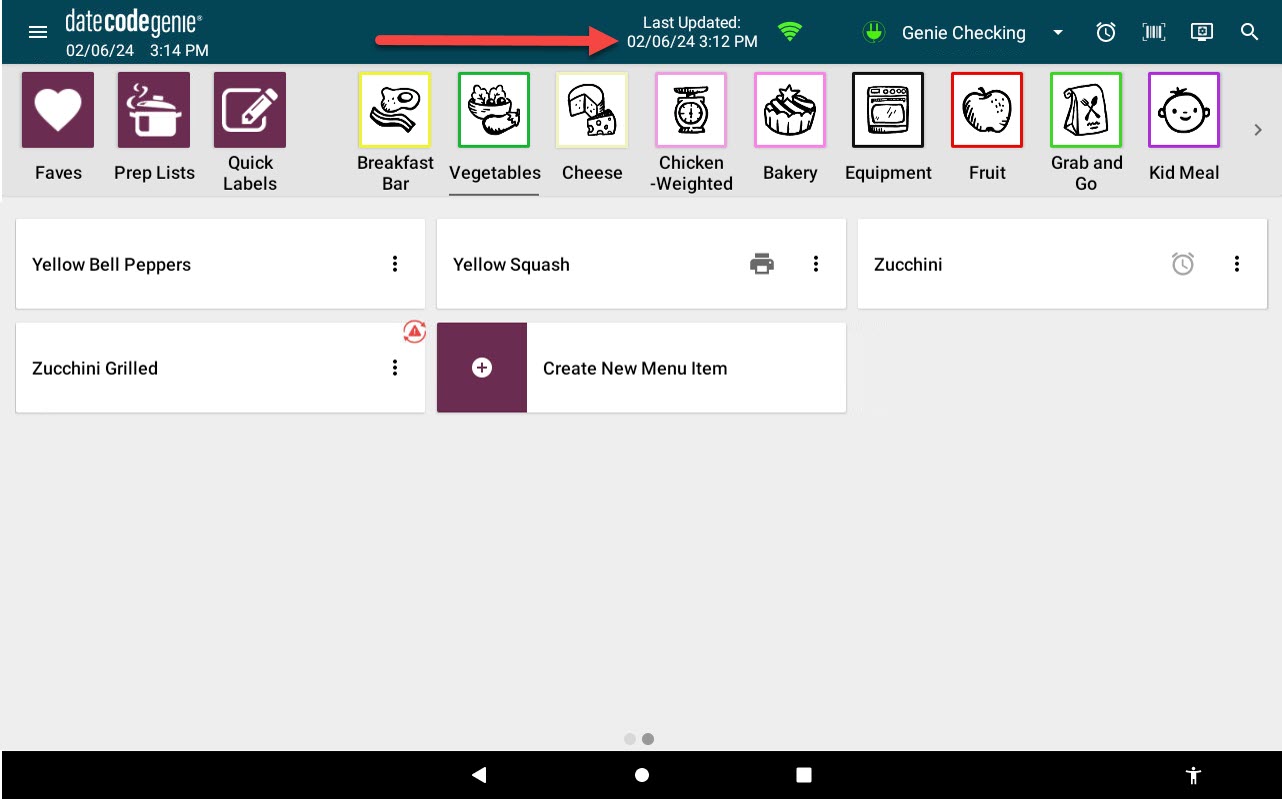
There are four ways to download updates:
1. App Login Screen
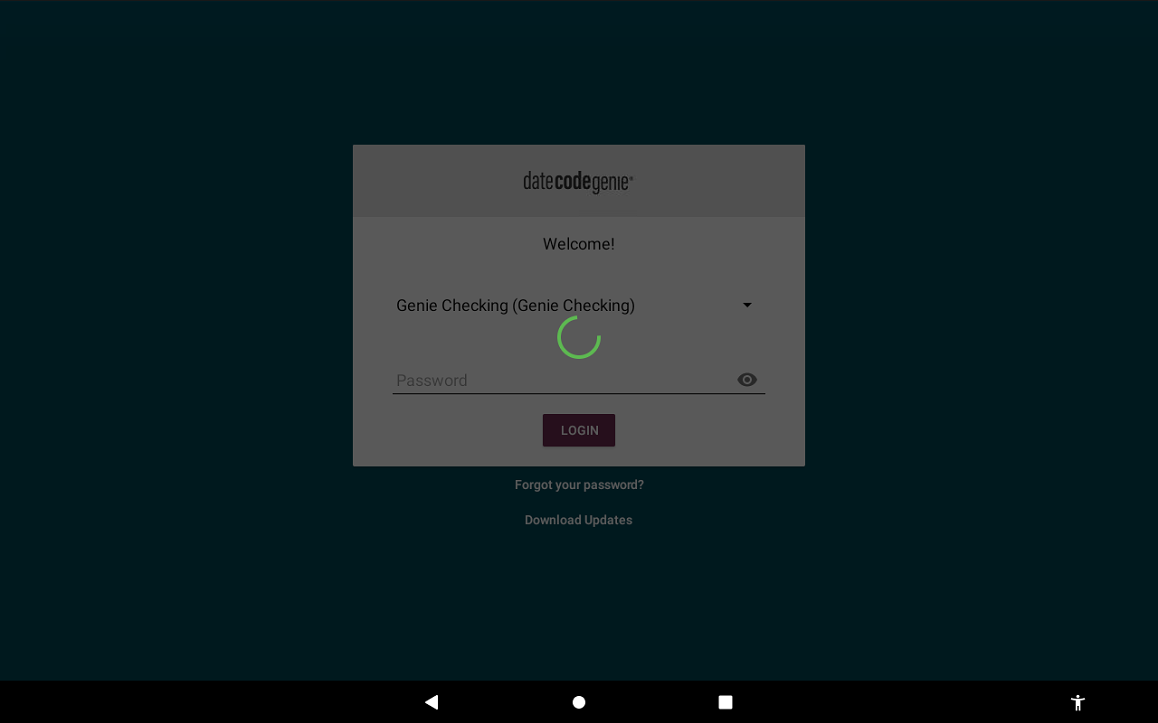
1. Tap Download Updates on the app login screen.
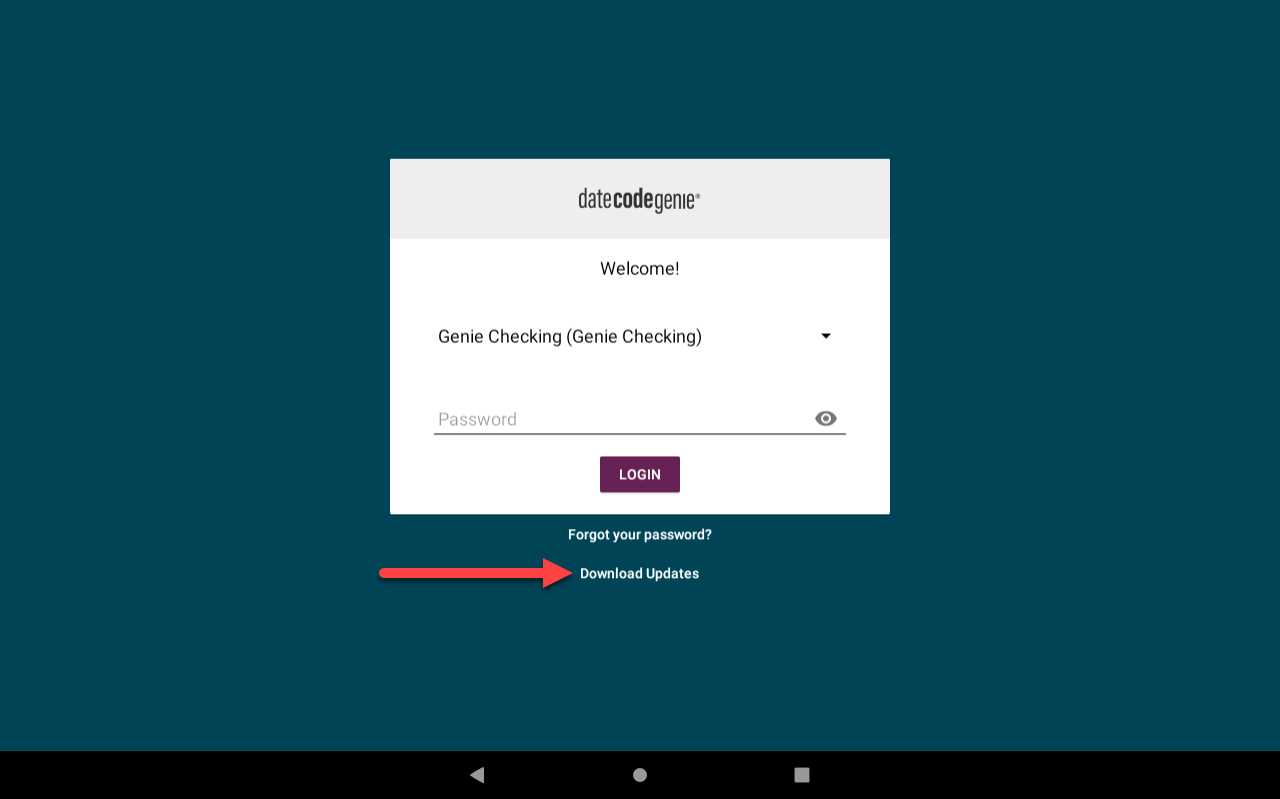
2. A green spinning circle icon will display and continue to spin while downloading. The screen darkens and is inactive.
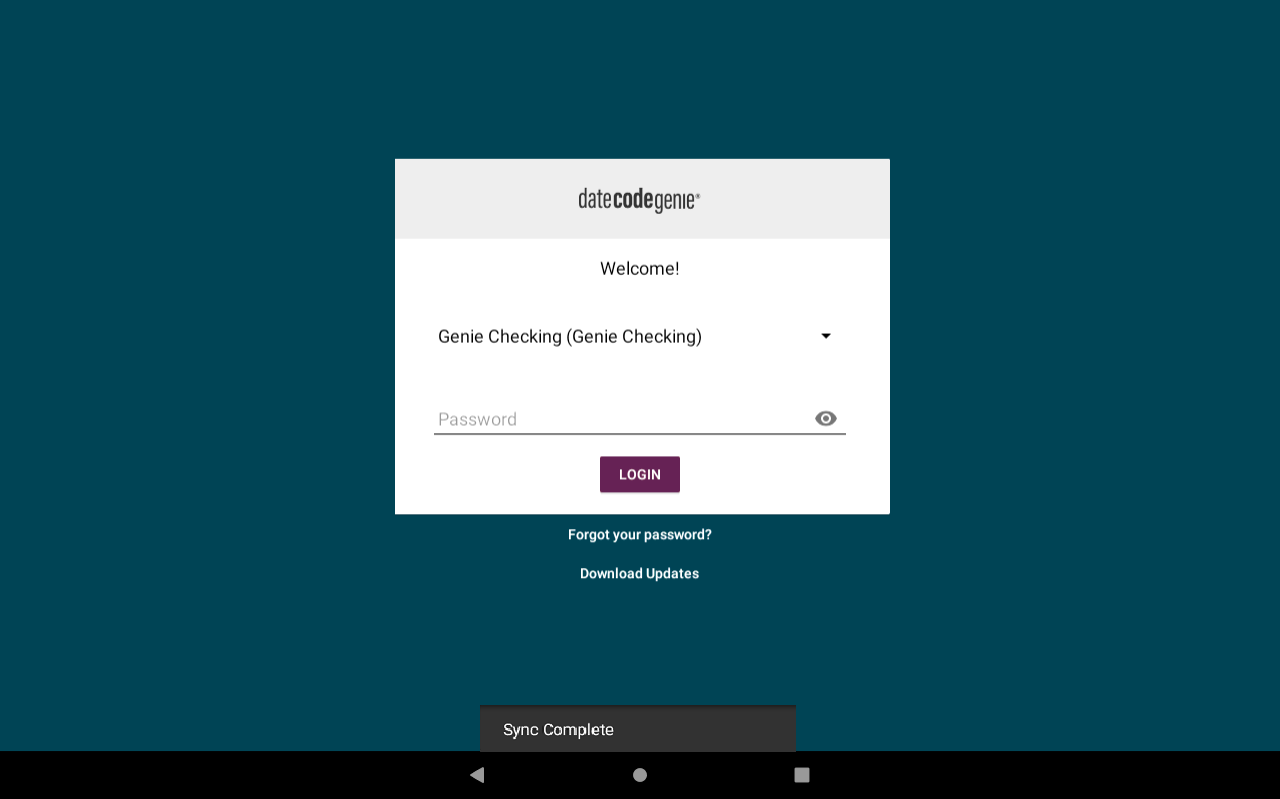
3. The Sync Complete will display briefly at the bottom of app login screen that download is complete and active.
2. Navigation Options
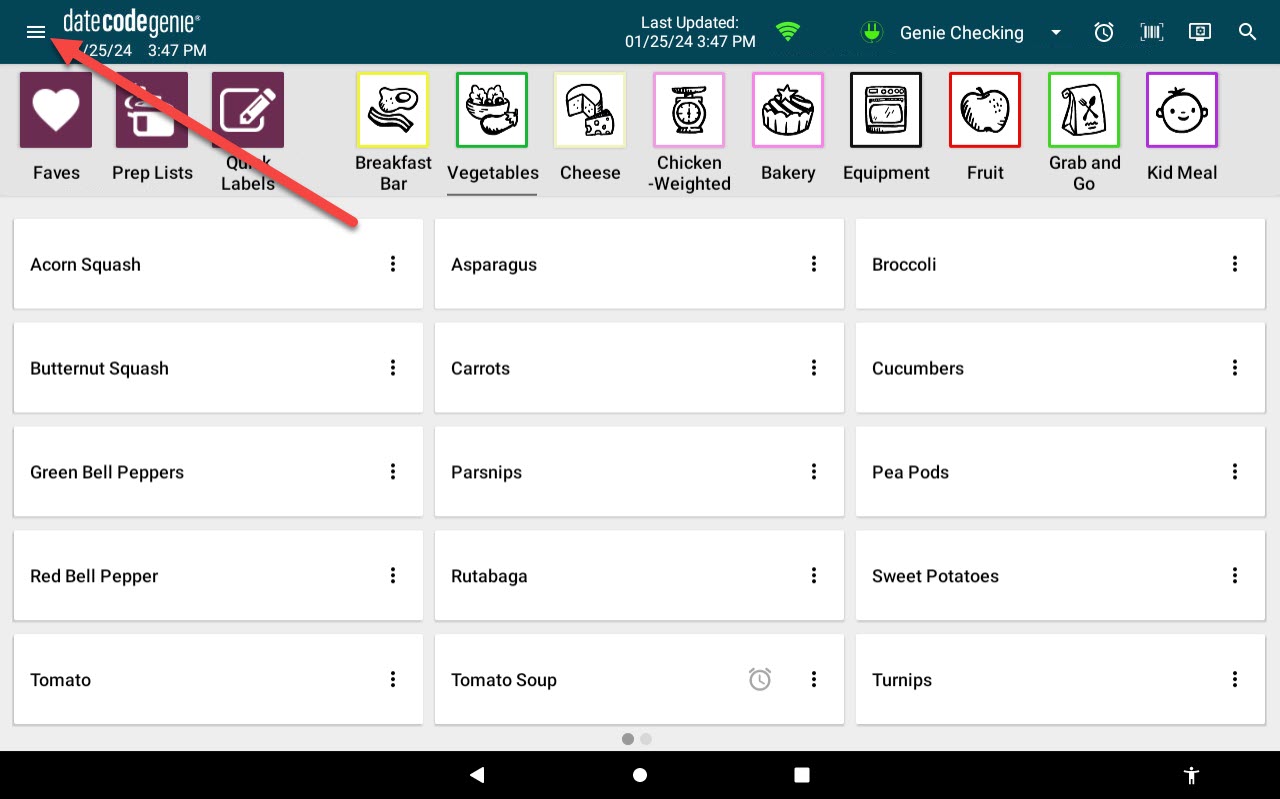
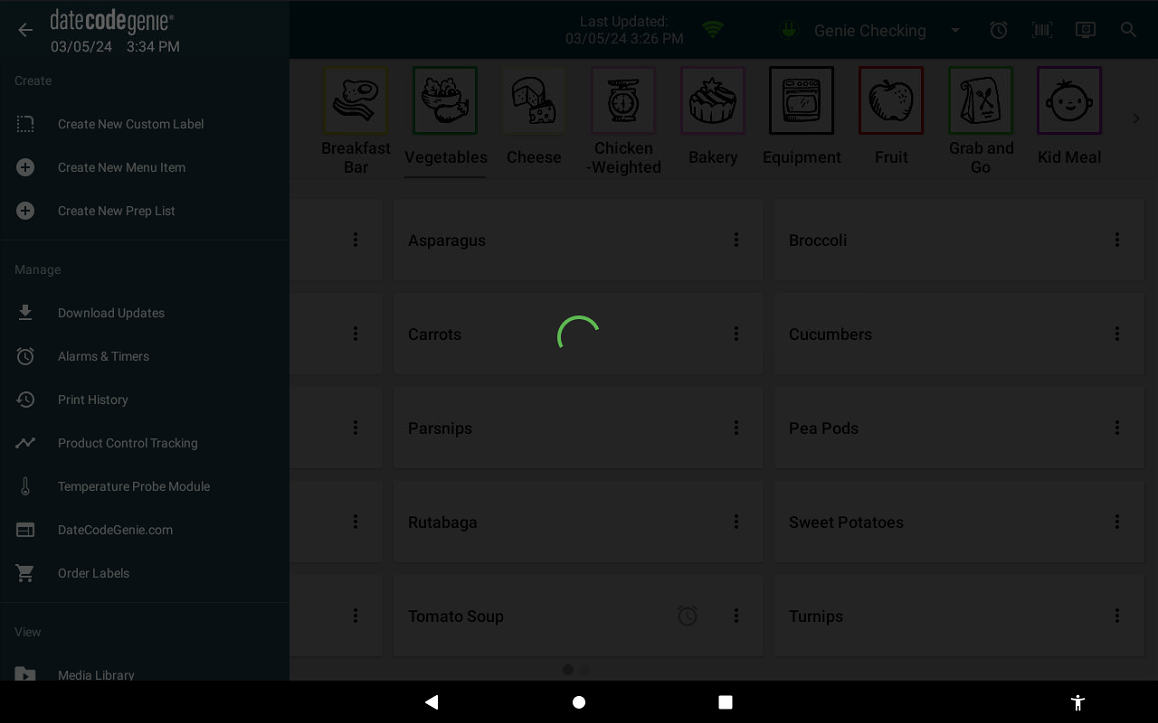
1. Tap the navigation button (three-line icon).
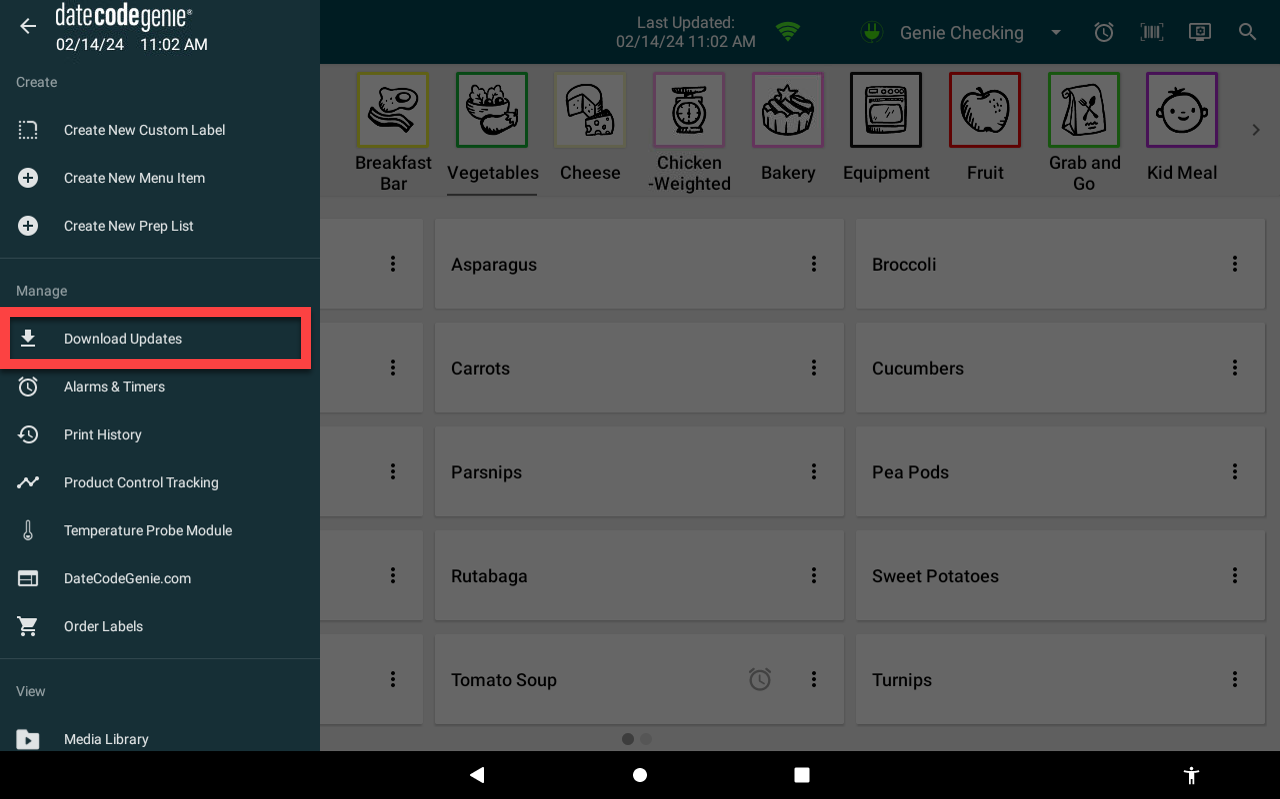
2. Tap Download Updates.
3. A green spinning circle icon will display and continue to spin while downloading. The screen darkens and is inactive.
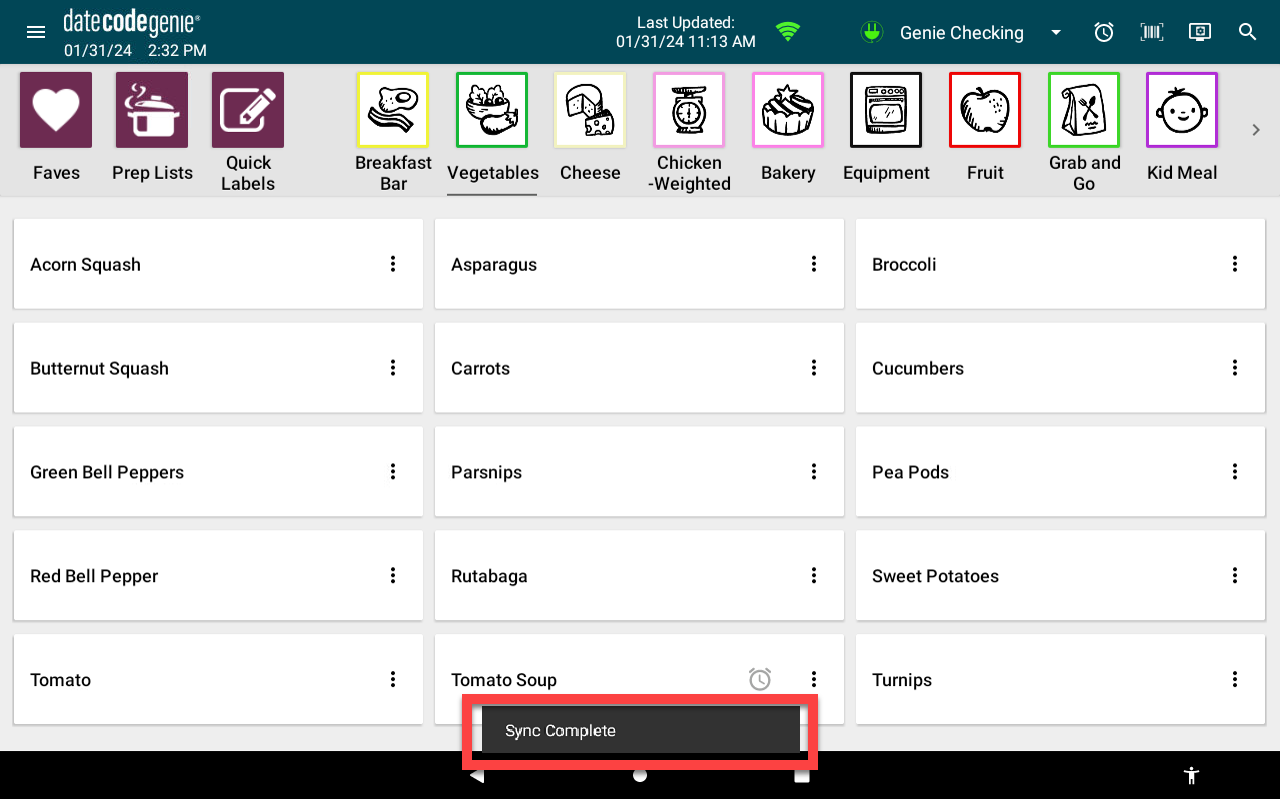
4. The Sync Complete will display briefly at the bottom of app dashboard that the download is complete and active.
3. Download Button
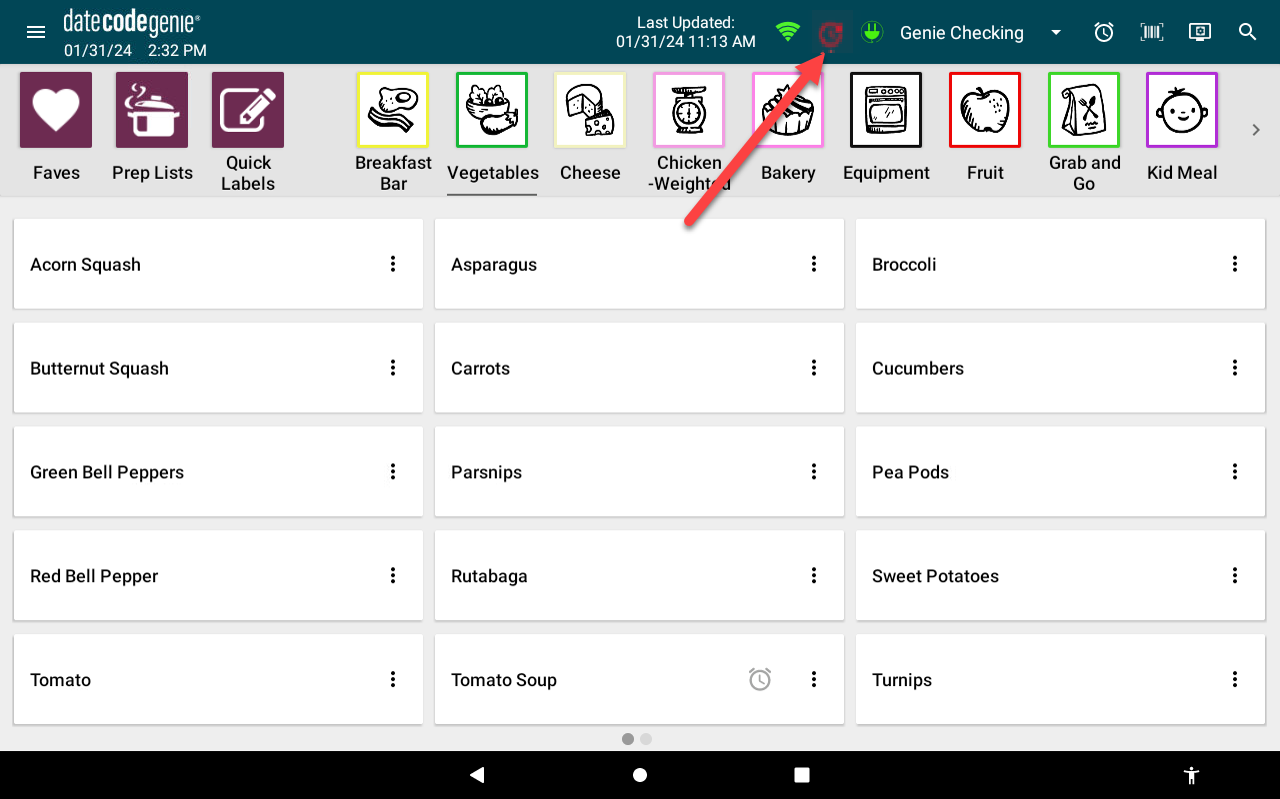
1. Tap download button (red clockwise circle arrow icon), if displayed.
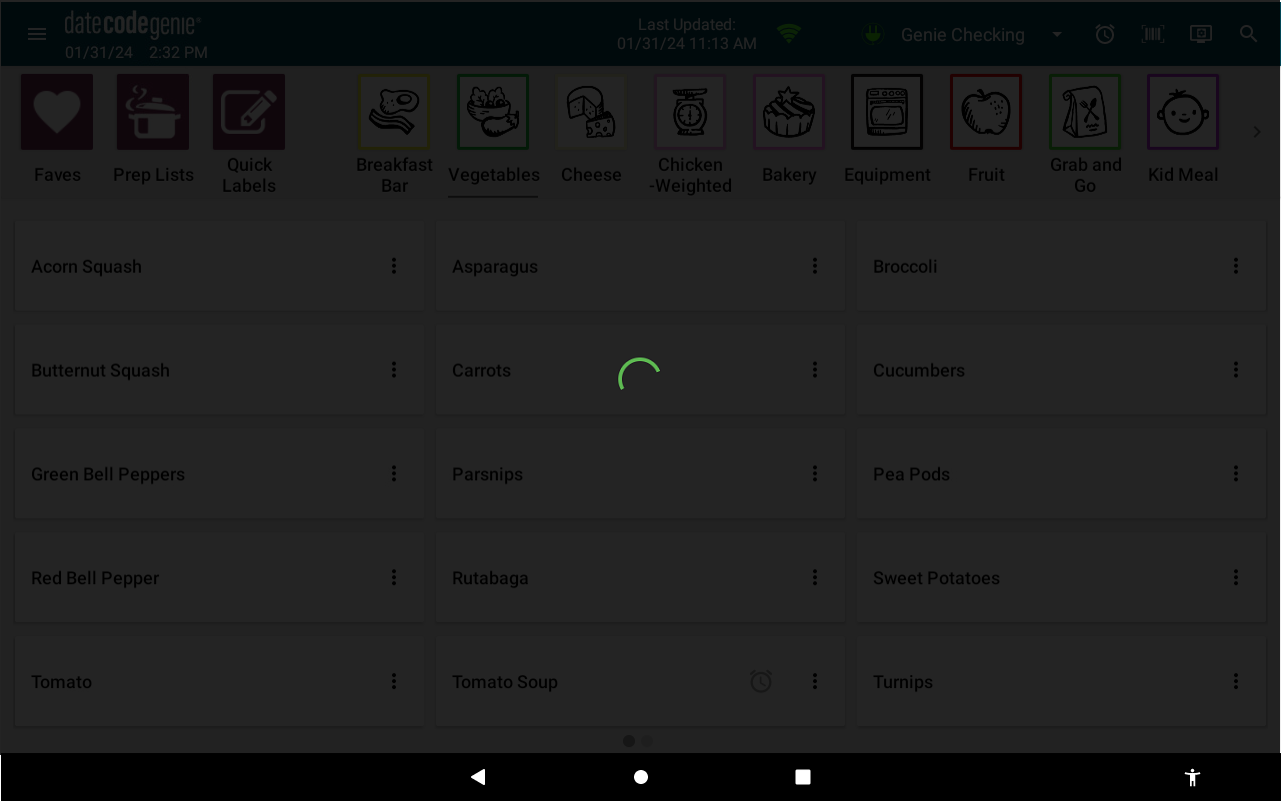
2. A green spinning circle icon will display and continue to spin while downloading. The screen darkens and is inactive.
3. The Sync Complete will display briefly at the bottom of app dashboard that download is complete and active.

4. Automatically Download Updates
Require staff to manually download updates before logging into the app following a set period of inactivity. Automatic app downloads are not available.
See Automatically Download Updates on the App
5. If the error continues, we recommend contacting your company or network provider for network connection issues.
1. Verify the Wi-Fi is turned on.
For managing Wi-Fi, see your tablet manufacturer's information.
2. Verify correct date and time.
For managing date and time, see your tablet manufacturer's information.
3. Download updates on the DateCodeGenie app.
Download Updates on the App
Downloading updates ensures the app has the most accurate data for printing and alerts you when a new version is available to download.
WARNING
Internet connection is required, see Connect Device to Wi-Fi or Connect Device to Ethernet.
NOTES
- Portal administrators and managers can allow staff the app permission to download updates, see Allowed to Download Updates Permission
- Time for downloading updates varies depending on internet speed, amount of data to update, and length of time from last download.
Last updated time is displayed on the app notification bar.

There are four ways to download updates:
1. App Login Screen
1. Tap Download Updates on the app login screen.

2. A green spinning circle icon will display and continue to spin while downloading. The screen darkens and is inactive.

3. The Sync Complete will display briefly at the bottom of app login screen that download is complete and active.

2. Navigation Options
1. Tap the navigation button (three-line icon).

2. Tap Download Updates.

3. A green spinning circle icon will display and continue to spin while downloading. The screen darkens and is inactive.

4. The Sync Complete will display briefly at the bottom of app dashboard that the download is complete and active.

3. Download Button
1. Tap download button (red clockwise circle arrow icon), if displayed.

2. A green spinning circle icon will display and continue to spin while downloading. The screen darkens and is inactive.

3. The Sync Complete will display briefly at the bottom of app dashboard that download is complete and active.

4. Automatically Download Updates
Require staff to manually download updates before logging into the app following a set period of inactivity. Automatic app downloads are not available.
See Automatically Download Updates on the App
4. If the error continues, we recommend contacting your company or network provider for network connection issues.


